Using Notifications in Business Central via AL
Introduction
Notifications in Business Central are alerts that appears in the Notification bar based on User actions.
Notifications stack up from top to bottom, lasting until the user dismisses them, including those from sub-pages.
Validation errors are prioritized and shown before other notifications.
We can use this to alert the user regarding something without taking all the user’s notification towards it, in the way messages or errors do.
They also have the option to allow Users to make a corrective action by embedding the action button directly into the notification.
Let’s see how it works.
Pre-requisites
Business Central OnPrem/Cloud.
References
Notification – Business Central Docs
Configuration
Here, for an example, I’ve created one simple page which takes two inputs.
1. The message that is to be shown in the notification.
2. The message to be shown after the User clicks on the action embedded in the notification.
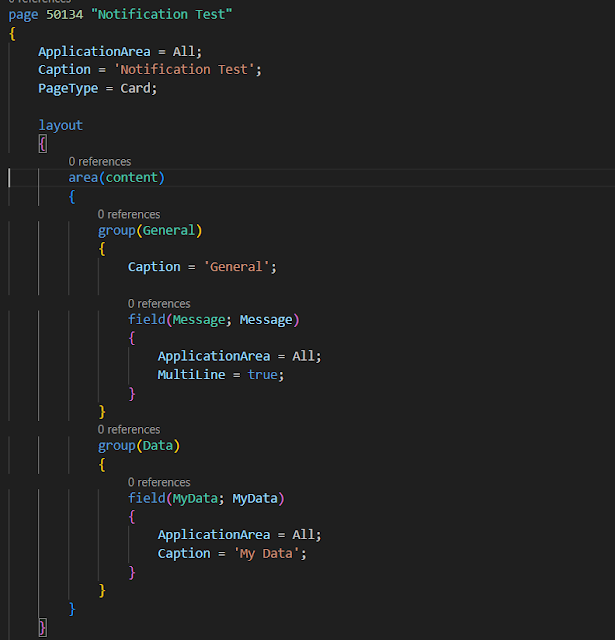
And I have two actions which I’ll be using to show/hide the notification itself.

Both of those combined result in a page like below –

Now, here is the list of procedures that are available with a “Notification” variable.
Let us walk through these one by one.
Message – Specifies the content of the notification that appears in the UI.
The message function is what we use to decide what the notification will say.
I set up a global variable (Message) on my page so the user can type in a value directly, and that value will appear in the message.

Scope – Specifies the scope in which the notification appears.
According to Microsoft Docs, it is meant to specify the context in which the Notification appears.
However for now, we only have the “Local Scope” available as an option so can’t comment much on this.
Send – Sends the notification to be displayed by the client.
Send is the function used to actually trigger the Notification in the UI.
It returns a boolean value indicating whether the notification was triggered successfully or not.
Set Data – Sets a data property value for the notification.
Get Data – Gets a data property value from the notification.
Has Data – Returns a boolean value indicating whether the notification has that value.
These three functions work similar to a dictionaries Get, Set or Has functions.
As Notifications can be used to perform actions, we need to store some data in them.
This data is stored using key value pairs using the “Set Data” function.
Then later we can retrieve it back using the “Get Data” function by passing in the specific key.
However, if the Key does not exist, we get a run-time error, thus we can use the “Has Data” function to check whether our notification has the specified key.
Please note that the data in the Notification is stored till the User dismisses the notification or exits from the page.
Add Action – Adds an action on the notification.

Here, in the “Show Notification” action, I have added the “Set Data” function to store the data within the global variable “MyData” into the notification with a key as “MyData” as well.
Then, we call the “Add Action” function the following parameters
- Action Caption – The name of the button on the Notification.
- Codeunit ID – The name of the codeunit that has the procedure that is to be called.
- Procedure Name – The name of the procedure that is be called. (Please note that this has to be a global procedure, the system doesn’t throw any runtime errors but the action button does not show up.)
In the “Notification Action” codeunit i’ve created a simple procedure which checks, gets and then messages out the value set in the “MyData” key.

And so, we get the following output when we click on the action button on the notification.


When we click on the action button, the notification automatically disappears.
Recall – Recalls a sent notification.
However, if we want to manually recall a notification, we can use the “Recall” procedure.

After I click the “Hide Notification” button.

Id – Gets or Sets the GUID ID for an individual notification.
We can use the ID function to Get to Set the ID for a particular notification.
We can use this in conjunction with the other functions by passing the ID of one notification and using that to get the data from that notification instead of passing the Notification variable itself.
Here I’ve made some changes to the “Show Notification” action such that now it pops up two notifications instead of one and I am storing the ID of the second notification.

This is the output.

Now, here is the “Hide Notification” action which will be using the ID saved from earlier to recall just the copy notification.

And this is the output.

Conclusion
Thus, we saw how we can use notification to provide non-intrusive alerts to the User along with actions.
Happy Coding!
