Approval Workflow Setup and Process in Microsoft Dynamics NAV 2017
Introduction:
Workflows are a list of steps, each step consists of workflow events, workflow condition and workflow responses. Companies require documents to be approved before they can be released or sent to the customers, vendors etc. E.g If a Purchase order has total amount above 10000, an approval may be required from the hierarchy before sending it across the Vendor. here, we use approval workflow
Workflow connects business-process tasks performed by different users. The task can be automatic posting, user tasks or approvals.
In this blog I’ll be covering the step-wise procedure to set up approval workflow and explain the process of approval workflows.
Pre-requisites:
Microsoft Dynamics NAV 2017
Steps:
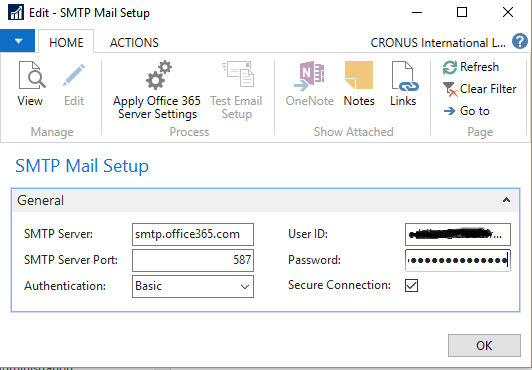
1. SMTP Mail Setup: Browse SMTP Mail Setup in the search bar. Click on ‘Apply Office 365 Server Settings’. This will populate the SMTP Server , SMTP server port and Authentication is set to Basic. In the User ID enter the default email id through which emails will be sent. Enter the password for the email id set.
2. Approval User Setup
Approval user setup is based on the user set up. In the user setup we define users, their limit amount based on their hierarchy and who should approve. We can assign substitute approvers when the direct approvers cannot approve for some reason. We can assign email-id of the approvers.
Approval Administrator – this user administers the whole approval process
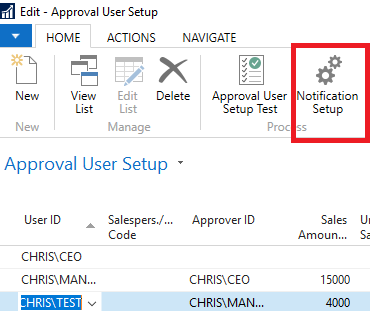
Below is a scenario for Sales order approval.
For an approval workflow we need to setup Approval User Setup
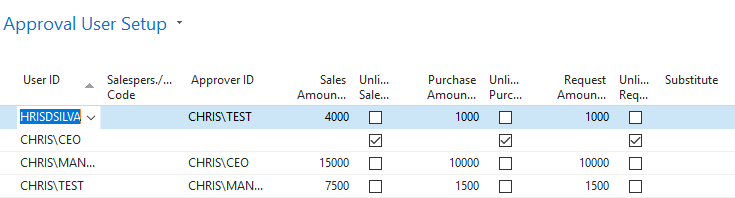
In the above image there are four users CHRISDSILVA, TEST, MANAGER, CEO
The CHRISDSILVA user initiates initiates the approval process for the Sales amount from limit 4000 and above and Purchase amount limit 1000 and above, Request amount limit 1000 and above and TEST will approve it
The TEST user initiates the approval process for the Sales amount from limit 7500 and above and Purchase amount limit 1500 and above, Request amount limit 1500 and above and MANAGER will approve it
The MANAGER user initiates the approval process for the Sales amount from limit 15000 and above, Purchase amount limit 1000 and above, request amount limit 1000 and above and CEO will approve it.
The CEO user has Unlimited sales amount, unlimited purchase amount and unlimited request amount and is the Approval administrator.
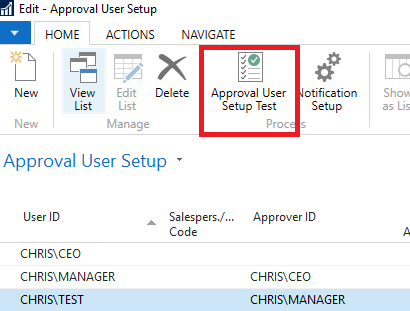
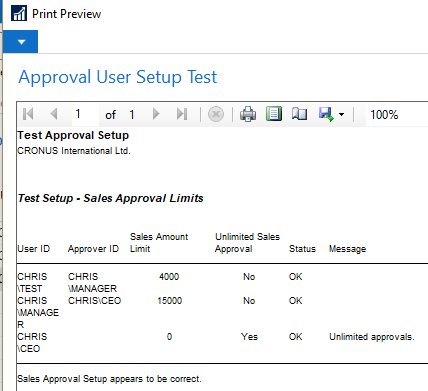
Click on approval user setup test to check whether the setup is correct.
This will run and give the status if the status is correct
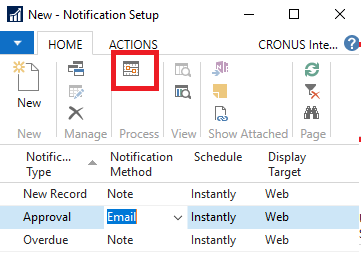
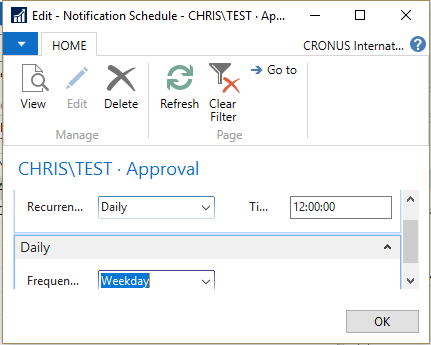
3.Notifications set up
Click on Notification setup for each user to notify the users in the approval process through note or email.
A schedule can also be set up to send the notifications daily, weekly, monthly on a particular time.
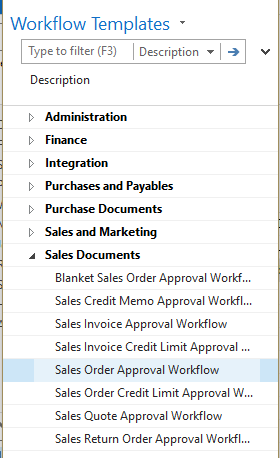
4. Workflow setup
Browse to workflow from the search bar or to the path
CRONUS International Ltd./Departments/Administration/Application Setup/Workflow/Workflows,
Click on New workflow from Template.
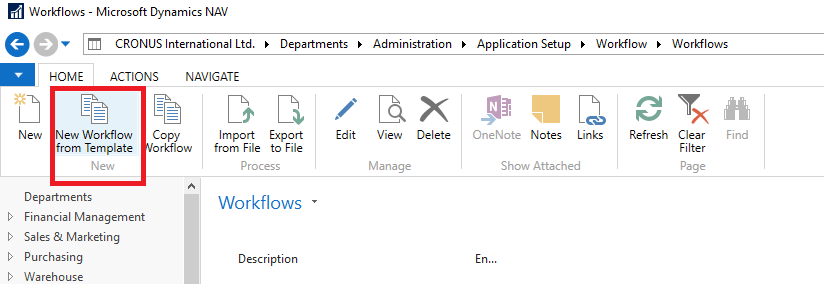
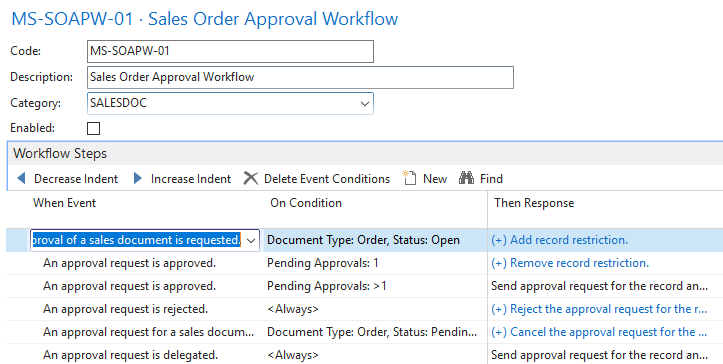
This will prompt to select a workflow category. Select the category eg. Sales document and then select a workflow template eg. Sales order workflow
This will open the Sales order workflow Template. The first event is approval of the sales document is requested and the condition is that the document type is Order and status of the document is Open then a list of responses will be executed.
First Event
Click on the Assit edit button on the Add record restriction line, this will open up the response window.
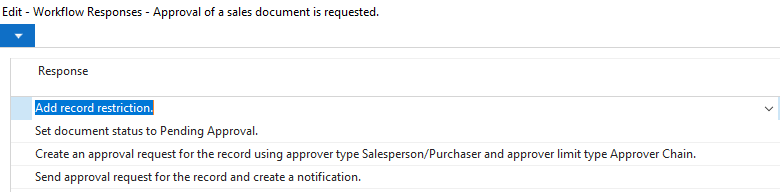
This response will do the following
- Add record restriction
- Set document status to Pending Approval : This changes the status of the document in this case the sales document status to Pending Approval.
- Create an approval request for the record using approver type Salesperson/Purchaser and approver limit type Approver Chain.
Click on the third response, a option for selected response window opens. Select the approver type depending upon the requirement – Approver, Salesperson/Purchaser, Workflow User Group.
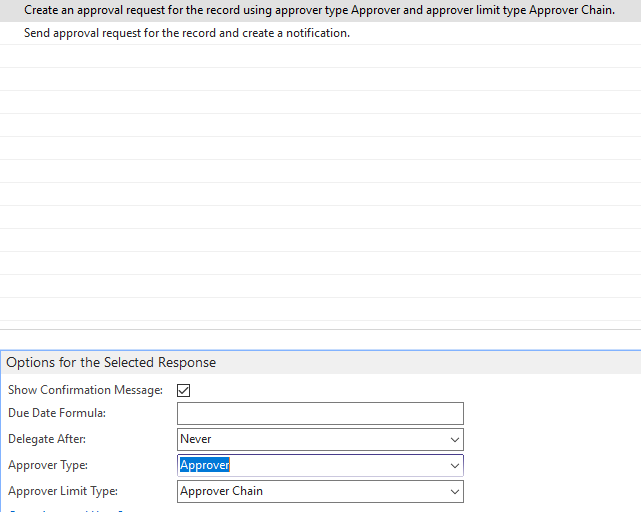
The Due date formula is used to send overdue approval mails after the due date mentioned.
The delegate after can be set if the document is not approved then it can be delegated to the substituted approver either never, after 1 day, 2 days, 5 days.
Approver type: The approver type can select between Salesperson/purchaser, Approver, workflow user group. Here workflow user group is group of users e.g sales department or purchase manager that must approve. Approver means the approver set up done in the previous step or the system approve based on the salesperson/purchaser that are using sales and purchase document.
Approver Limit Type: Options like Approver chain, direct approver, First Qualifier approver, Specific approver.
Approver chain: if we have multiple approvers then everyone will get an approval request immediately. E.g. if a user creates sales order which not only exceeds his/her limit but also the limit of the direct approver then approval will be required not only from the Direct approver but also from the hierarchy above the Direct approver. These users will receive an approval request in the approval chain.
Direct Approver: here only the Direct approver will receive the approval request
First Qualifier Approver: Here if the user creates a sales order which exceeds not only his/her limit but also the limit of the Direct approver then an approval request is directly sent to the hierarchy above the Direct approver.
Specific Approver: here we can set a user ID to which the approval request will be send.
- Send approval request for the record and create a notification.
An approval request is sent and a notification is created based on the notifications settings.
Second Event
An approval request is approved that means all users have approved the approval request so the system checks whether the Pending approvals is 0 then in the response all record restrictions are removed and the document is released.
Third Event
If the system rechecks and the Pending approval is greater than 0 i.e some approver users have not approved the approval request then again a approval request is sent and a notification is created.
Fourth Event
An approval request is rejected- The approval request is rejected and notification is sent to the user who initiates the approval process and the status of the document is set to Open.
Fifth Event
An approval request for a sales document is cancelled: here it checks if the document type is Order and status is Pending approval then in the response, the approval request is cancelled and notification is created, record restrictions are removed and the document status is set to Open and a message is displayed as “The approval request for the record has been canceled.”.
Sixth Event
An approval request is delegated: an approval request is sent and notification is created.
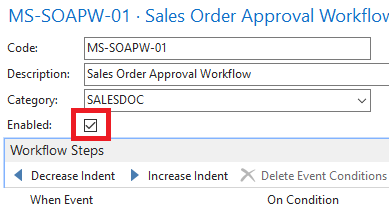
These steps can be customized and changed based on the requirements. The final step is to enable the workflow.
Approval Workflow
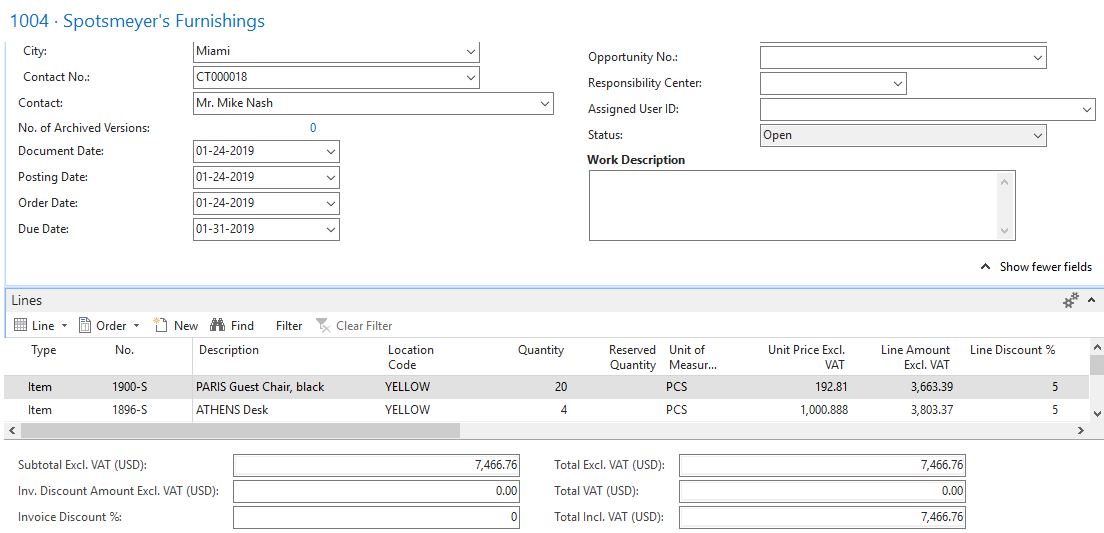
1. Navigate to Sales order in the search bar of the Role Tailored Client, below screenshot is an example of a sales order (Here CHRISDSILVA is the user) Sales amount limit for this user is 4000. In the below example the Sales amount 7,466.76 which is above the limit amount hence approval workflow is triggered.
2. Click on Send Approval Request to send an approval request
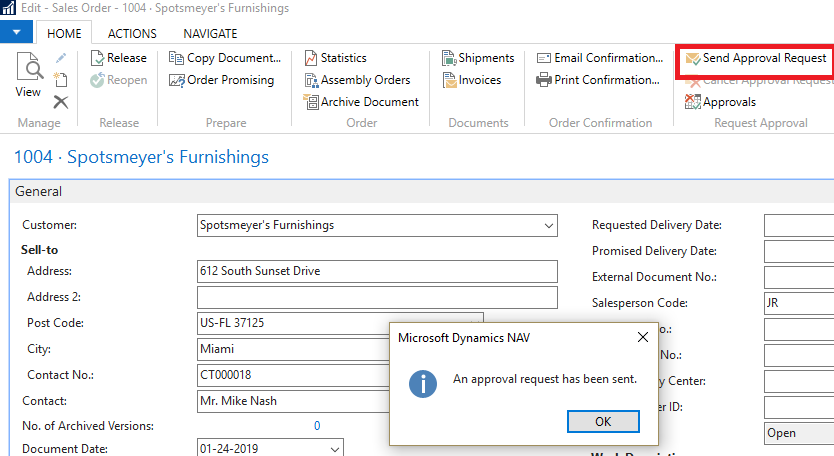
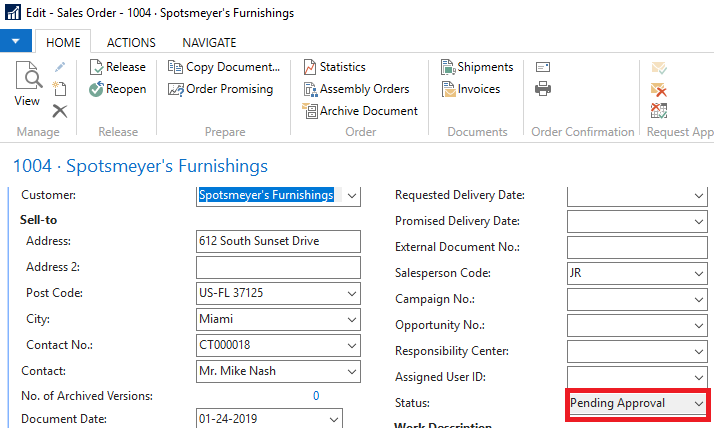
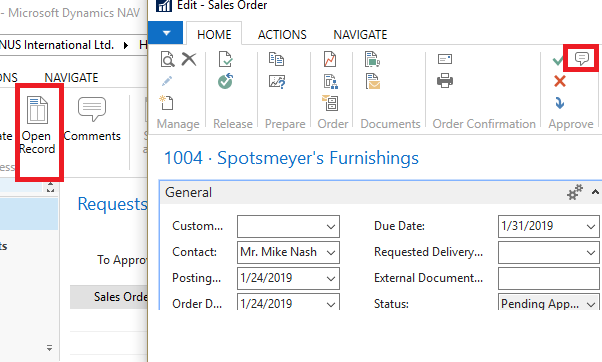
3. Once the approval request is sent the Status changes to Pending Approval.
4. TEST user launches NAV and navigates to ‘Request to Approve’ in the search bar.
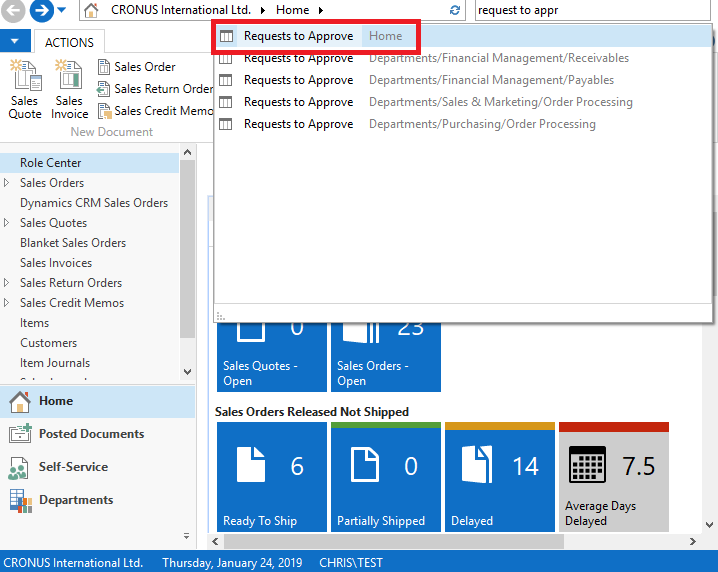
5. The Request to approve page provides the TEST user with options
- Approve: This option approves the document and the status of the document changes to Released
- Reject: This option rejects the document and changes the status of the document to Open
- Delegate: This option allows the user to delegate the approval to another user
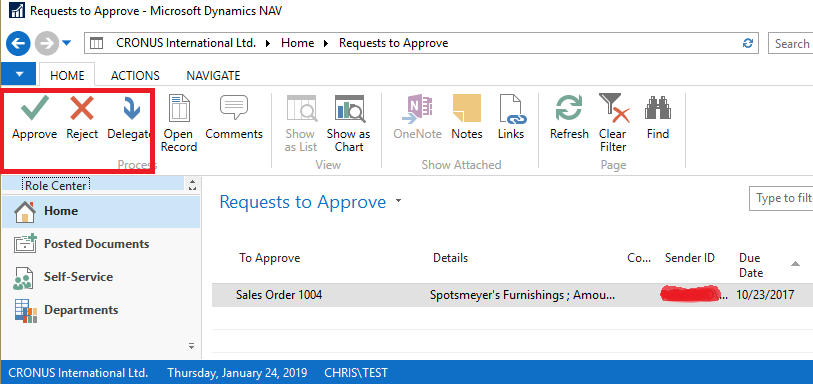
- Open Records: Open Records opens the document to be approved. The TEST user can review the document and add comments in the comment
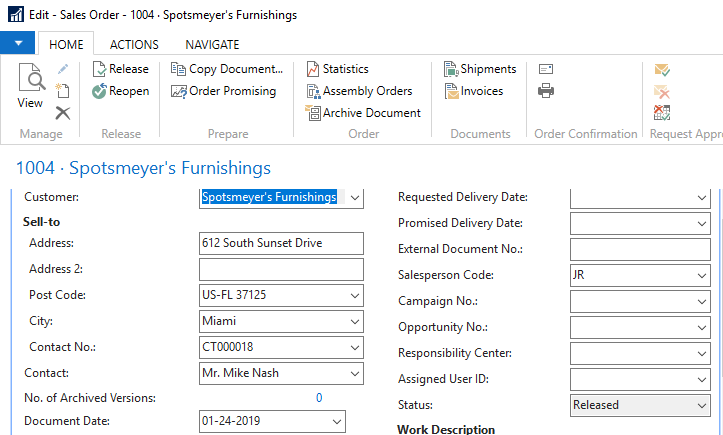
6. After clicking on Approve, the document is approved, the status changes to Released and clears from the Request to approve page. Below is the image of the sales order after approval.
Conclusion:
Approval Workflow overview : Firstly set up the SMTP mail setup by providing the email credentials. Setup the Approval users by setting their amount limit, approver ID and providing their email id also substitute user(optional). Setup the Notifications and finally the Workflow.
