Deploy a Microsoft Dynamics NAV Database to Azure SQL Database
Dynamics 365 for finance and operations is the ultimate solution for all the modern-day organisations facing issues on ERP level and this is the reason it is the most trusted software in the world which all modern-day organisations have adapted. Get a live perspective on the entirety of your numbers and information investigation from Microsoft elements for money related administrations. This cloud-based Microsoft ERP framework gives the important data you have to convey vital, information-driven bits of knowledge to key divisions.
Mechanize your stockroom procedures to lessen operational expenses. With Microsoft ERP, your distribution center supervisors can all the more likely control their set aside, quality-control, and picking activities. Furthermore, with an adaptable work process motor, they can quickly react to changing business needs.
Introduction
This article describes how to deploy Microsoft Dynamics NAV database to Microsoft Azure SQL Database.
To deploy a Microsoft Dynamics NAV database to Azure SQL Database, the database must be exported as a data-tier application (DAC) file, which is known as a .bacpac file. This can be performed by using the SQL Server Manager.
Pre-requisite
- Microsoft Azure subscription and access to the Azure Management portal
- Microsoft Dynamics NAV database is installed on a SQL Server Database Engine instance. SQL Server Manager is also installed on the same computer.
- Access to the Microsoft Dynamics NAV installation media (DVD).
Purpose:
The purpose of this article is to deploy NAV Database on Azure SQL database and to access the deployed Database from Microsoft Dynamics NAV Development Environment.
Steps:
1. Create and configure an SQL Database Server in Azure
a. Create a SQL database in Azure.
-
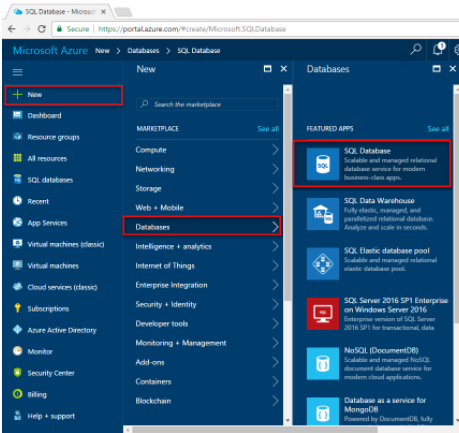
- Click the New button found on the upper left-hand corner of the Azure portal.
- Select Databases from the New page, and select SQL Database from the Databases page
-
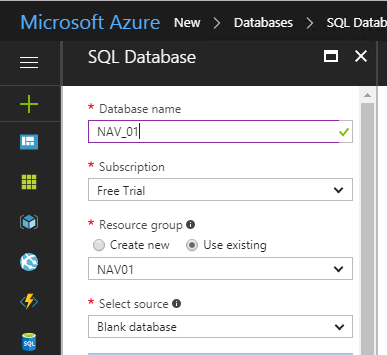
- Enter the Database name, resource group, select source
-
- Under Server, click Configure required settingsand click on Create a new server.
Fill in the details- Server name – valid server name
- Server admin name, password, Location. Here location is the location name where the Virtual Machine is stored
- When completed the form click on Select.
- Click Pricing tier to specify the service tier and performance level for your new database. Use the slider to select 20 DTUs and 250 GB of storage. For more information on DTU see what-is-a-dtu
- Under Server, click Configure required settingsand click on Create a new server.
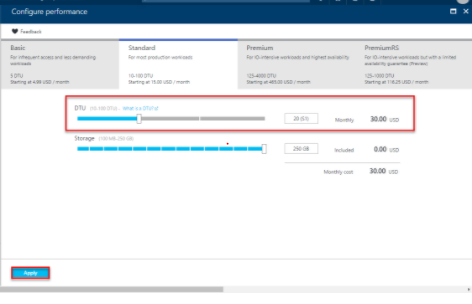
- After selected the amount of DTUs, click Apply.
- Click Createto provision the database.
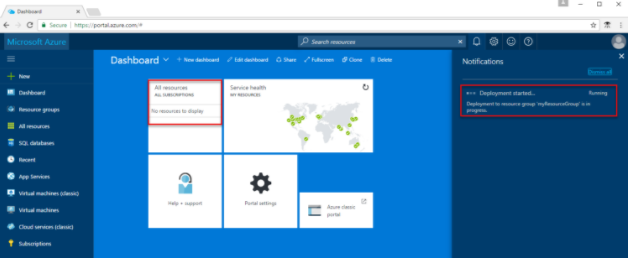
- On the toolbar, click Notifications to monitor the deployment process
b. Create a server level firewall rule
The SQL Database service creates a firewall at the server-level that prevents external applications and tools from connecting to the server or any databases on the server unless a firewall rule is created to open the firewall for specific IP addresses.
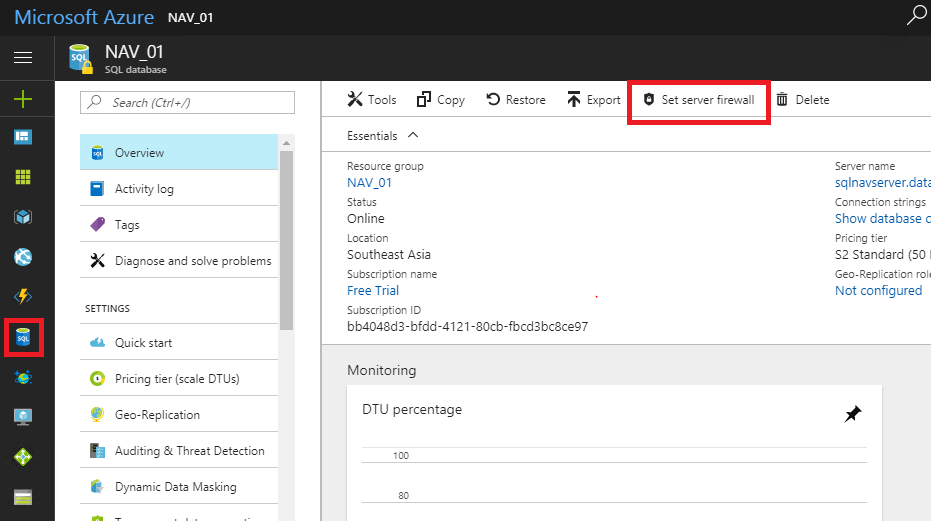
-
- To set a server-level firewall rule, click on SQL Database > Overview page > click Set server firewall on the toolbar as shown in the following image: The Firewall settings page for the SQL Database server opens.
-
- Click Add client IP on the toolbar to add the IP address of the computer that is currently being used and then click Save. A server-level firewall rule is created for the current IP address.
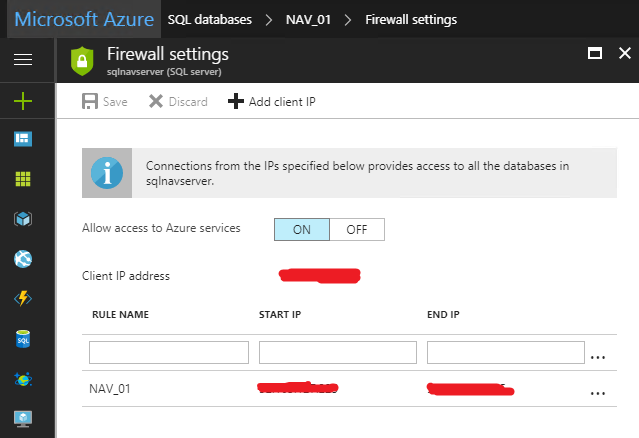
- Make a note of the SQL Database server name because it will be required later.
2. Deploy the existing Microsoft Dynamics NAV Database to an Azure SQL database.
Deploy a databse to SQL Azure wizard is used to deploy database between an instance of the Database Engine and an Azure SQL Database server.
The wizard uses a Data-tier Application (DAC) BACPAC archive file to deploy both the data and the definitions of database objects.
Limitation and Restriction:
The Deploy Database wizard supports deploying a database:
- From an instance of the Database Engine to Azure SQL Database.
- From Azure SQL Database to an instance of the Database Engine.
- Between two Azure SQL Database servers.
The wizard does not support deploying databases between two instances of the Database Engine.
Using the Deploy Database wizard:
-
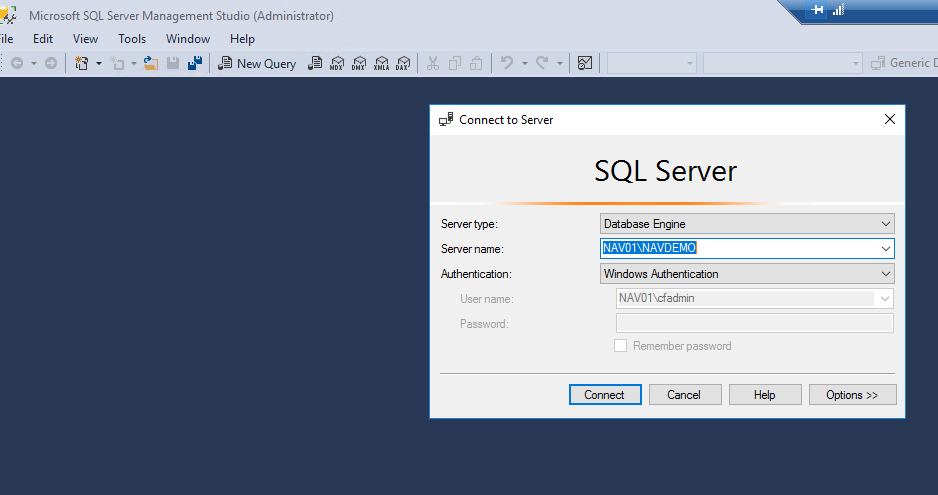
- In the VM, open SQL Server Management studio(SSMS).
- Click on File > Connect Object Explorer.
- Connect to the location of the database you want to deploy. You can specify either an instance of Database Engine or a Azure SQL Database server.
-
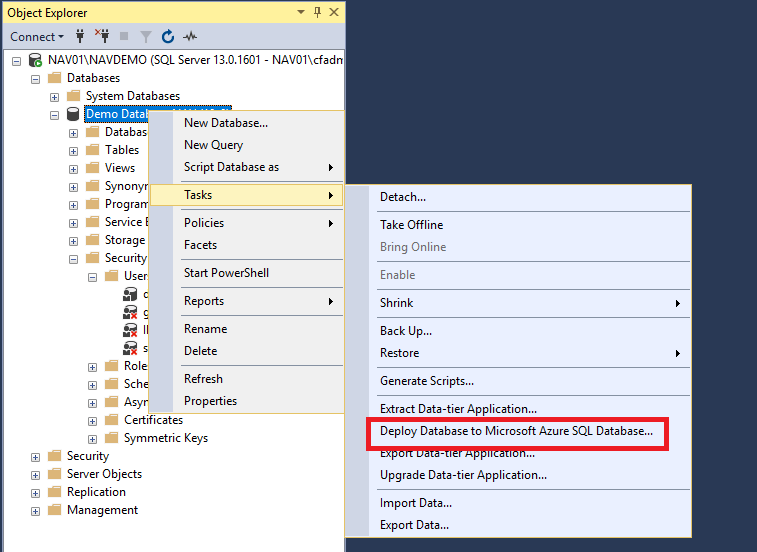
- In Object Explorer, expand the node for the instance that has the database.
- Expand the Database
- Before deployment, remove the windows authenticated users as these will cause failure of the transfer process.
To remove the windows login user, navigate to Security under the Database in NAV > Users >Click on the Windows user then delete.
-
- Right click the database you want to deploy, select Tasks, and then select Deploy Database to Microsoft Azure SQL Database.
-
- This opens the Introduction page, click on Next.
- In the Deployment settings page, click on connect and specify a path to store the .bacpac file in the Temporary file name.
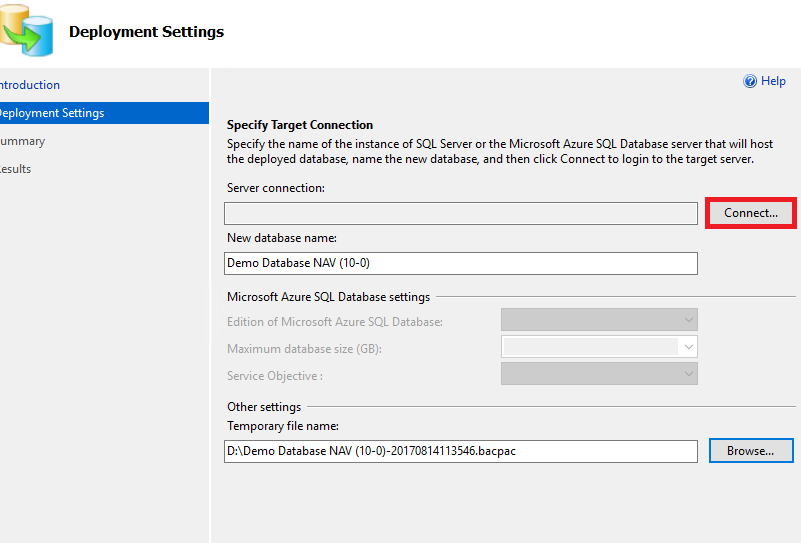
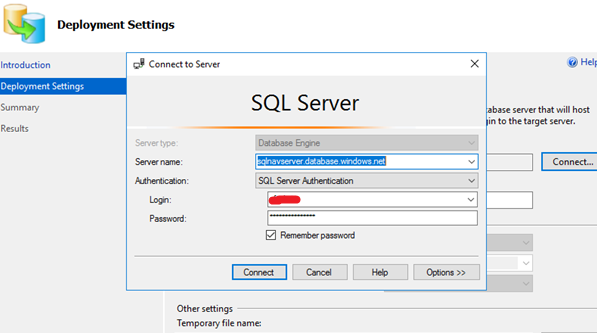
-
- Specify the Azure SQL Server name, authentication is SQL Server authentication and enter the login name and password for the server and click on connect.
-
- Specify the Edition of Microsoft Azure SQL Database, Maximum database size and service objective then click on Next.
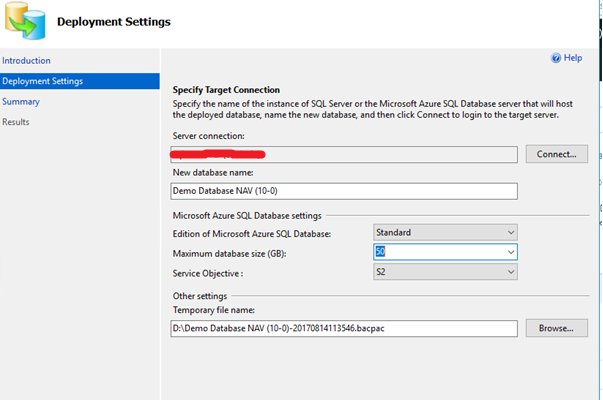
This information can be viewed in the Overview of the Azure SQL Database.
- Specify the Edition of Microsoft Azure SQL Database, Maximum database size and service objective then click on Next.

-
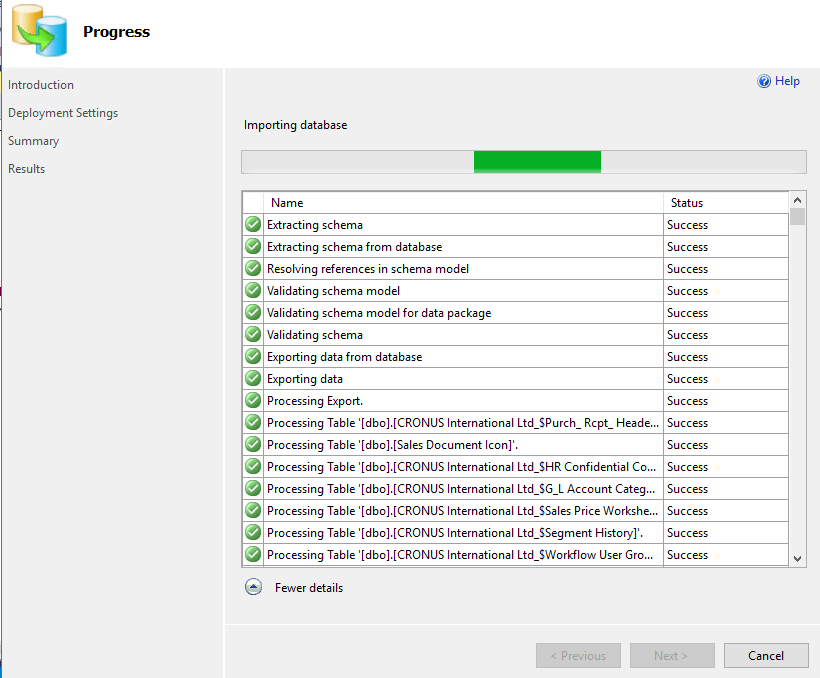
- The progress of the deployment can be viewed in the summary tab. This may take few minutes.
-
- The Result is displayed after completion of the deployment of NAV Database to Azure SQL Database.

-
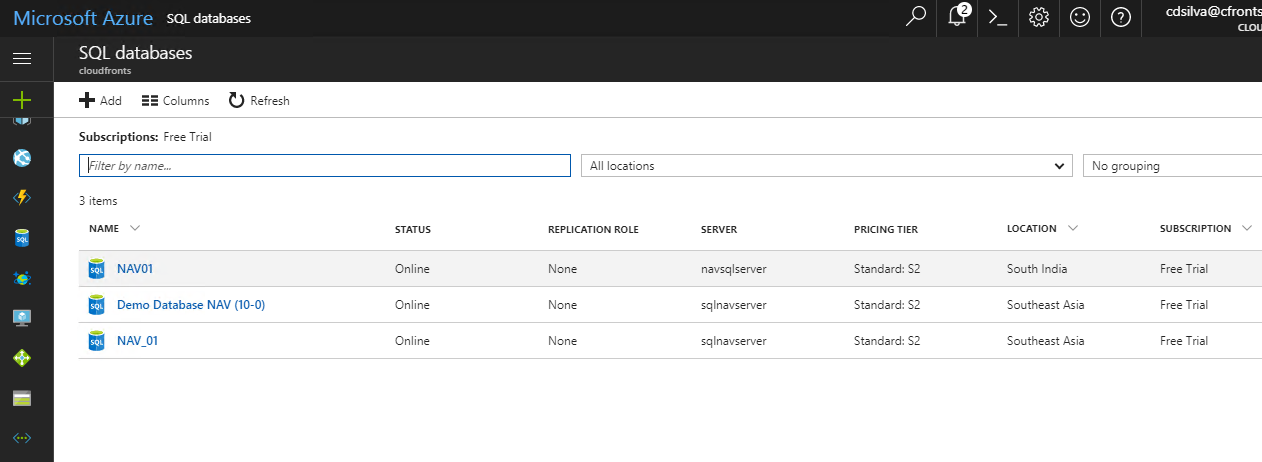
- The Database deployed can be viewed in Azure SQL database. Below is the figure showing the deployed database ‘Demo Database (10-0)’ from NAV to Azure.
3. Set up endpoints for the Microsoft Dynamics NAV client services.
To add the endpoint you need to follow the below steps,
-
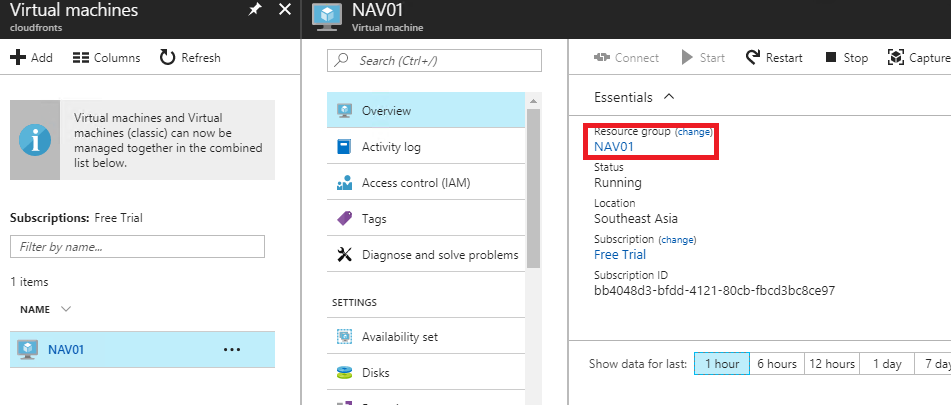
- Click on the Virtual Machine( VM) > overview > Resource Group .
-
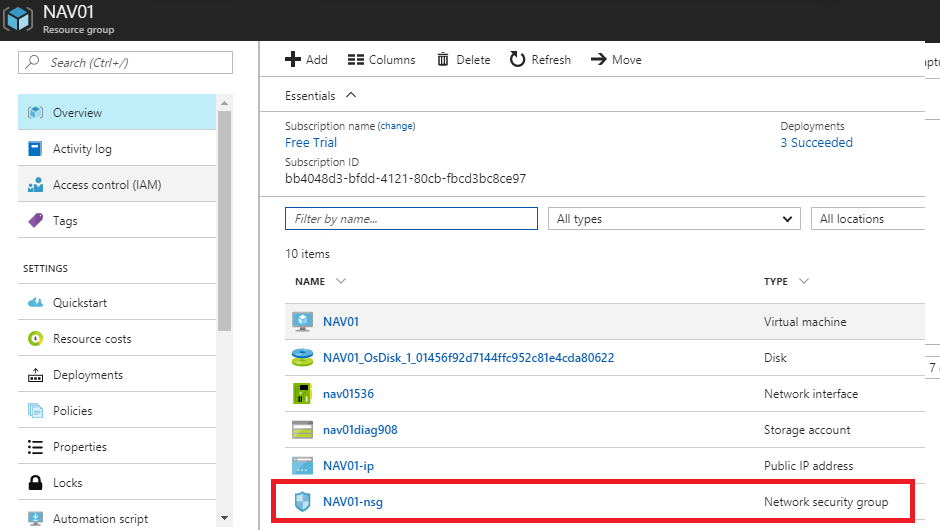
- This will open an overview for the resource group. select NetSecurity (Network Security Group) then click on Inbound Security Rules.
4. Configure a Microsoft Dynamics NAV Server instance on the virtual machine.
To configure SQL Server authentication:
- Set up an Encryption key
- Configure SQL Authentication on Database
- Configure SQL Server authentication on Microsoft NAV Sever Instance (Non-Multitenant) or Configure SQL Server authentication on Microsoft NAV Sever Instance (Multitenant Deployment)
Follow the below steps to set up an encryption key and configure SQL Authentication on the database.
Run the Windows Powershell ISE as Administrator and run the below command.
$Credentials = (New-Object PSCredential -ArgumentList '<your Azure SQL Database login name>',(ConvertTo-SecureString -AsPlainText -Force '<your password>'))
$License = "<path to the Dynamics NAV 2017 installation files>\SQLDemoDatabase\CommonAppData\Microsoft\Microsoft Dynamics NAV\100\Database\Cronus.flf"
Import the NAV administrations cmdlets by running the below command.
Import-module "C:\Program Files\Microsoft Dynamics NAV\100\Service\NavAdminTool.ps1"
Install the NET HTTP Activation windows feature.
Install-WindowsFeature -Name NET-HTTP-Activation
To Create a new encryption key run the below command, specify the key path and the password.
New-NAVEncryptionKey -KeyPath "C:\TEMP\Key\DynamicsNAV.key" -Password (ConvertTo-SecureString -AsPlainText -Force '<password>') -Force
Import the key to the NAV server instance.
Import-NAVEncryptionKey -ServerInstance Dynamicsnav100 `
-ApplicationDatabaseServer ' sqlnavserver.database.windows.net' `
-ApplicationDatabaseCredentials $Credentials `
-ApplicationDatabaseName 'Demo Database NAV (10-0)' `
-KeyPath C:\TEMP\Key\DynamicsNAV.key `
-Password (ConvertTo-SecureString -AsPlainText -Force '<password') `
-Force -Verbose
Add the credentials to NAV Service tier configuration file.
Set-NAVServerConfiguration -DatabaseCredentials $Credentials -ServerInstance DynamicsNAV100 -Force
Redirect the NAV tier to use the Azure SQL database for NAV by running the below commands.
Set-NAVServerConfiguration DynamicsNAV100 -KeyName DatabaseServer -KeyValue sqlnavserver.database.windows.net -Force
Set-NAVServerConfiguration DynamicsNAV100 -KeyName DatabaseName -KeyValue 'Demo Database NAV (10-0)'
Set NAV Server Configuration and enable encryption.
Set-NAVServerConfiguration DynamicsNAV100 -KeyName EnableSqlConnectionEncryption -KeyValue true
Restart the service by running the below command.
Set-NAVServerInstance DynamicsNAV100 -Restart
Import the Licence file to Azure SQL datavase.
Import-NAVServerLicense DynamicsNAV100 -LicenseFile $License -Database NavDatabase -Force
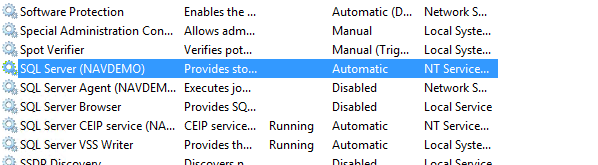
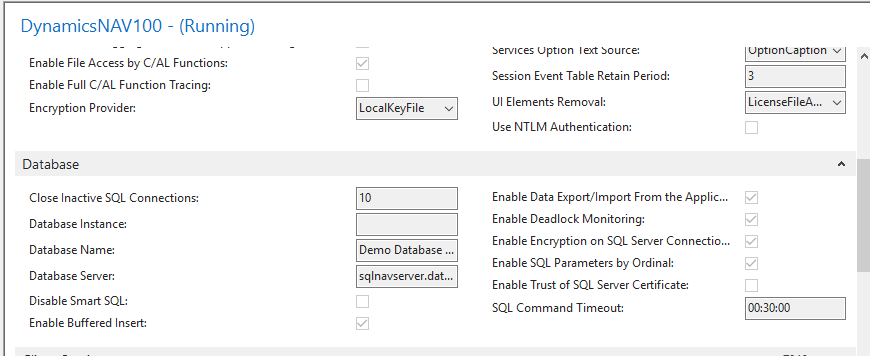
NAV database now uses the Azure SQL database, so the on-premise database is no longer required, Hence in the services, stop the SQL server.
Configure SQL Server Authentication on Microsoft NAV Server Instance
-
- In the NAV Administrator, navigate to Database, the server name is set to the Azure SQL server name. Clear the Database Instance and restart the service.
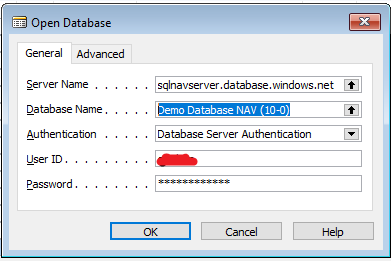
-
- In the NAV Development Environment, open the database with the Azure SQL server name, authentication as Database Server authentication and enter the user id and password and click on OK.
Conclusion:
NAV database is successfully deployed on Azure SQL database.
