Post Dated Checks in D365 Finance
While electronic methods of payment are becoming increasingly popular everywhere for quick payments, check payments are still popular across the world, especially post dated checks, which can be cashed out only after a specified date, giving them an edge over electronic payment methods. D365 Finance has a very simple process to create post dated checks and account their entries. Since post dated checks are cleared after a certain date, known as the maturity date, the amount is not directly accounted in the bank account, but to a bridging account instead. A bridging account serves as a ‘bridge’, for the transaction amount between the bank account and the vendor/customer account till the maturity date of the PDC. When a payment entry with a PDC is made, the system will store the amount temporarily in the bridging account till the maturity date. On the maturity date, the system will transfer the amount from the bridging account in the bank account. The accounting process of the PDC is summarized below: –
For Vendor:-
| PDC (Before Maturity) | Dr | Cr |
| Vendor | XX | |
| Bridging Account | XX |
| PDC (After maturity) | Dr | Cr |
| Bridging Account | XX | |
| Bank | XX |
For Customer:
| PDC (Before Maturity) | Dr | Cr |
| Customer | XX | |
| Bridging Account | XX |
| PDC (After maturity) | Dr | Cr |
| Bridging Account | XX | |
| Bank | XX |
The steps to set up and use PDC are as follows: –
- Navigate to Cash & Bank Management -> Setup -> Cash & Bank Management Parameters -> Post Dated checks.
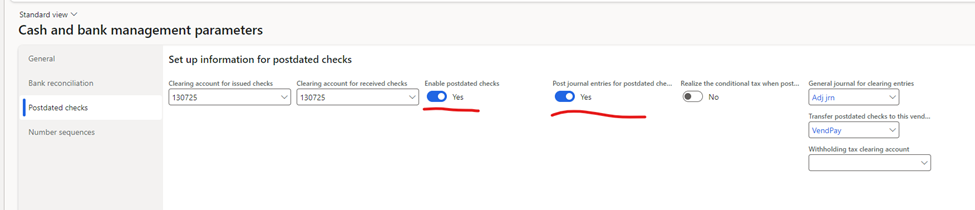
- Activate ‘Enable Postdated checks’ and ‘Post journal entries for postdated checks’. Activating this enables the system to create and post postdated payment entries.
- Specify the bridging account in the fields for ‘clearing account for issued checks’ and ‘clearing account for received checks’. These two fields are for specifying the bridging account separately for vendor or customer payments, but you can specify the same account for both.
- In the General Journal for clearing entries, specify the General Journal name which should be created upon the maturity of the PDC.
- Now go to Accounts Payable -> Methods of Payment.
- Create a new payment method with the appropriate name.
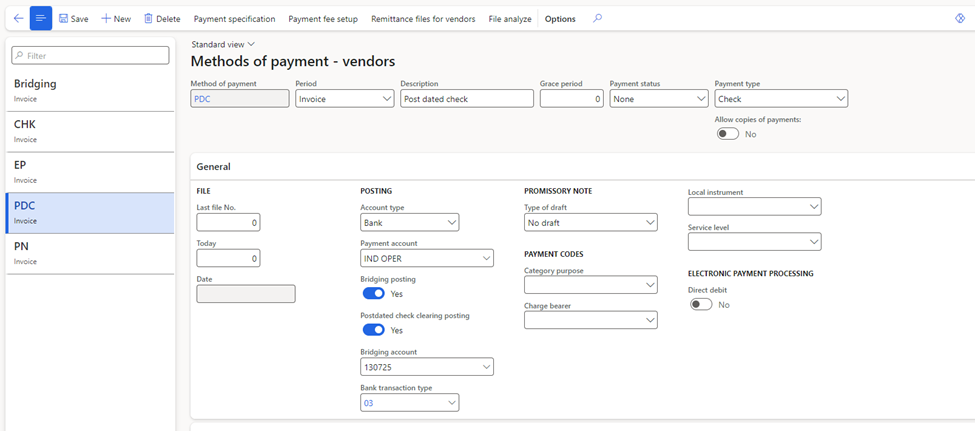
7. Select the Account type as Bank.
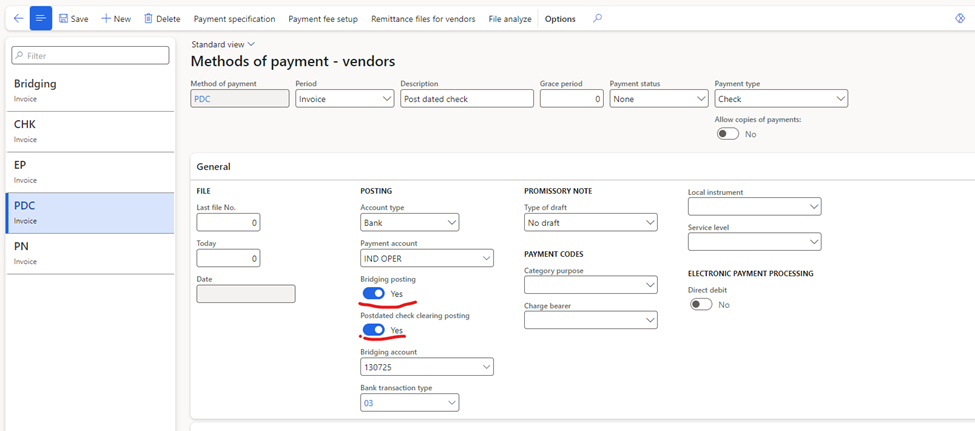
8. Enable the parameters for Bridging posting and Post Dated check clearing posting.
9. The bridge account gets selected automatically by default based on the one defined in the Cash & Bank management parameters defined earlier.
10. Do the exactly same setup in AR module -> Methods of payment as well.
This concludes the setup part. Now we can proceed with the transactions.
Process: –
- On the vendor side, create a payment journal.
- After selecting the vendor and entering the amount, don’t select any offset account. Select the method of payment of PDC instead.
- Upon selecting the method, the system will automatically default the offset account as the bridging account.
- Enter other details like the check number or the narration.

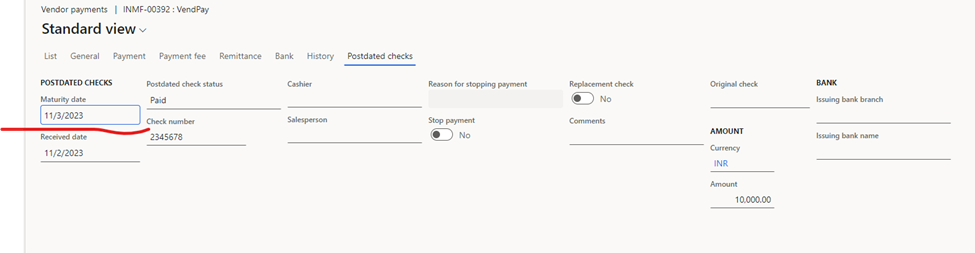
Go to Postdated Checks tab and enter the maturity date for the PDC.
- Create the entry and post it.
- Now, the vendor will be debited but the bank wont be credited. The amount will be credited to the bridging account instead, thus reducing the vendor liability but not impacting the bank account till the required date.
- The system will create a record of the PDC in Accounts Payable -> Payments -> Vendor Postdated checks.

Until the maturity date is reached, we cannot settle the PDC. So either we can wait till that date or for the sake of testing purposes, we can set the system clock to a future date.
- Either way, once the date becomes equal to or greater than the maturity date, the PDC can be settled.
- Go in the PDC and click on Settle on top.

- Upon the settlement, system will generate a general journal entry where the bridging account will be settled and the bank account will be credited. This will settle the PDC.
- To view the JV entry, open General Journals and filter according to the Journal name configured for the PDC.
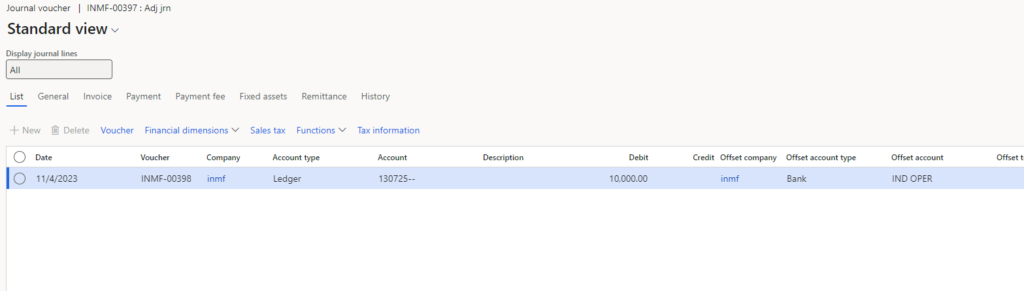
- From the above image, it is clear that the system has created an entry to knock off the bridging account and credit the bank account.
- The exact same process is followed for the AR module as well.
This concludes the configuration and process for PDC in D365 Finance.
