Trigger Power Automate Flow using JavaScript – Uni-Directional
Hi All,
Did you know you can use JavaScript to trigger Power Automate flows and pass input data?
So, I’ll show you how to do that, as well as how to pass strict structured data and dynamic schema in Power Automate.
In the next blog, I’ll talk about Trigger Power Automate Flow using JavaScript – Bi-Directional
Steps to follow for Initial Setup
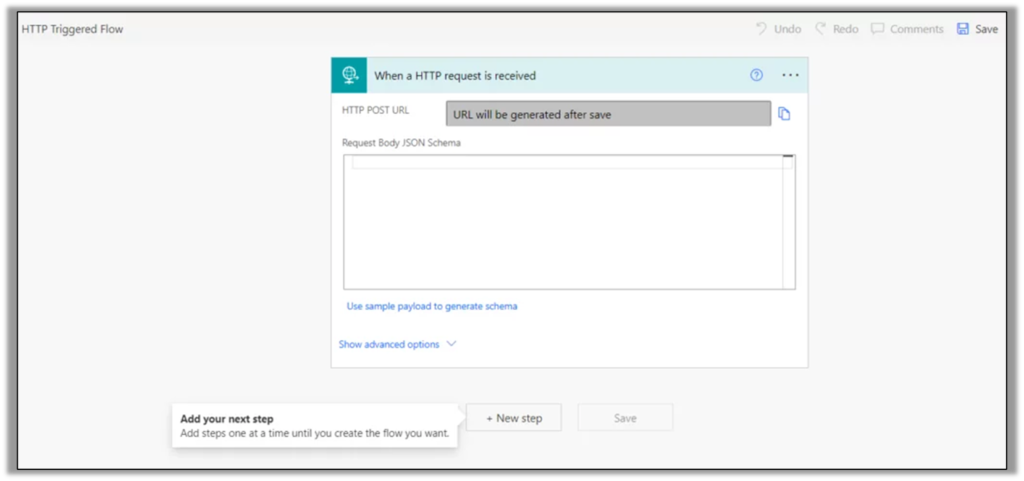
Step 1: Let’s create a Power Automate Flow and define the input JSON schema.
Go to: Power Automate
Create an Instant Flow with the trigger ‘When a HTTP request is received‘
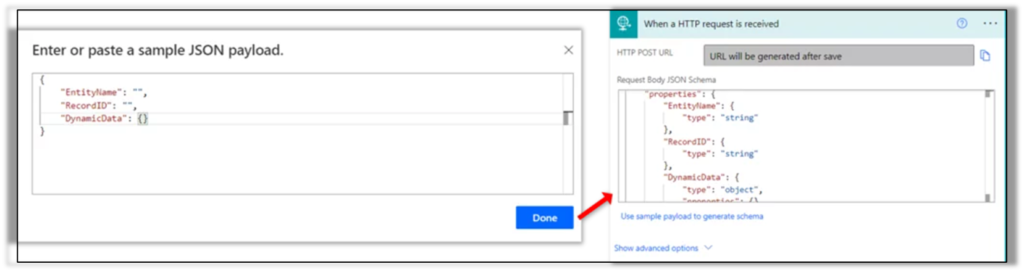
Step 2: Let’s outline the input schema and then focus on the output in a ‘Compose’ block. I’ll describe two types of inputs. (Strict and Dynamic).
Our strict schema will be identified by a specific pattern indicating how the input should be given.
Our dynamic schema will be recognised by an unknown pattern, and input will not always be fixed.
- Click on ‘Use sample payload to generate schema’.
- Apply the following code, click on Done and you will see the schema in ‘Request Body JSON Schema’.
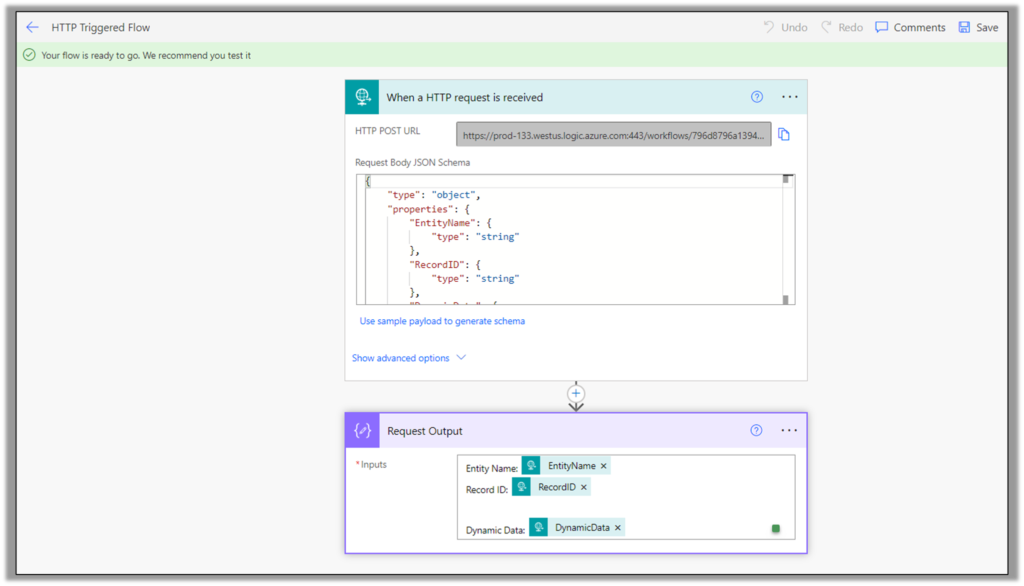
- Add a Compose Block to check the output of the request and save the Flow. URL will be generated and is ready to be used.
Let’s now proceed to create JavaScript to trigger this flow
Steps to follow for calling Flow using JavaScript
Since I’ll show the code snippet, adjust it as per your use case.
Note: Copy your HTTP Post URL from the trigger as it will be used in the JavaScript
Step 1: Type the following code
var TriggerFlow =
{
    Main: (executionContext) =>
    {
        var formContext = executionContext.getFormContext();
        //Strict Defined Parameters
        var RecordID = formContext.data.entity.getId().replace("{", "").replace("}", "");
        var EntityName = formContext.data.entity.getEntityName();

        //Dynamic Parameter - Sample Data
        var DynamicValues = {Name: "Ethan", Operation: "One Way Power Automate trigger"};


        //Find Plural Logical Name of the Entity and Call Flow
        Xrm.Utility.getEntityMetadata(EntityName, "").then(
            function (result)
            {
                TriggerFlow.CallFlow({logicalEntityName: result.EntitySetName, CurrentRecord: RecordID, DynamicData: DynamicValues});
            },
            function (error)
            {
                console.log(error);
            }
        );
    },

    CallFlow: ({logicalEntityName, CurrentRecord, DynamicData}) =>
    {
        var flowUrl = "https://prod-133.westus.logic.azure.com:443/workflows/796d8796a139409e844e8f1001493567/triggers/manual/paths/invoke?api-version=2016-06-01&sp=%2Ftriggers%2Fmanual%2Frun&sv=1.0&sig=XtYrETcQW07SX5EIuxtQDv7lQ8mPNyDpDZ9O7tGmqc8";
        var inputdata = JSON.stringify({
            "EntityName": logicalEntityName,
            "RecordID": CurrentRecord,
            "DynamicData": DynamicData
        });

        var req = new XMLHttpRequest();
        req.open("POST", flowUrl, true);
        req.setRequestHeader('Content-Type', 'application/json');
        req.send(inputdata);
    }
}
Step 2: Execute the JS with ‘TriggerFlow.Main()‘.
Note: Make sure you pass Execution Context to the JS
Step 3: Check your Power Automate Flow History and open the Run.
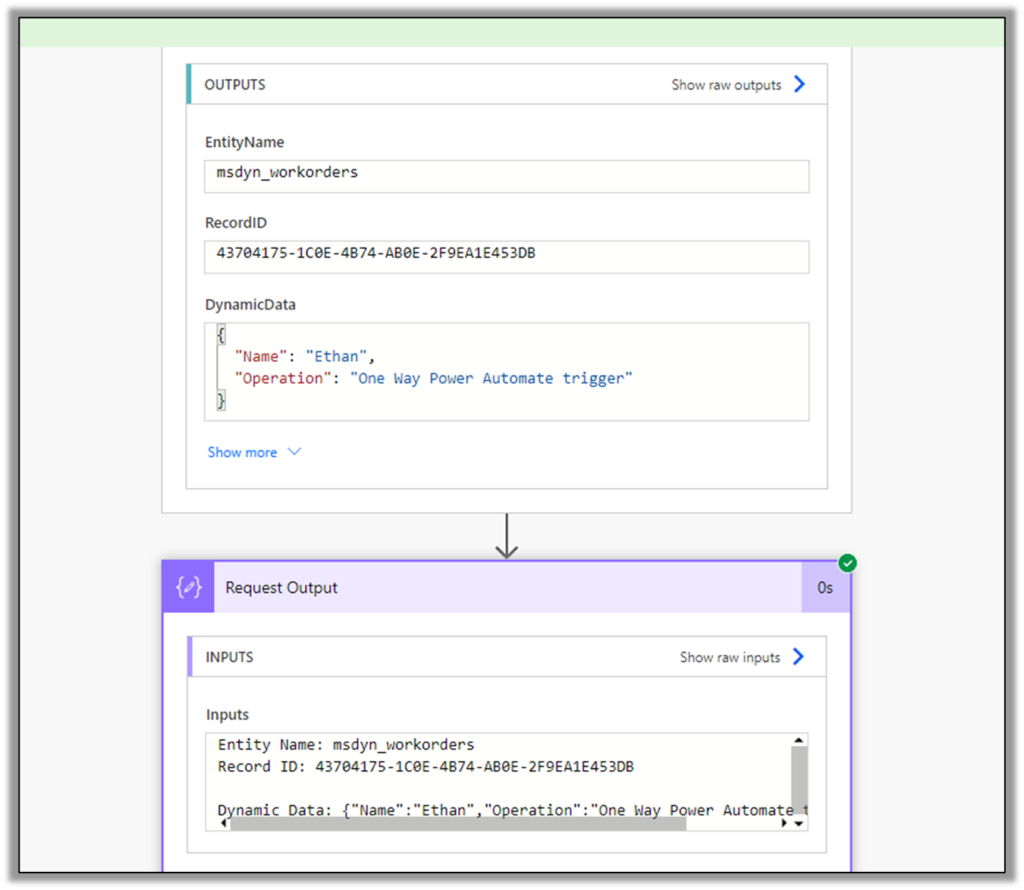
That’s how Power Automate is triggered using JavaScript.
Hope this has helped you 🙂
Next blog – Trigger Power Automate Flow using JavaScript – Bi-Directional
