How an Abu Dhabi-Based Diversified Holding Company Corrected Mis-Tagged Ledger Entries in Dynamics 365 Business Central
At a Glance
A client in Abu Dhabi discovered more than 400 posted G/L entries with incorrect dimension values. Using Dimension Correction in Microsoft Dynamics 365 Business Central, the finance team was able to correct the dimension values in bulk without creating reversal or adjustment entries. The corrections could be validated, audited, reviewed, and undone, providing a controlled approach to fixing posted transactions. However, it is important to note that Dimension Correction applies to G/L entries only; related sub-ledger entries retain their original dimensions.
Table of Contents
- Introduction
- Why Dimension Errors Happen in the First Place
- What Dimension Correction Actually Does
- Setting Up Before the First Correction
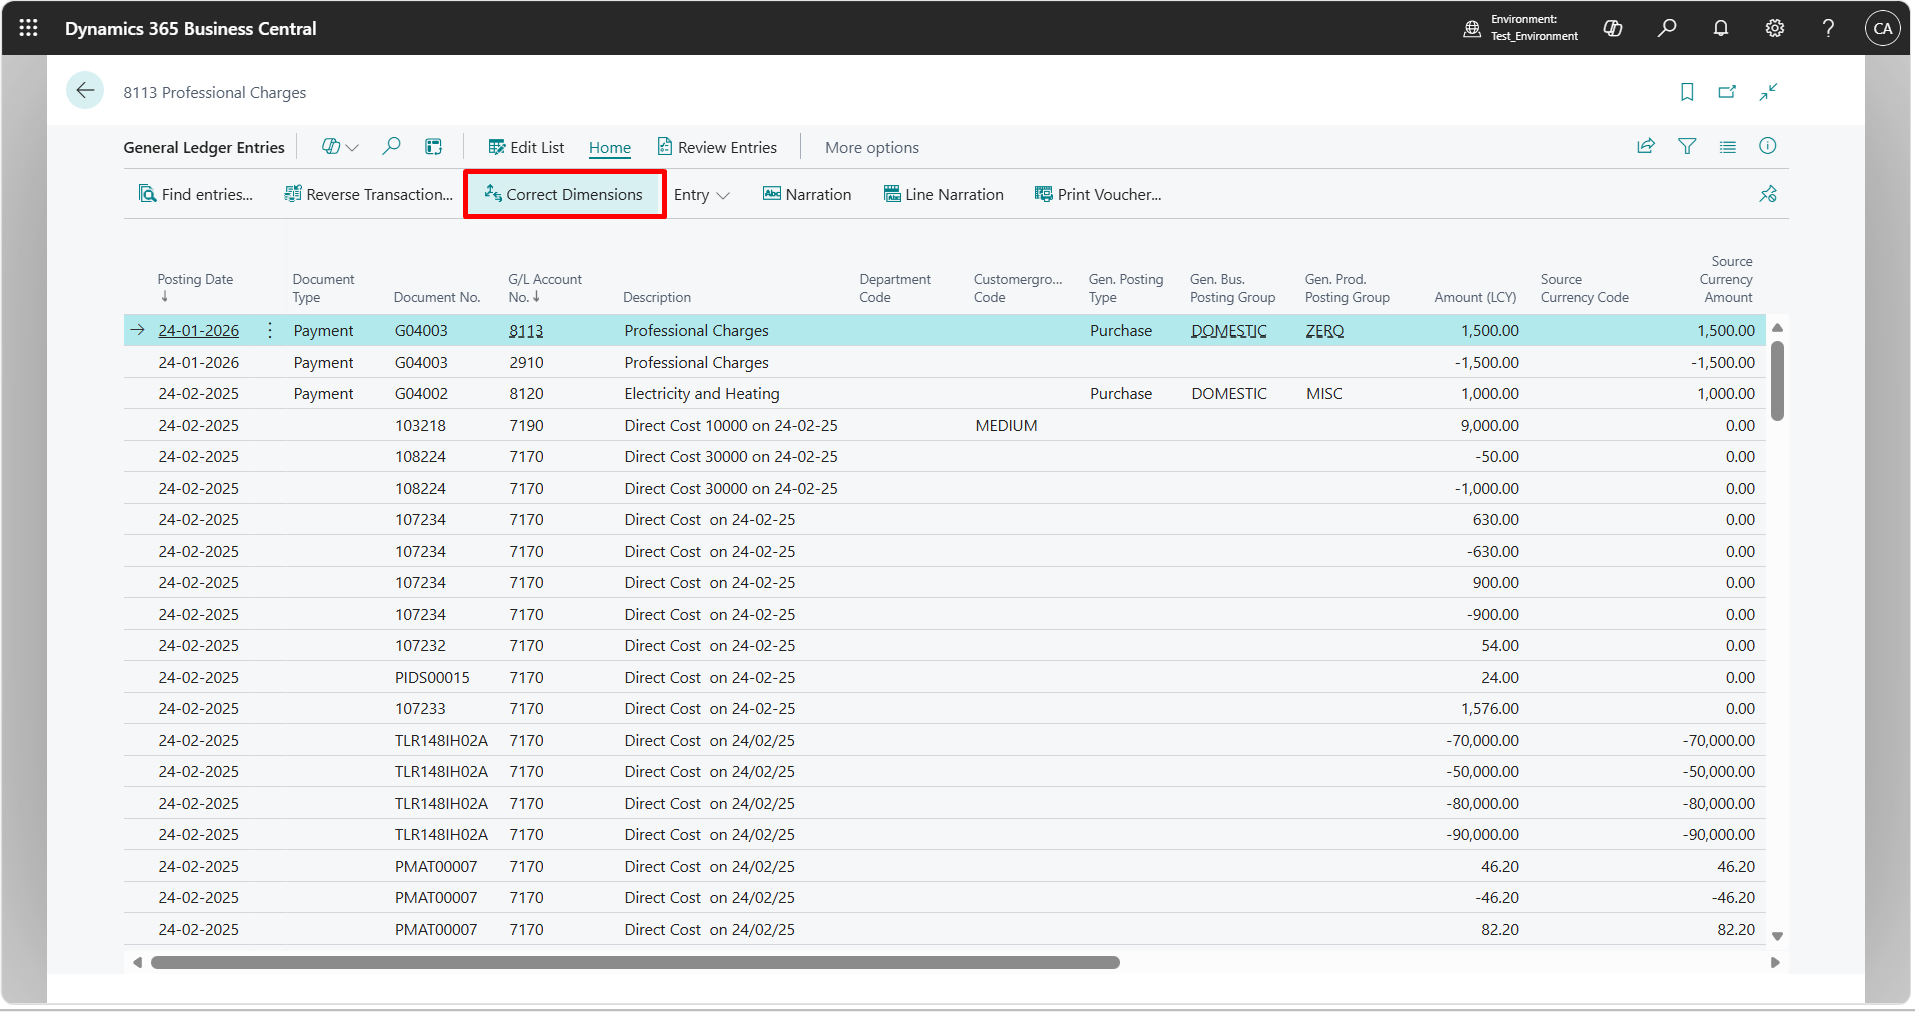
- Step 1: Starting the Correction from the Ledger
- Step 2: Selecting Entries in Bulk
- Step 3: Defining the Dimension Changes
- Step 4: Validating Before You Run
- Step 5: Running the Correction
- Step 6: Reviewing, Undoing and Auditing
- A Note on Cost Accounting
- The Outcome
- Best Practices We Recommend
- Conclusion
- Frequently Asked Questions
- About the Author
Introduction
Dimensions are what turn a general ledger from a list of numbers into something management can actually use. A single expense posting tells you how much was spent; the dimensions on that posting tell you which department spent it, on which project, at which location. When dimensions are right, reports by cost centre, business unit or project take seconds to produce. When they are wrong, every one of those reports quietly becomes unreliable.
That was the situation one of our clients in Abu Dhabi found themselves in. During routine month-end review, their finance team noticed that a large group of posted transactions carried the wrong dimension values. Some entries were tagged to the wrong department, others to the wrong project, and a few had no value at all where one was expected. By the time the pattern was traced, more than 400 general ledger entries were affected.
Reversing and re-posting each transaction was not an option. It would have doubled the number of entries in the ledger, cluttered the audit trail and taken days of effort. Editing entries one at a time was equally impractical. Instead, we used the Dimension Correction feature in Microsoft Dynamics 365 Business Central to fix all of them in a controlled, bulk operation, without touching the amounts or the accounts.
This blog walks through how the feature works, how we applied it for this client, and what to keep in mind before you run a correction in your own environment.
Why Dimension Errors Happen in the First Place
In our experience, incorrect dimensions rarely come from a single cause. For this client, the errors came from a mix of everyday situations that most finance teams will recognize:
- 1. Default dimensions not updated after an internal restructuring, so new transactions kept inheriting the old department code.
- 2. Manual journal entries where users picked a similar-looking value from the lookup list.
- 3. Recurring journals that were copied forward month after month with an outdated project code.
- 4. Imported data from a spreadsheet where the dimension column was shifted by one row.
None of these errors affected the trial balance. The debits and credits were correct and the accounts were correct. What was wrong was the analytical layer on top, which meant that department-wise P&L and project cost reports no longer matched reality.
What Dimension Correction Actually Does
Dimension Correction lets an authorized user change the dimension values on general ledger entries that have already been posted. It does this without creating new journal lines, reversals or adjustment postings. The amounts, dates, document numbers and G/L accounts stay exactly as they were; only the dimension set linked to each entry is updated.
Every correction is recorded as its own document with a description, a status and a list of the entries it touched. That means auditors and finance managers can always see what was changed, when, and why.
Important limitation
The correction applies to G/L entries only. Related sub-ledger entries, such as customer, vendor, item or fixed asset ledger entries, keep their original dimensions. Since the purpose of the feature is accurate financial reporting, this is by design, but it is worth communicating to anyone who reports from sub-ledgers.
Setting Up Before the First Correction
Before our client’s finance team ran anything, we put two controls in place.
1. Decide who can correct dimensions
Access to the feature is governed by the D365 DIM CORRECTION permission set. We assigned it only to the finance controller and one senior accountant. Users with this permission can create, run and undo corrections, so it should not be handed out broadly.
2. Protect dimensions that should never change
On the Dimension Correction Settings page, you can list dimensions that are blocked from correction. For this client, we blocked the dimension used for statutory entity reporting, since any change there needed a formal adjustment rather than a re-tag.
Step 1: Starting the Correction from the Ledger
A correction can be started from two places:
- 1. General Ledger Entries page, using the Correct Dimensions action. This is the most flexible starting point when the affected entries are spread across many postings.
- 2. G/L Registers page, by selecting a register and choosing Correct Dimensions. This pre-loads all entries from that register and is useful when a single batch posting went wrong.
Because the client’s 400+ entries came from different journals and dates, we started from the General Ledger Entries page. The first thing we filled in was the Description field, with a note explaining the reason for the change and a reference to the internal approval. It takes ten seconds and saves a lot of questions six months later.
Step 2: Selecting Entries in Bulk
This is where the feature really earns its place. Instead of picking entries one by one, the Selected Ledger Entries FastTab offers several ways to build the list:
| Option | How we used it |
|---|---|
| Add by Filter | Filtered on G/L account range and posting date range to pull in the affected expense lines. |
| Add by Dimensions | Pulled every entry carrying the incorrect department value, which captured the bulk of the errors in one step. |
| Add Related Entries | Brought in the remaining lines from the same registers so that balancing entries were corrected together. |
| Manual Selection | Added a handful of one-off entries that did not fit any filter. |
| Remove Entries | Took out a few entries that matched the filter but were actually tagged correctly. |
| Manage Selection Criteria | Reviewed the history of each selection step and rolled back one filter that was too broad. |
A practical tip
Finish building the selection before you enter any dimension changes. If you change the selection afterwards, Business Central clears the values on the changes FastTab and you will have to enter them again.
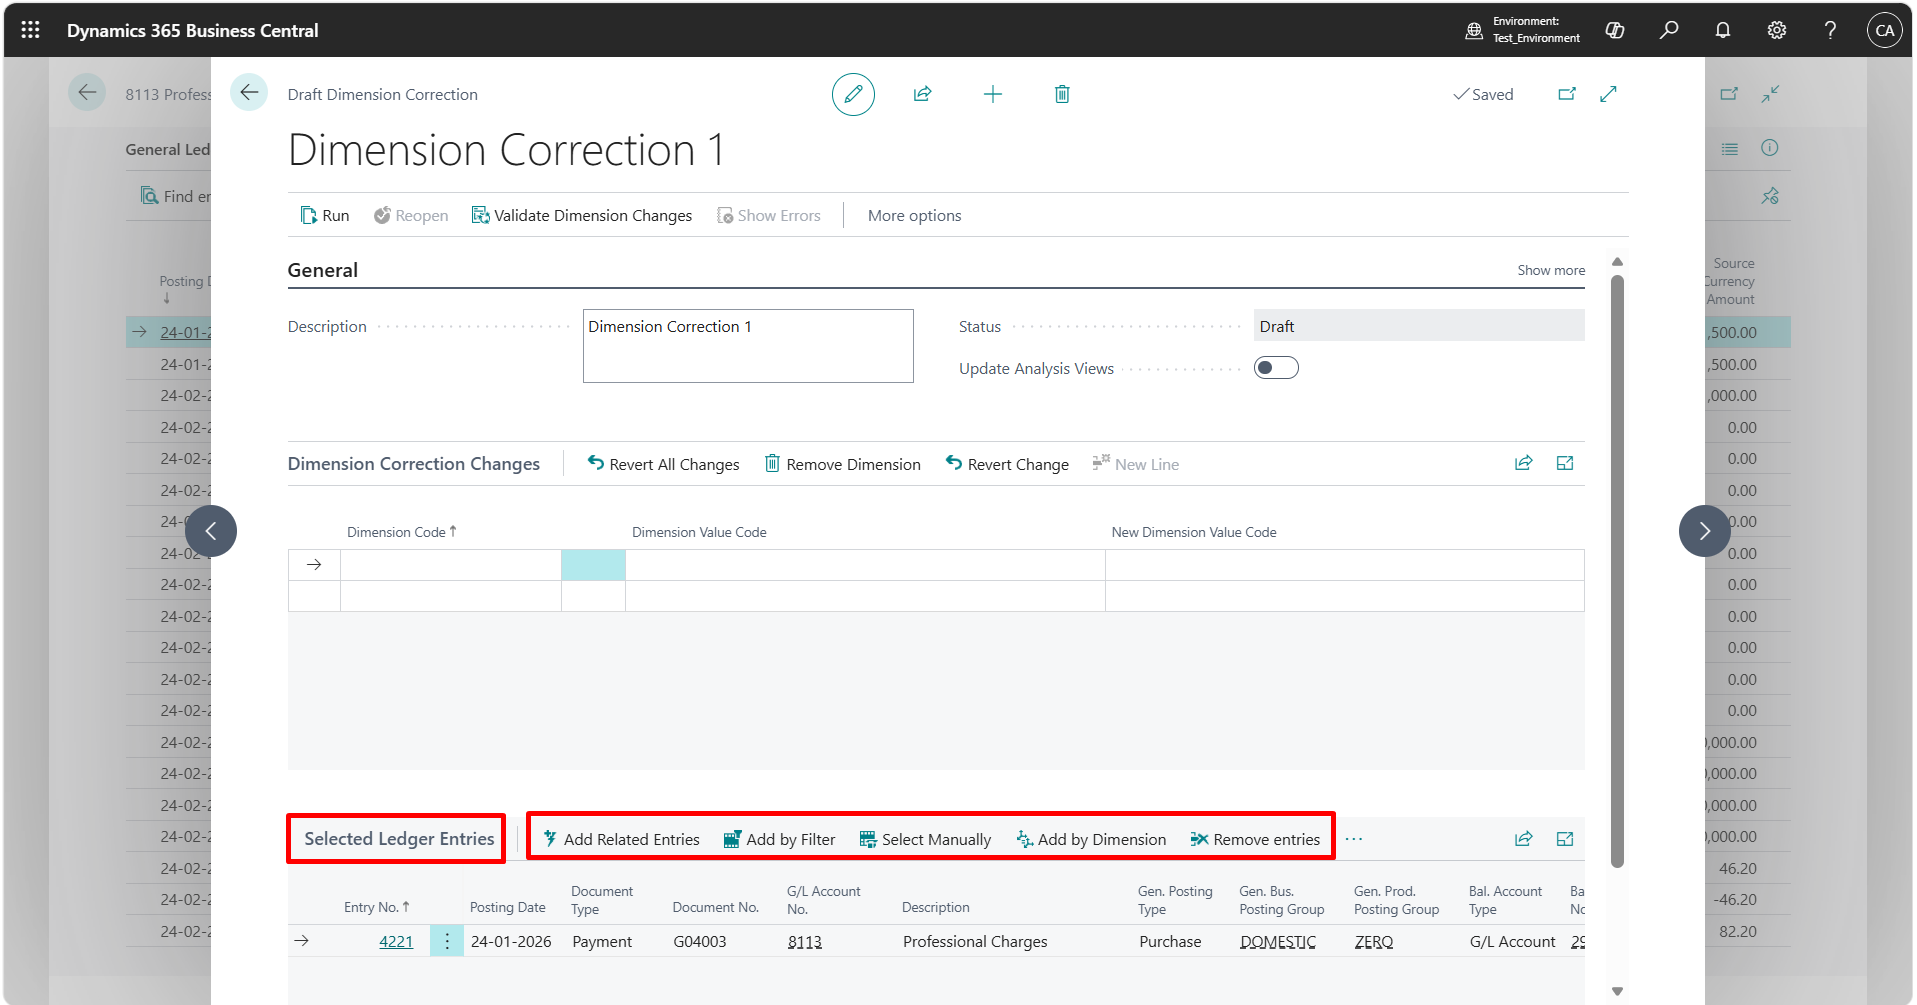
Step 3: Defining the Dimension Changes
On the Dimension Correction Changes FastTab, we specified which dimension to change and what the new value should be. The feature supports three kinds of change:
- 1. Replace an existing value with a new one, for example changing the department from the old code to the correct one.
- 2. Add a value where the dimension was blank on the original posting.
- 3. Remove a value that should not have been there at all.
The client had two distinct types of error, so rather than cramming them into one document, we split them into separate corrections. The table below shows an illustrative example of how the changes were grouped.
| Correction | Dimension | Old Value | New Value | Entries |
|---|---|---|---|---|
| DC-01: Department restructuring | DEPARTMENT | ADMIN | OPERATIONS | ~260 |
| DC-02: Project code cleanup | PROJECT | PRJ-OLD | PRJ-2026-A | ~110 |
| DC-03: Missing values | PROJECT | (blank) | PRJ-2026-B | ~40 |
Keeping each correction focused on one logical issue made validation easier to read and, if anything needed to be undone, it could be undone in isolation.
Step 4: Validating Before You Run
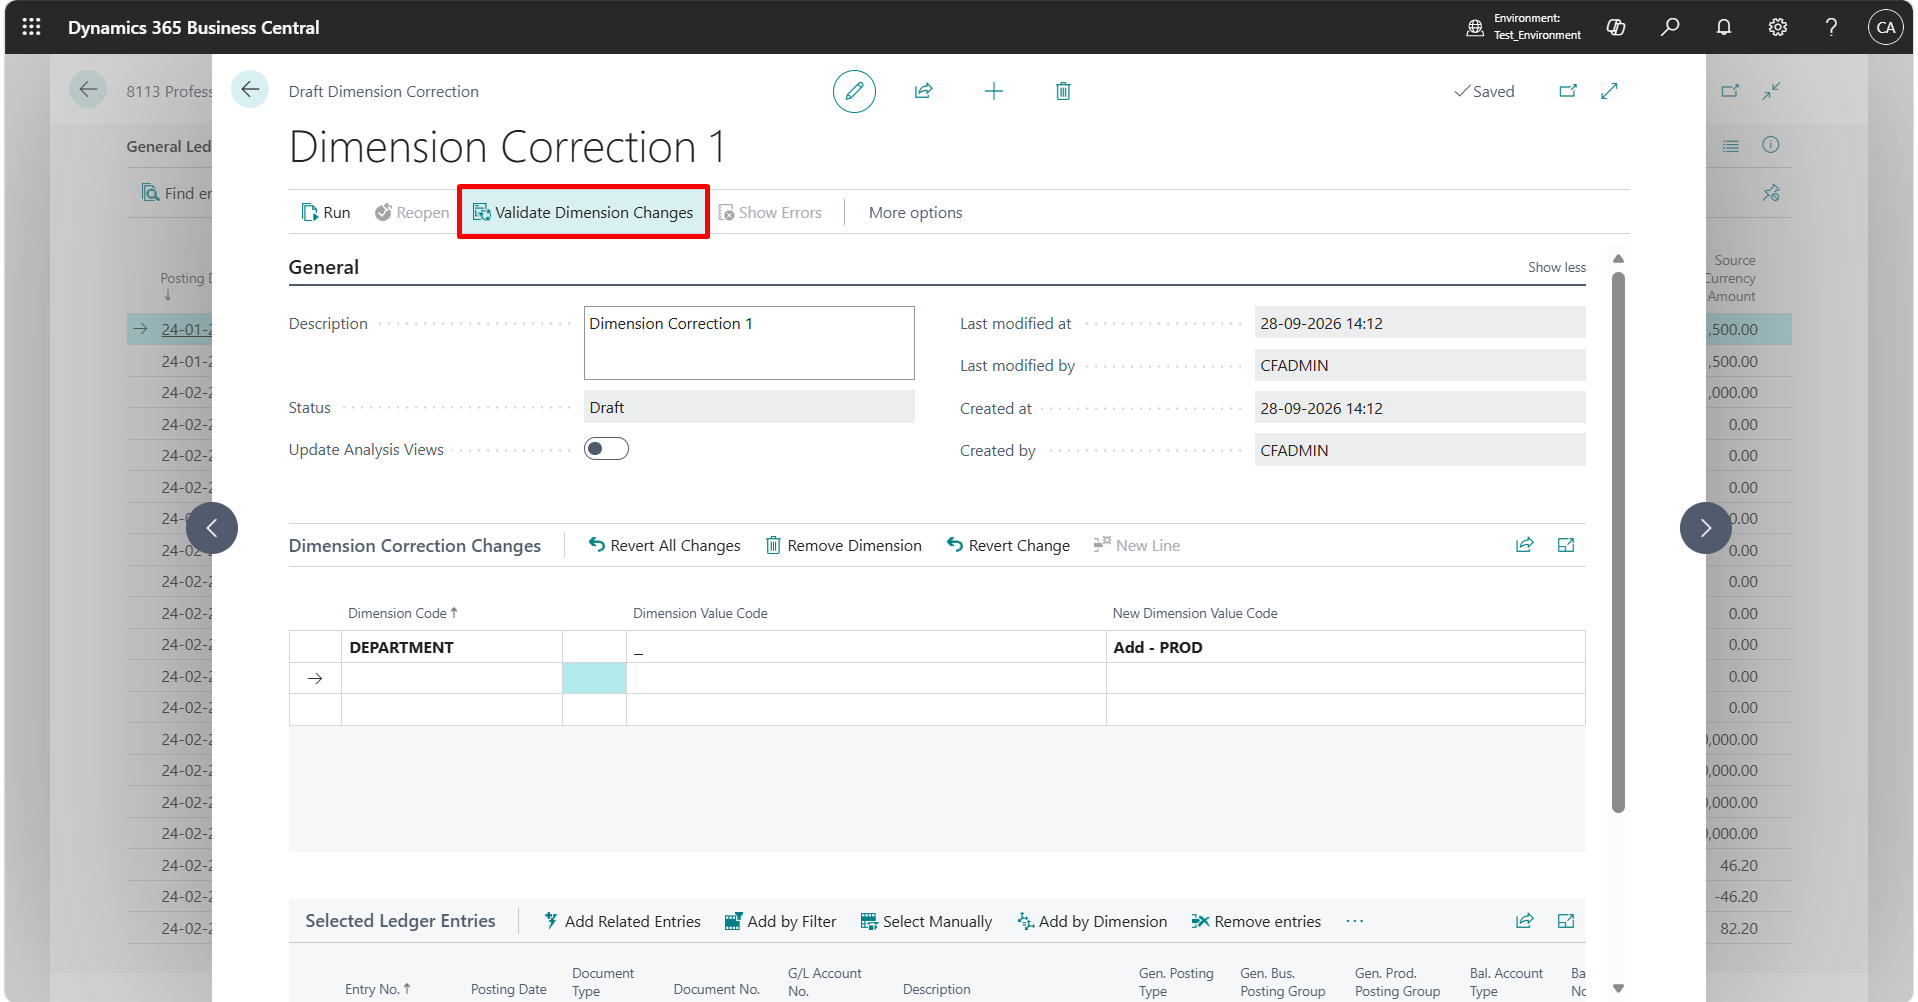
Before running the correction, we chose Validate Dimension Changes. Business Central checks the proposed changes against the same rules it applies at posting time, including:
- 1. Value Posting rules on default dimensions for the G/L accounts (Code Mandatory, Same Code and No Code).
- 2. Dimension combination restrictions that block certain values from being used together.
- 3. Blocked dimensions and dimension values.
While validation is in progress, the status shows Validation in Process. Once it completes, the result appears in the Validation Status field. In our case, the first validation flagged several entries posted to an account with a Same Code rule tied to the old department. We used View Errors to see exactly which entries were affected, updated the default dimension rule after confirming with the finance controller, chose Reopen, and validated again. The second pass came back clean.
Skipping validation is possible, but we would not recommend it. It is far better to find a conflict at this stage than halfway through a run.
Step 5: Running the Correction
With validation passed, we chose Run. You can run a correction immediately or schedule it through the job queue for a later time. With around 400 entries, the run completed in a few minutes during business hours without any noticeable impact on users.
For much larger volumes, Microsoft advises caution once a correction goes beyond roughly 10,000 entries. In those cases, break the work into smaller filtered sets and schedule each run outside working hours.
Updating analysis views
If your analysis views are set to Update on Posting, you can turn on the Update Analysis Views toggle on the correction so the views reflect the new dimensions straight away. Since this adds processing time, it is best suited to smaller corrections like this one. For larger jobs, update the analysis views separately once the correction is done.
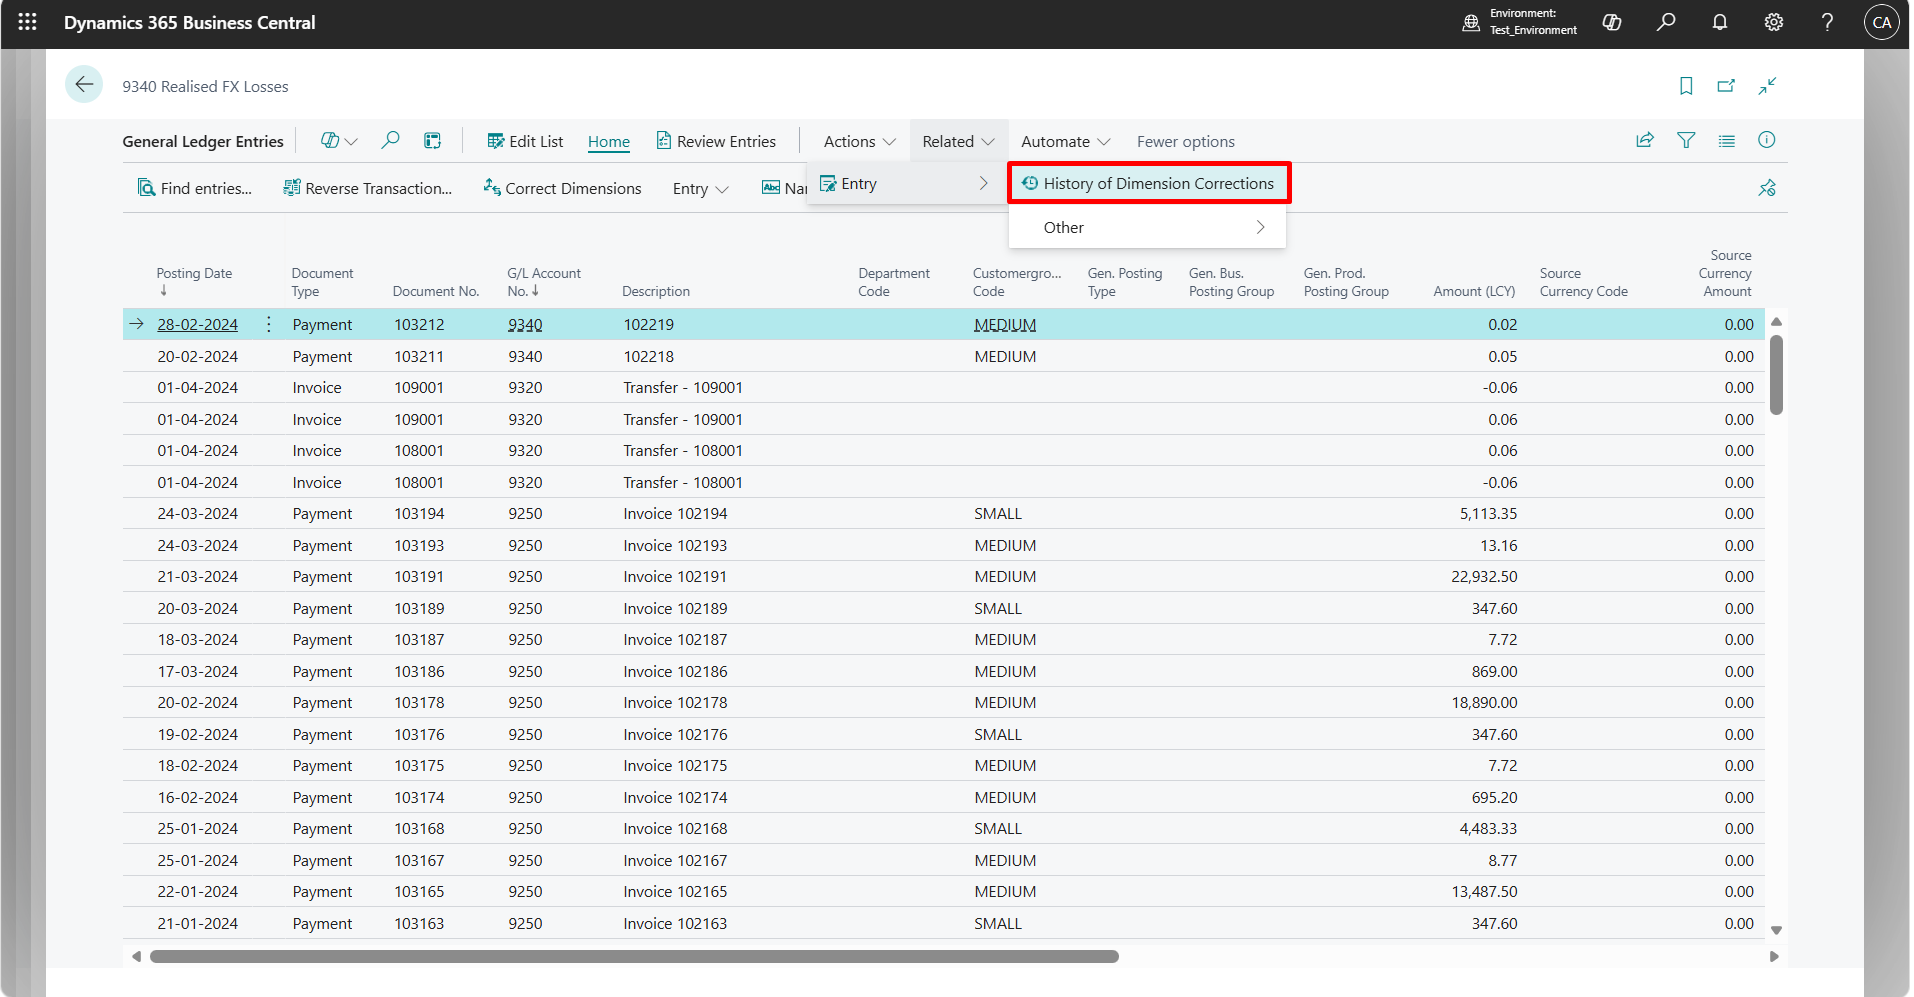
Step 6: Reviewing, Undoing and Auditing
Once a correction completes, it stays available as a record. Several actions help with review and control:
- 1. History of Dimension Corrections, available from a G/L entry, shows every correction that has been applied to that entry.
- 2. Undo reverts the most recent correction on the entries. You can validate an undo first, which is useful if dimension rules have changed since the correction ran.
- 3. Copy to Draft creates a new correction for the same set of entries when Undo is no longer available.
- 4. Reset returns an incomplete correction to draft if a run was interrupted, so it can be run again. Note that analysis view updates are applied at the end of the process and are not affected by a reset.
For our client, the finance controller reviewed the department-wise and project-wise reports immediately after the run and signed off the same afternoon.
A Note on Cost Accounting
If you use the Cost Accounting module, corrected G/L dimensions will not flow automatically into cost registers or allocations. Depending on what changed, you may need to delete specific cost registers and rerun allocations, or rebuild your cost models entirely. Business Central does not identify these impacts for you, so plan this step as part of the correction exercise.
The Outcome
What could have been several days of reversals and re-postings was completed in a single working session:
- 1. 400+ G/L entries corrected across three focused correction documents.
- 2. Zero reversal or adjustment entries added to the ledger.
- 3. Department and project reports reconciled to the expected figures the same day.
- 4. A clean audit trail, with each correction documented, validated and traceable to the entries it changed.
Just as important, the exercise exposed the root causes. We updated the outdated default dimensions, corrected the recurring journal templates and tightened Value Posting rules on key expense accounts, so the same errors are far less likely to come back.
Best Practices We Recommend
- Restrict the D365 DIM CORRECTION permission set to a small group of finance users.
- Block dimensions on the Dimension Correction Settings page if they must only change through formal adjustments.
- Write a meaningful description on every correction, including the approval reference.
- Build the complete entry selection first, then define the changes.
- Split unrelated issues into separate corrections.
- Always validate before you run.
- Schedule very large corrections outside business hours and split them into smaller batches.
- Fix the root cause, such as default dimensions or journal templates, once the correction is done.
Conclusion
Dimension errors are one of those problems that do not show up in the trial balance but can quietly undermine every management report built on top of it. Dimension Correction in Business Central gives finance teams a safe, controlled way to fix them after posting, in bulk, with validation and a full audit trail, and without adding noise to the ledger.
For our Abu Dhabi-based client, it turned a stressful month-end discovery into a routine clean-up task, and it gave the finance team the confidence that their dimensional reporting reflects how the business actually operates.
Frequently Asked Questions
1. Does Dimension Correction change the amounts or G/L accounts on posted entries?
No. Only the dimension values are changed. Amounts, accounts, posting dates and document numbers remain as originally posted.
2. Are customer, vendor or item ledger entries updated as well?
No. Corrections apply only to G/L entries. Sub-ledger entries keep their original dimensions, so reports built from sub-ledgers will still show the old values.
3. Can I correct global and shortcut dimensions?
Yes, unless a dimension has been blocked on the Dimension Correction Settings page.
4. Who can run a dimension correction?
Users who have been assigned the D365 DIM CORRECTION permission set.
5. Is there a limit to how many entries can be corrected at once?
There is no fixed limit, but Microsoft recommends caution beyond roughly 10,000 entries. Split large volumes into smaller batches and run them outside business hours.
6. Can a correction be reversed?
Yes. The Undo action reverts the most recent correction. If Undo is unavailable, Copy to Draft lets you create a new correction for the same entries.
7. What happens if a correction fails midway?
A warning appears on the correction card. Use Reset to return it to draft and run it again.
8. Will my analysis views and financial reports reflect the change?
Financial reports that read G/L entries reflect the change immediately. Analysis views update if you turn on Update Analysis Views on the correction, or when you update them manually.
9. Does it affect Cost Accounting?
Cost Accounting data is not updated automatically. You may need to delete and rerun cost registers or allocations.
10. Is there an audit trail?
Yes. Each correction is saved with its description, status and entries, and the History of Dimension Corrections action shows all corrections applied to a given G/L entry.
I hope you found this blog useful, and if you would like to discuss anything or explore a future implementation, you can reach out to us at:
About the Author