Quality Management Process in Dynamics 365 Supply Chain Management (SCM) – Part 1
Introduction
Hello Everyone! In this blog, I will explain the Quality Management Process in Dynamics 365 Supply Chain Management and cover all the necessary setups required for Quality Management.
Imagine a supply chain where every component, every process, and every product meets or exceeds customer expectations. Where defects and delays are minimized, and customer satisfaction soars. This is the power of quality management in Dynamics 365 Finance and Operations.
For this blog, I have taken the example of an Automobile company that purchases the Product Brake Pads from the Vendor. When car brake pads are received in a warehouse against a purchase order, they undergo specific quality checks, similar to other products.
Setup required for Quality Management Process in Dynamics 365 SCM
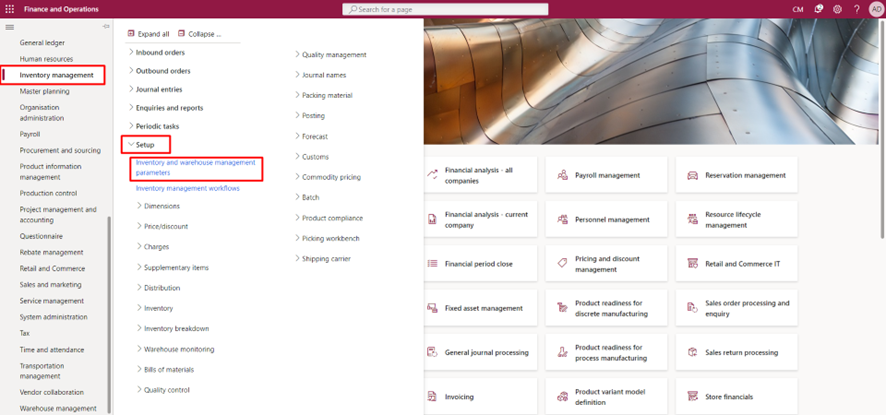
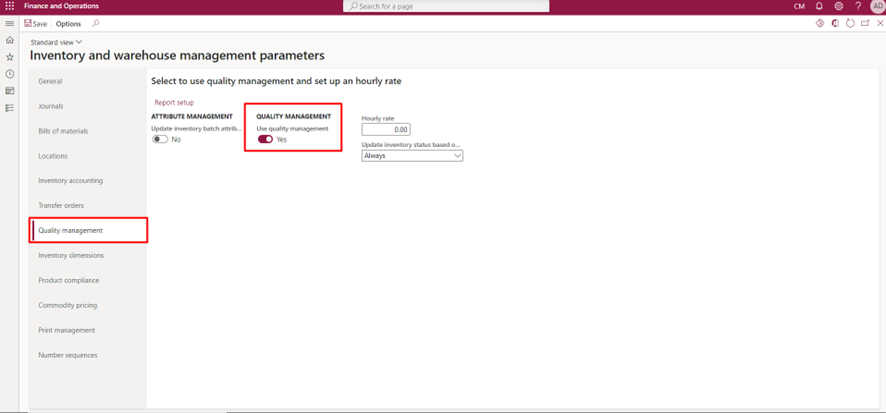
The first step is to enable the Quality Management parameter.
The pathway for that is:
Inventory Management>Set Up>Inventory and Warehouse Management Parameters.
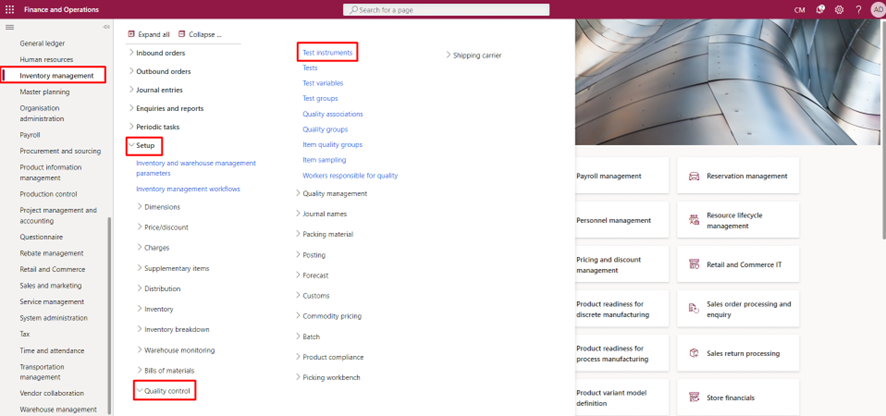
Step 1: Creation of Test Instruments:
Depending on the Product Type we must create different Test Instruments to conduct quality tests on the Product. So here I need to create these instruments for my Product Brake Pads.
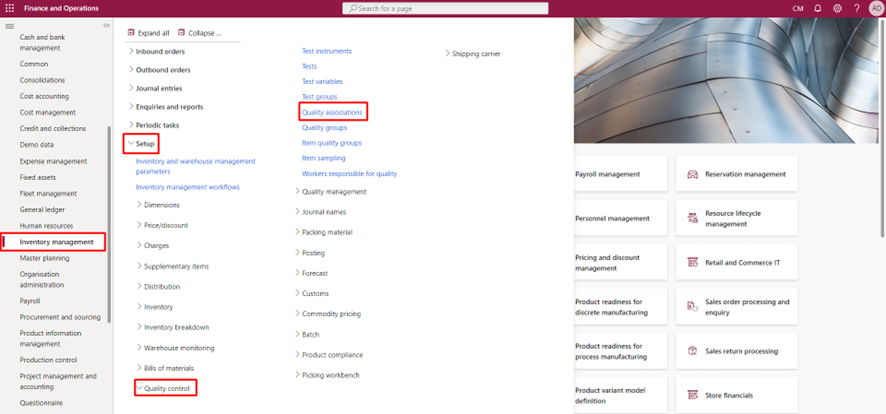
To create Test Instruments, Go to Inventory Management>Set Up>Quality Control>Test Instruments.
Now click on New from the top of the screen then enter the Name, Description, and Unit of the Instrument.
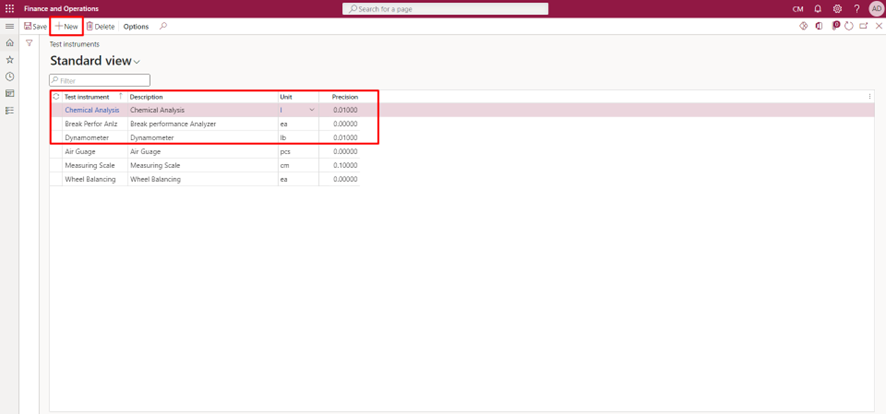
Here I have created three different Test Instruments for the product Brake Pads. The Precision here is linked to the Unit which can be edited in the unit setup.
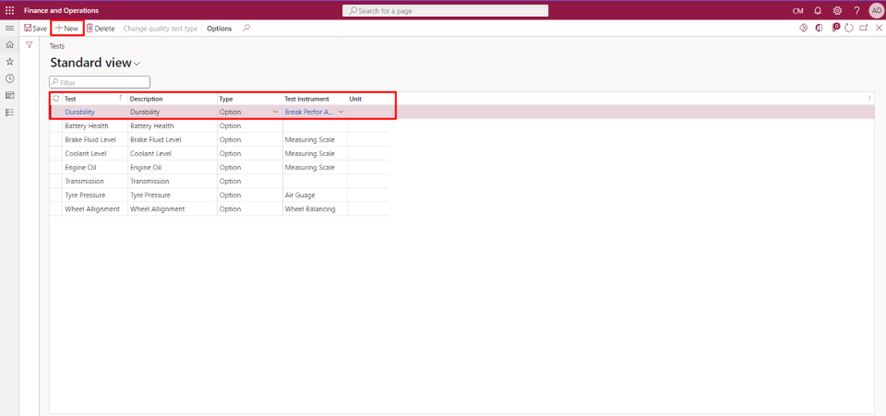
Step 2: Creation of Tests:
Now, the next step is to create the Tests in the system which I will use to check the Quality of the product Brake Pads. So as per my requirement Brake pads will be Tested for the following tests.
Note: There are two types of tests:
- Quantitative: Quantitative Tests are those tests wherein the Type field is set to Integer or Fraction. Here the Test Results and Quality Specifications are expressed in Numbers.
- Qualitative: Qualitative Tests are those tests wherein the Type field is set to Option. Additional information regarding the Test Variable being measured and its enumerated options is required for these tests. Here the Test Results and Quality Specifications are expressed according to an outcome.
To create Tests in the system, go to Inventory Management>Set up>Quality Control>Tests.
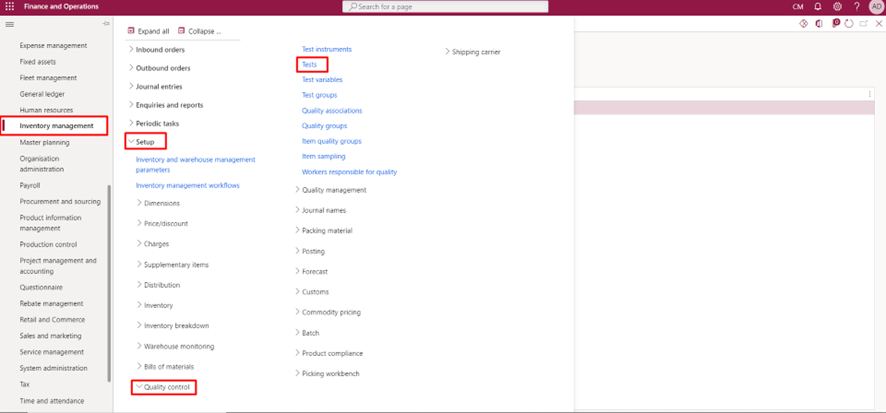
To create a Test click NEW from the top of the screen. Then enter the name and description of the Test. Then select the Type and Test Instrument. Follow these steps to create all the required Tests in the system.
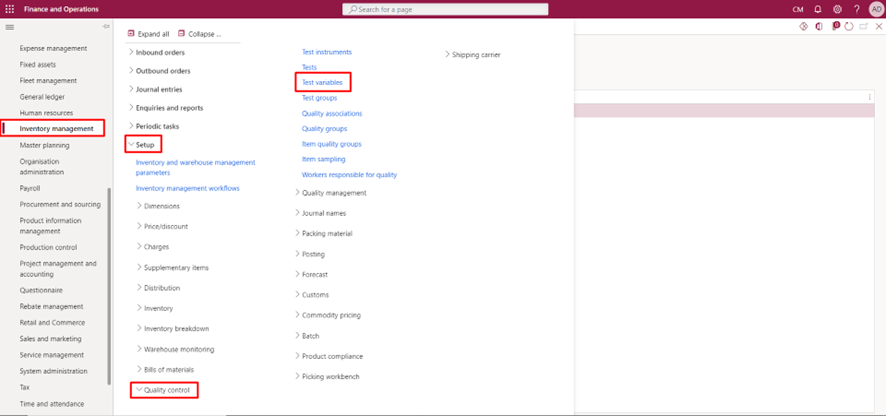
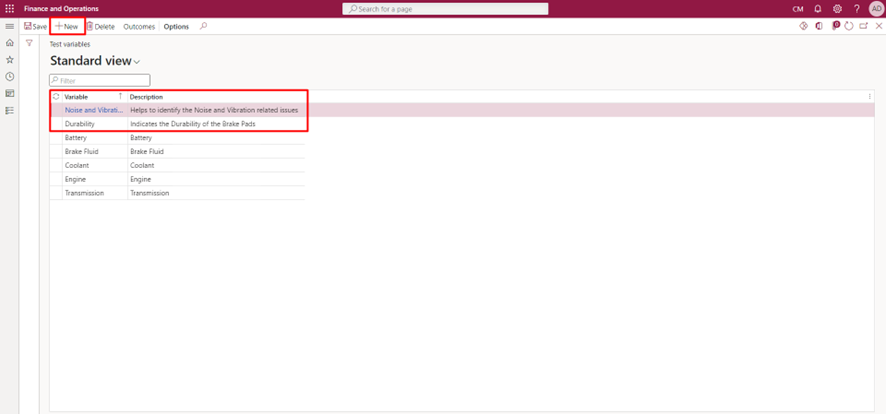
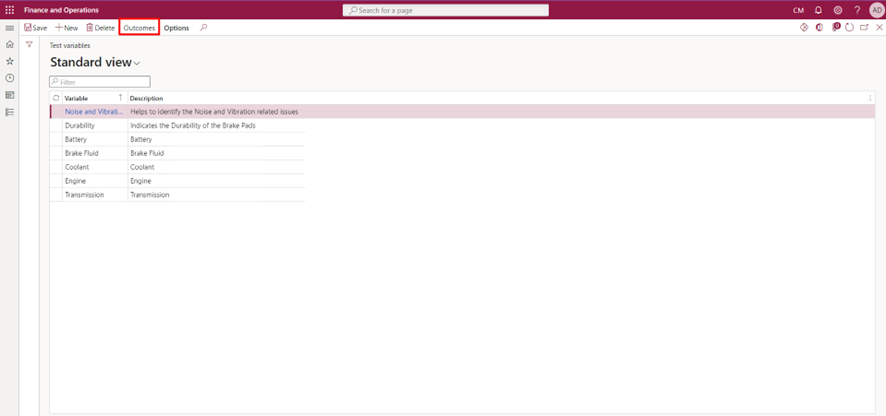
Step 3: Creation of Test Variables:
The Test Variables page allows you to configure, modify, and observe the potential results for a test variable linked to a qualitative test. When selecting an outcome as a test result, you assign a Pass or Fail status to each outcome to indicate whether the test has been passed or failed.
It is always better to define a minimum of two outcomes that is one with a Pass status and one with a Fail status for each variable. There are no restrictions on the maximum number of variables or outcomes that can be specified. Moreover, multiple tests can utilize the same test variables to record results.
To create Test Variables, go to Inventory Management>Set Up >Quality Control>Test Variables.
Step 1: Click on NEW from the Action Pane at the top of the screen, then enter the name and description of the Variable. To make it easy to understand here the Variables are created similar to the Test name.
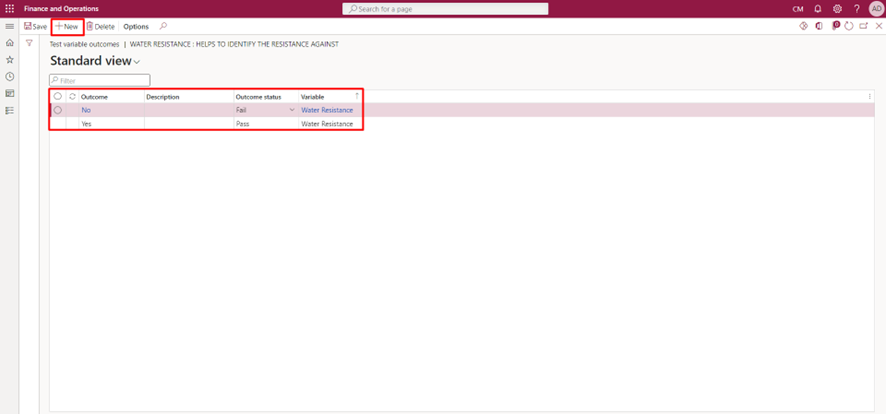
Step 2: The next step is to enter the Outcomes. For that select the Variable and then click on Outcomes from the Action Pane which is at the Top of the screen.
Step 3: In the Test Variable Outcomes page click on NEW from the top of the screen. Then enter the Name and Description of the Outcome. When the outcome is selected as a test result, choose either Pass or Fail to indicate whether the test has been passed or failed.
Repeat Steps 1, 2, and 3 to create multiple Test Variables and their Outcomes.
Item Sampling
According to the Business Requirement you must specify the sample size for testing which can be indicated as a percentage or a fixed quantity. In this scenario, the entire quantity received in the stock from the Purchase Order will be selected for testing. So in this case I will establish item sampling for the entire quantity, representing 100% of the items.
Full Blocking Parameter under Item Sampling
The Full Blocking parameter is enabled on the basis of business requirements. For example, if I create the item sampling as 10% and if I receive 100 qty so among them only 10% qty will be taken for testing. In such a case if I enable the full blocking parameter, even though I will be testing only 10% of 100 qty the system will automatically block the rest of the 90% of the quantity as this option is enabled. But if this parameter is disabled then only 10% of the qty will be blocked for quality inspection and the rest of the 90% qty can be used for consumption.
Per Updated Quantity Parameter under Item Sampling
Enabling this feature ensures that a Quality order will be generated specifically for the quantity received in a Purchase Order, whether it is a complete or partial quantity. For example, Item sampling is set to 100%, If the Purchase Order quantity is 100 and the Per Updated Quantity parameter is enabled and if I received a partial quantity that is 50, in such a case the Quality Order will be generated for 50 quantity and not for 100 quantity as the Per Updated Quantity parameter is enabled. But if this parameter is disabled and if I receive a partial quantity of 50 the Quality Order will be generated for the entire 100 quantity.
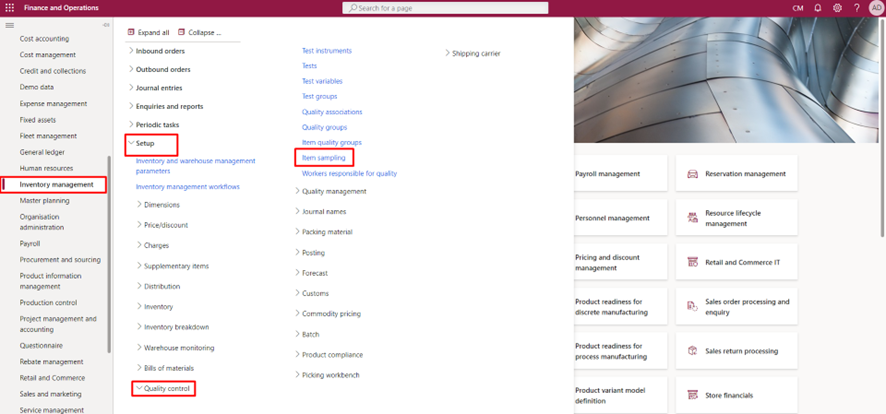
Now to Create Item sampling the pathway is Inventory Management>Set up>Quality Control>Item sampling.
In the Item Sampling page click NEW from the Top of the screen. Then enter the name and description of the sampling that you want to create.

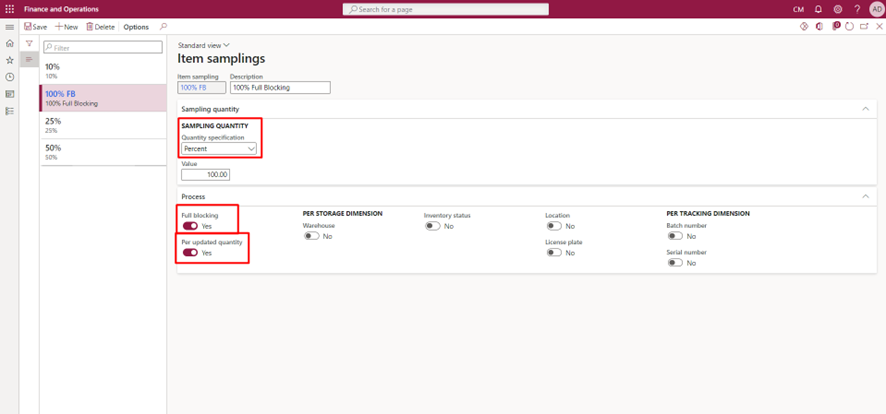
In the above screenshot, you can see that I have created an Item sampling of 100%. Under the name and description field, you can see the Sampling Quantity field in which I have selected the Quantity Specification as Percent. You can either select Percent or Fixed Quantity depending on the business requirement. Here I have defined the value as 100 since we are testing for 100% of items received. In this scenario, I have enabled the Full Blocking and Per Updated Quantity parameters.
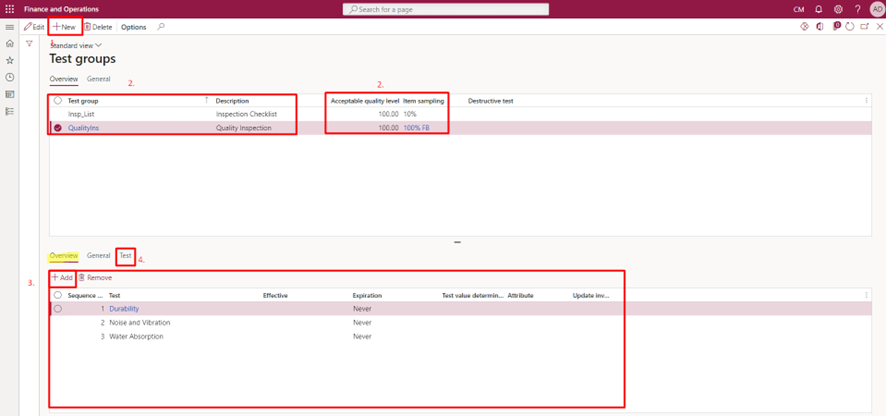
Test Groups
A Test Group page is used to Set up, Edit and view test groups and individual tests that are assigned to them. When assigning an individual test to a test group, you provide supplementary details such as the sequence, documents, and validity dates. In addition to that, multiple policies are assigned to the test group, including a sampling plan, an acceptable quality level (AQL), and the requirement for destructive testing. The Acceptable Quality Level is defined on the basis of business requirements. Here I have kept the Acceptable Quality Level to 100 but in some scenarios, it can be 90 to 95.
The pathway to create Test Groups is Inventory Management>Set up>Quality Control>Test Groups.

- Click NEW.
- Define the Name and Description of the Test Group. And mention the acceptable quantity and Item sampling.
- To specify the desired sequence of tests, click on “Add” and then select the tests in the order in which you want them to be conducted.
- Once you have added the tests in the desired sequence, navigate to the “Test” tab to define the test variable, default outcome, or value based on the type of quality test.
After clicking on Test select the Variable (here it is Durability), Default Outcome which I have selected here as No which can be changed after Testing and then select the Test Instrument.
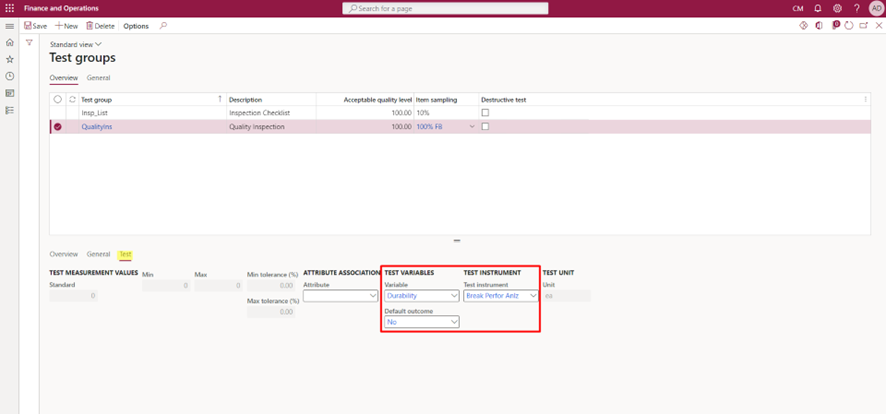
Since I have kept all the Test Types as option the Test Instrument Values are all greyed out for me which can be enabled if you select the Test type as Fraction or Integer.
Quality Groups
A quality group serves as a means to consolidate testing requirements for items. Using a quality group saves time compared to individually adding each item to a quality association. Alternatively, based on the business requirement, you can create a quality association for each individual item. Quality groups are created on the basis of requirements. For example, if I have different types of Brake Pads based on their size in such a case, I can create a Quality Group to make it easier for me instead of manually searching and adding products.
To create a Quality Group, go to Inventory Management>Setup>Quality Control>Quality Groups.

- On the Quality Groups Page click NEW from the Top of the Screen.
- Enter the Name and Description of the Quality Group.
- On the Action pane there is ADD ITEMS option click on that to add the items to the Quality Group.
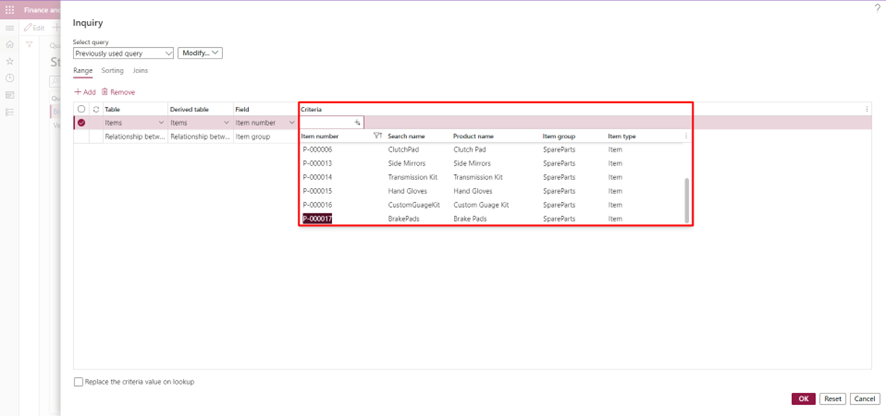
In the Criteria option select the Item that you want to add to the Group and then click on OK.
Quality Association
The Quality Association is the Key set-up in the Quality Management process. The Quality Association defines the set of Tests, Acceptable Quality Levels (AQL), and Item Sampling that apply to the Quality Orders that are generated. Depending on the business requirement the conditions can be specific to a site or Legal Entity.
To create Quality Associations, go to Inventory Management>Set up>Quality Control>Quality Association.
- Click NEW on the Quality Associations page.
- In the reference type field, I have selected Purchase and in the Item group field, I have selected Group which can be different on the basis of business requirement.
- In the Account Code, you can specify a particular Vendor for which the Quality Order should be generated but here I have kept it All which means the Quality Order will be generated for all the Vendors.
- Determine the Event type and Execution field values. In this example, I have specified that the Quality Order will be generated after product receipt generation.
- In the event blocking field, I have selected Invoice which means that till the time Quality Inspection is not performed the system will not allow me to Invoice the Purchase Order.
- Select the Test Group in which you have mentioned all the details that is Item sampling, and Acceptable Quality Level (AQL).
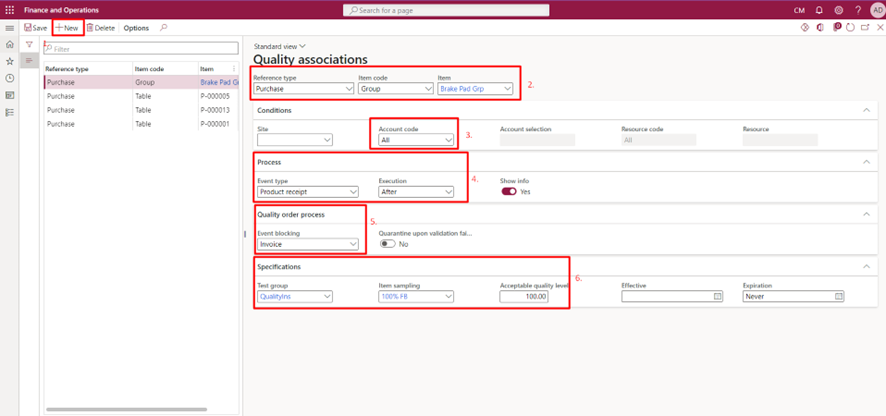
In the above screenshot, you can see the Quarantine Upon Validation Failure parameter which can be enabled based on business requirements. If I enable this parameter, for the products that have failed the Quality Order process the system will automatically create a Quarantine Order and transfer the products to the Quarantine Warehouse.
That’s it for this blog. I will explain the Execution process in part 2 of the blog.
Thank you!!!!
