
Dynamics 365 Project Operations and Business Central Integration: Automate Data Sync Without Manual Work
Please find this CloudFronts Product at – CloudFronts PO-BC Integration Module | Microsoft Marketplace
Watch the webinar – CloudFronts PO-BC Integration Webinar | YouTube
Summary
Dynamics 365 Project Operations (PO) holds customers, projects and time. Business Central (BC) holds invoices and payments. When the two are not connected, people copy data by hand, which is slow and causes mistakes.
The CloudFronts PO-BC Integration Module is a Dynamics 365 Project Operations and Business Central integration. You set up the link once, and every change in PO shows up in BC automatically. The result is no double typing, fewer mistakes and faster billing. This blog shows how it works, step by step.
Table of Contents
- 1Introduction
- 2Business Challenge
- 3Why an Integration Hub?
- 4Implementation Procedure
- 5End-to-End Working
- 6Why This Approach Works
- 7Real-World Use Cases
- 8Frequently Asked Questions
- 9Conclusion
Introduction: Why Connect Dynamics 365 Project Operations with Business Central
Many project-based businesses use two systems. Project Operations (PO) is where the sales and project teams keep customers, projects and time. Business Central (BC) is where the finance team keeps invoices, payments and money records.
Both systems need the same details. A customer made in PO must also exist in BC. A project made in PO must also be there when it is time to send an invoice. Without a link, someone has to copy all of this by hand.
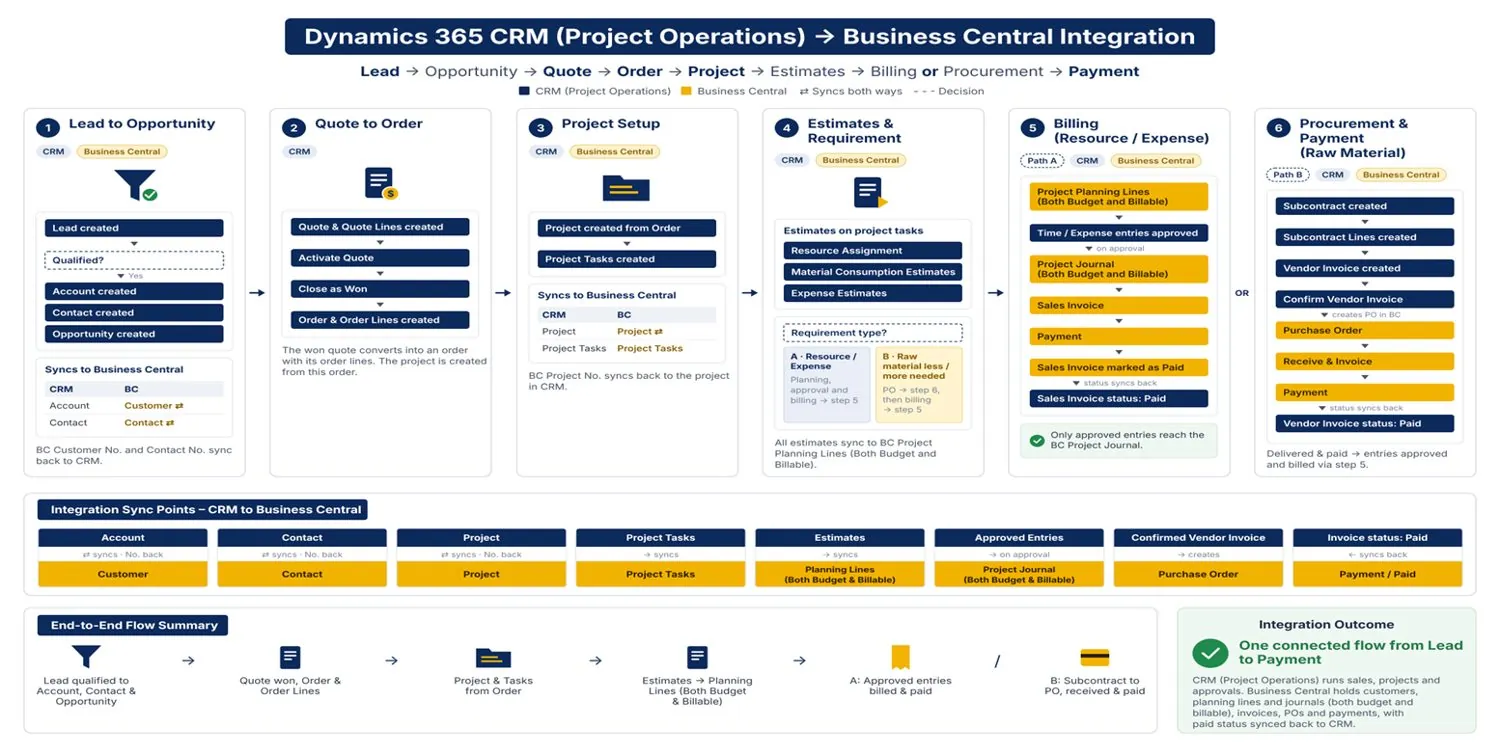
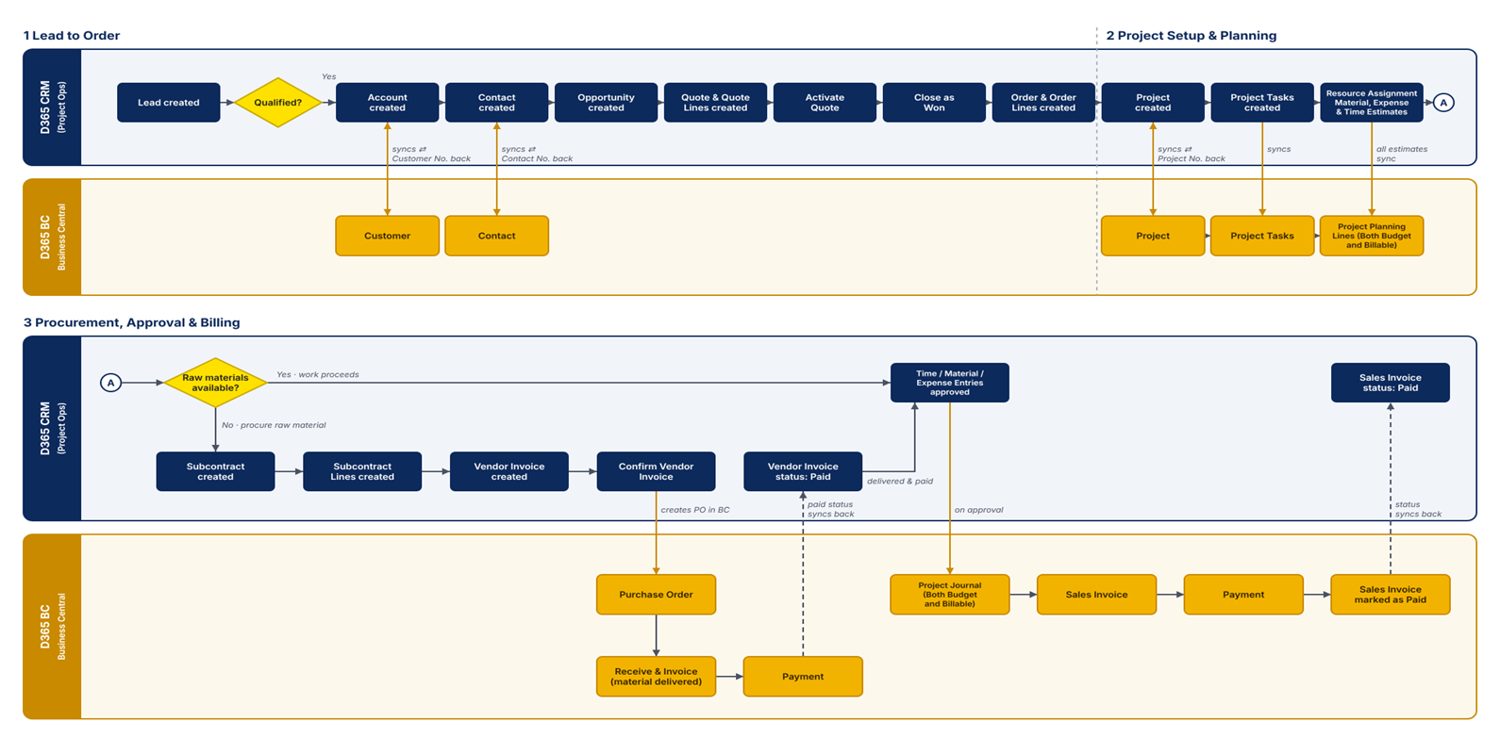
Here is the full picture of how work moves from a lead to a payment. The top row is PO and the bottom row is BC. The arrows show where the two systems share data.
The Solution: We built an Integration Hub. It is a simple web app where you connect PO and BC, set the rules once, and let the data move on its own.
Business Challenge: Manual Data Entry Between PO and BC
Think about a normal project business. The sales team makes a customer in PO. The project team makes a project and adds tasks. The finance team then needs the same customer and project in BC to send invoices.
These details need to be shared between the two systems:
- Customers and contacts
- Projects and tasks
- Planned work and costs
- Approved time and expenses
- Vendor invoices and purchase orders
- Paid status of invoices
When people copy these by hand, many problems come up:
- Extra effort: The same details are typed in two systems.
- Mistakes: A wrong phone number or address is easy to type.
- Details that do not match: The two systems slowly stop agreeing with each other.
- Late invoices: If data reaches finance late, money comes in late.
- Hard to grow: More customers and projects mean more copying and checking.
The Objective: When something changes in PO, BC should get the change by itself. No one should have to copy anything by hand.
Why Use an Integration Hub for PO and BC Integration?
The Integration Hub is one place where you create and manage every link between PO and BC. You fill a form, choose what to send, and set simple rules. You do not need to write a lot of code.
With the Integration Hub, you can:
- Set up each link once
- Choose what data moves, from where, and to where
- Write simple rules for which detail goes where
- Test the result before it goes live
- See all links in one list, with their status and last runs
- Add new links as your business grows
In simple words: Think of the Integration Hub as a control room. From here you decide what data moves, from where, and to where.
Implementation Procedure: How to Integrate Project Operations with Business Central
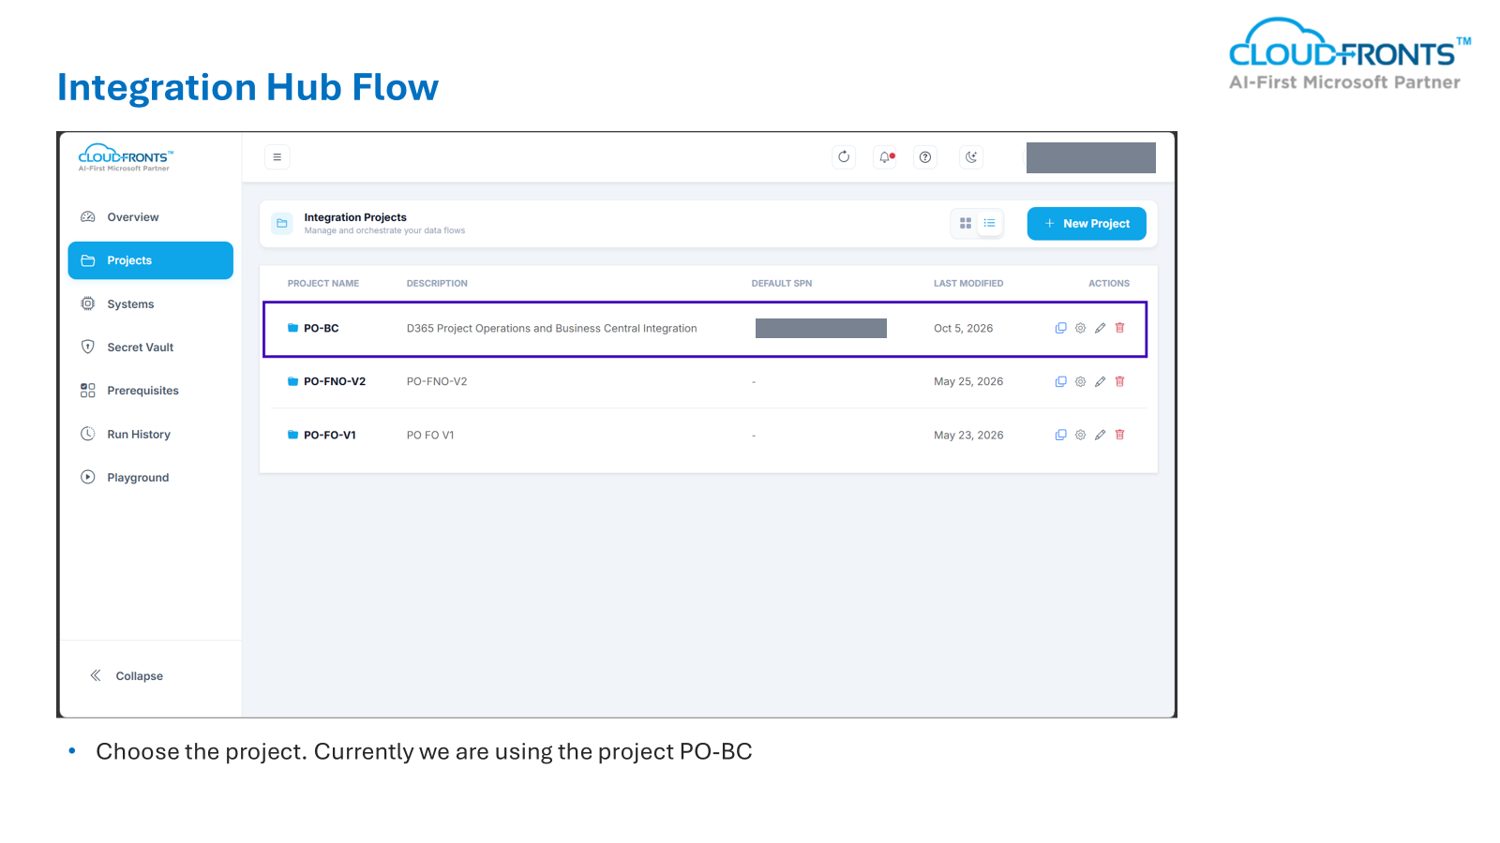
Step 1 – Choose the Project
On the first screen you pick a project. A project here is a group of links. We use the project named PO-BC, which is for Project Operations and Business Central.
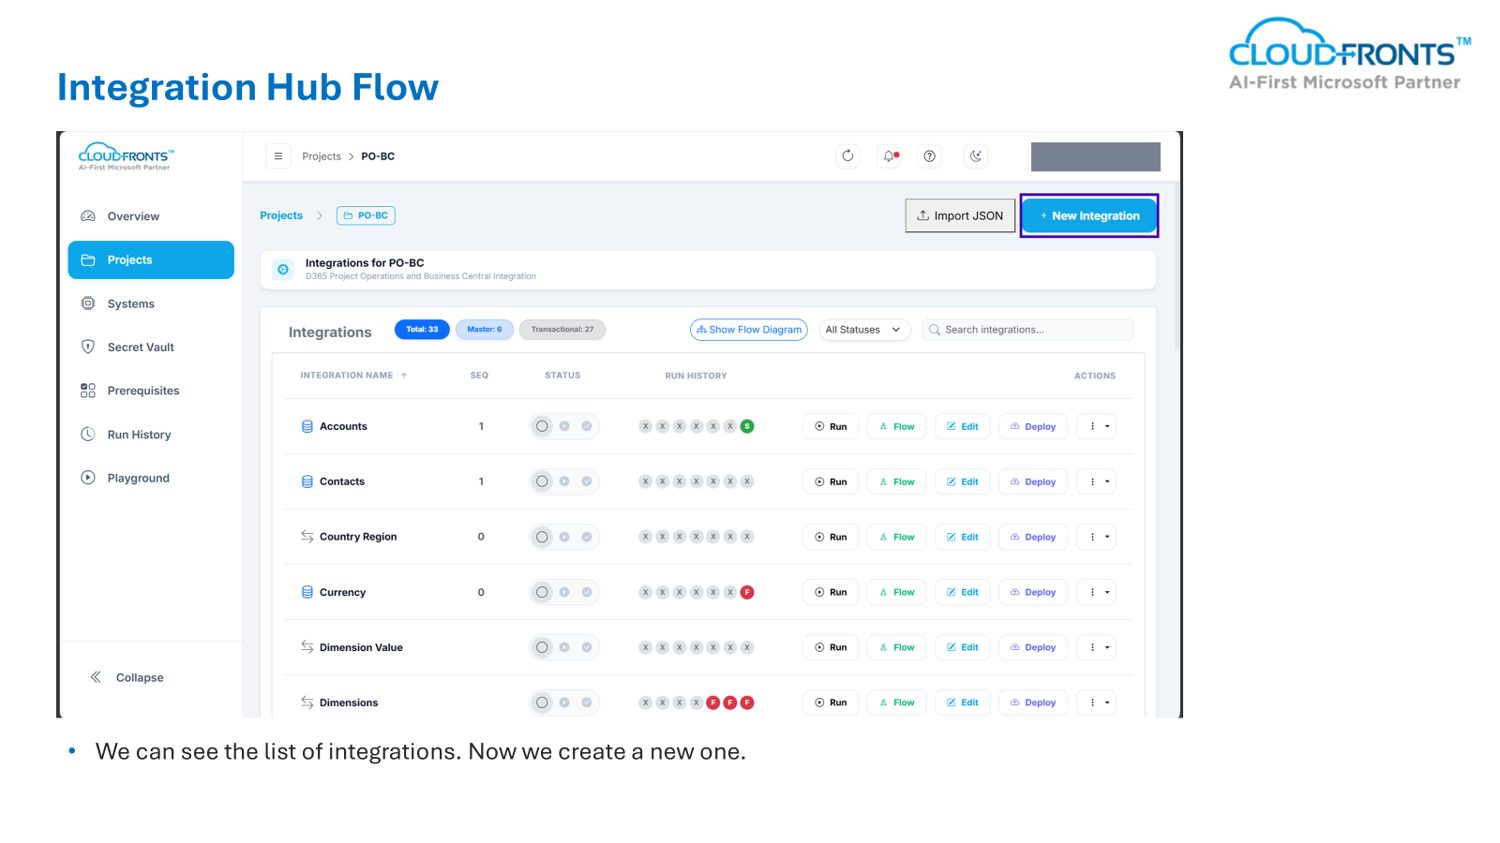
Step 2 – See the List of Integrations
Inside PO-BC you can see all the links. Each row shows its order number, its status, and its last few runs. You can run, edit or deploy each one from here. To add a new one, click New Integration.
Step 3 – Fill the New Integration Form
A form opens on the right side. Here you tell the platform:
- Integration Name: A name for this link. For example, Accounts.
- Integration Type: Master means basic details that rarely change, like customers. Transactional means things that happen often, like invoices.
- Source System and Source Entity: Where the data starts, and what kind of record it is. Here the system is PO, and the record type is accounts.
- Target System and Target Entity: Where the data goes, and what kind of record it becomes. Here the system is BC, and the record type is customer.
- Sequence No.: The order in which links run. Customers must exist first, so this is 1.
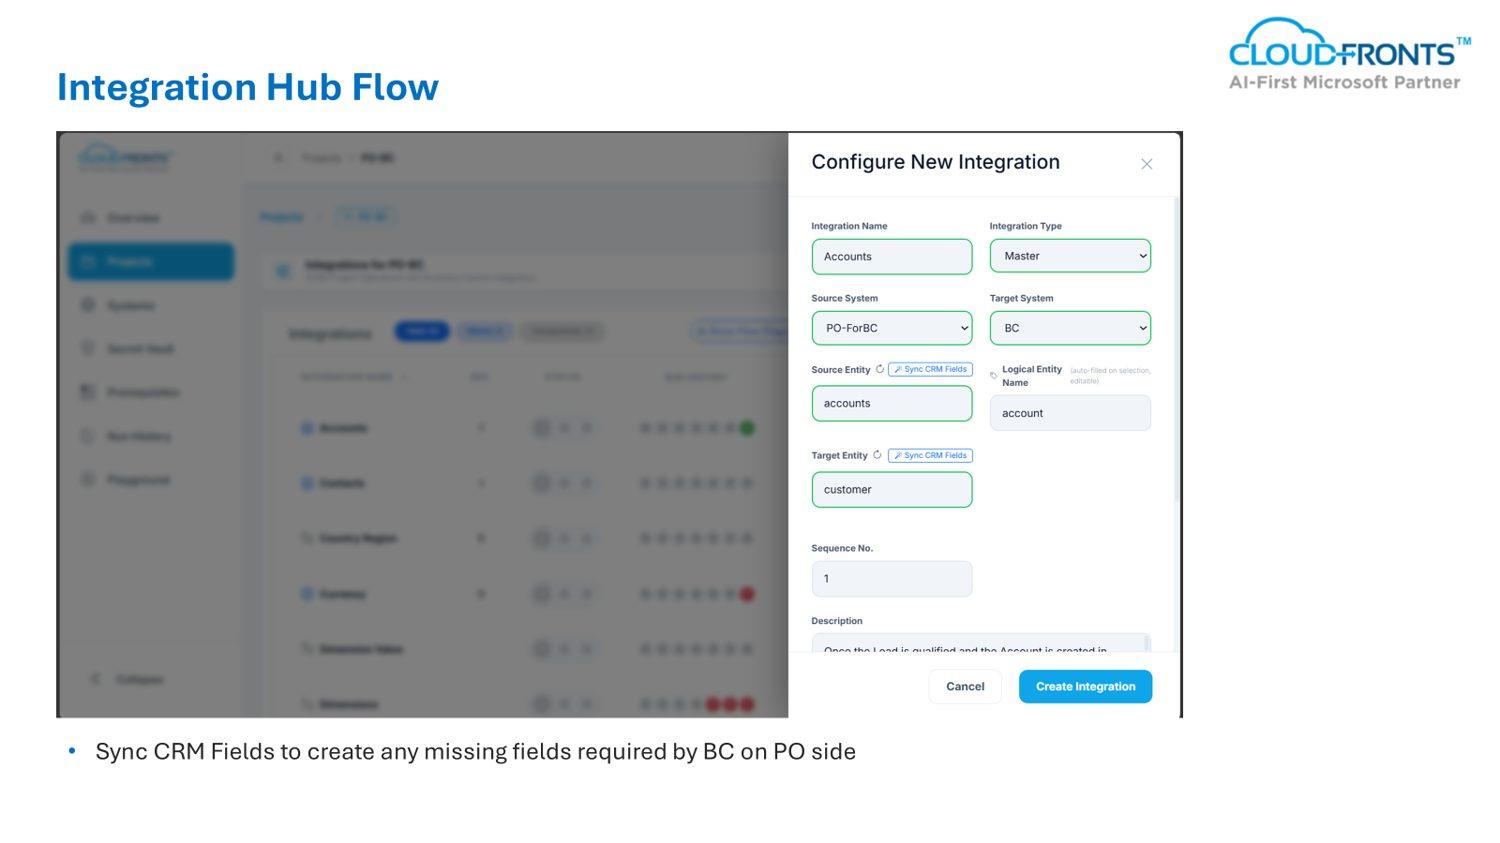
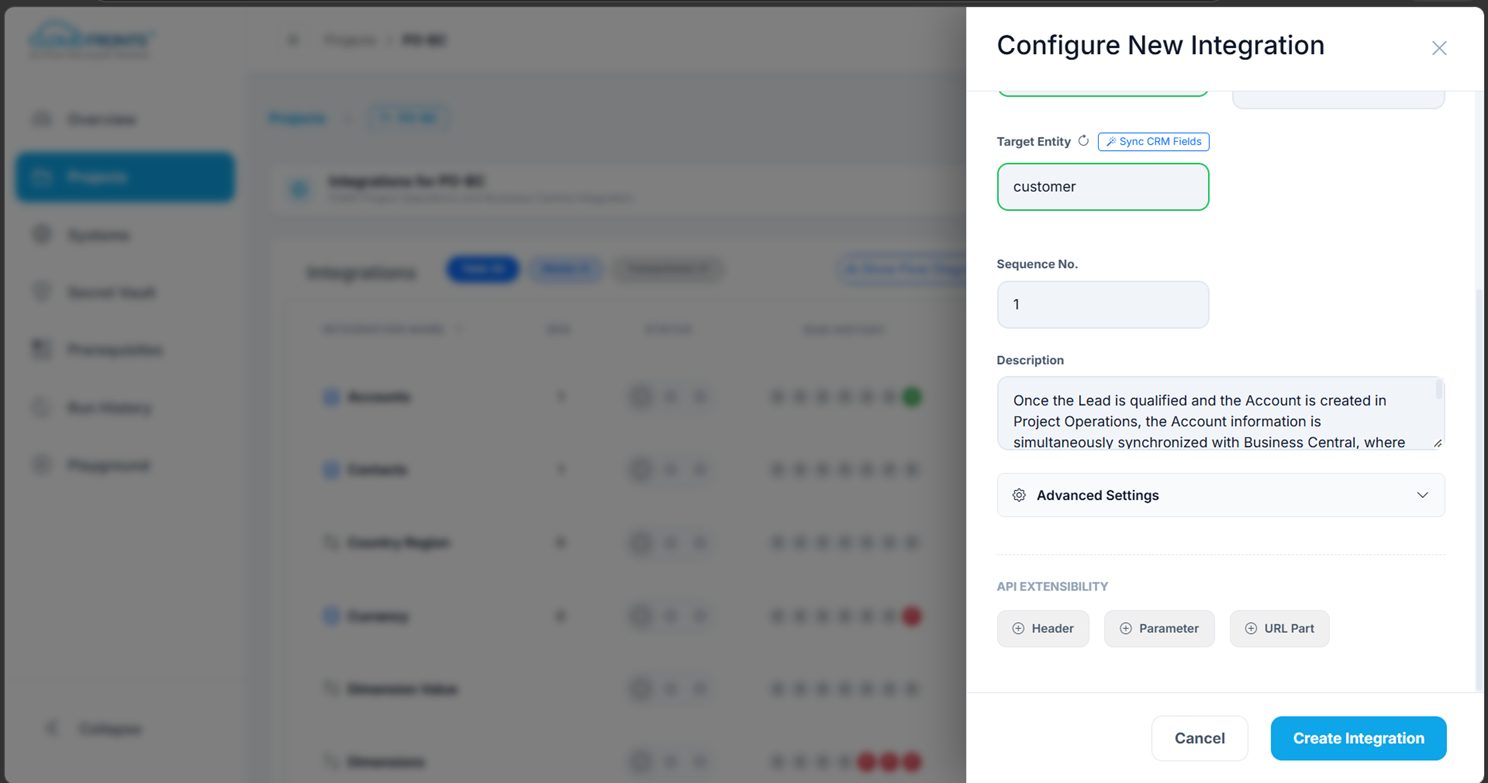
Tip: There is a handy button called Sync CRM Fields. Sometimes BC needs a detail that PO does not have yet. This button creates the missing field in PO for you.
Scroll down and add a short description. This helps everyone understand later what the link does. Then click Create Integration.
Step 4 – Open the Flow
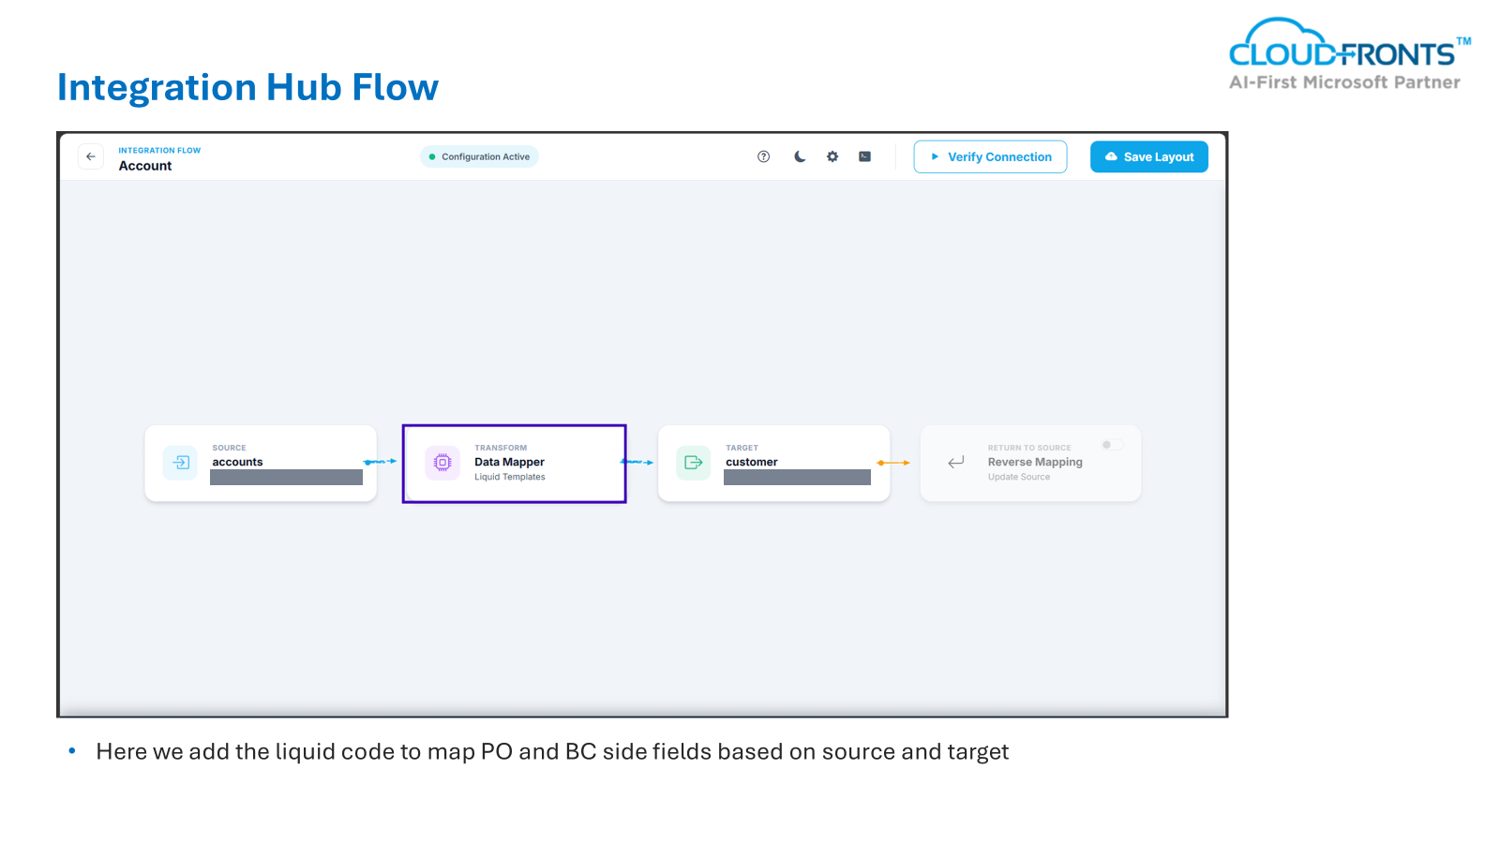
After you create the link, you can open its flow. It is a simple picture with boxes from left to right:
- Source: the PO data (accounts)
- Data Mapper: the rules that change the data into the shape BC needs
- Target: the BC data (customer)
- Return to Source: an optional step to send data back to PO
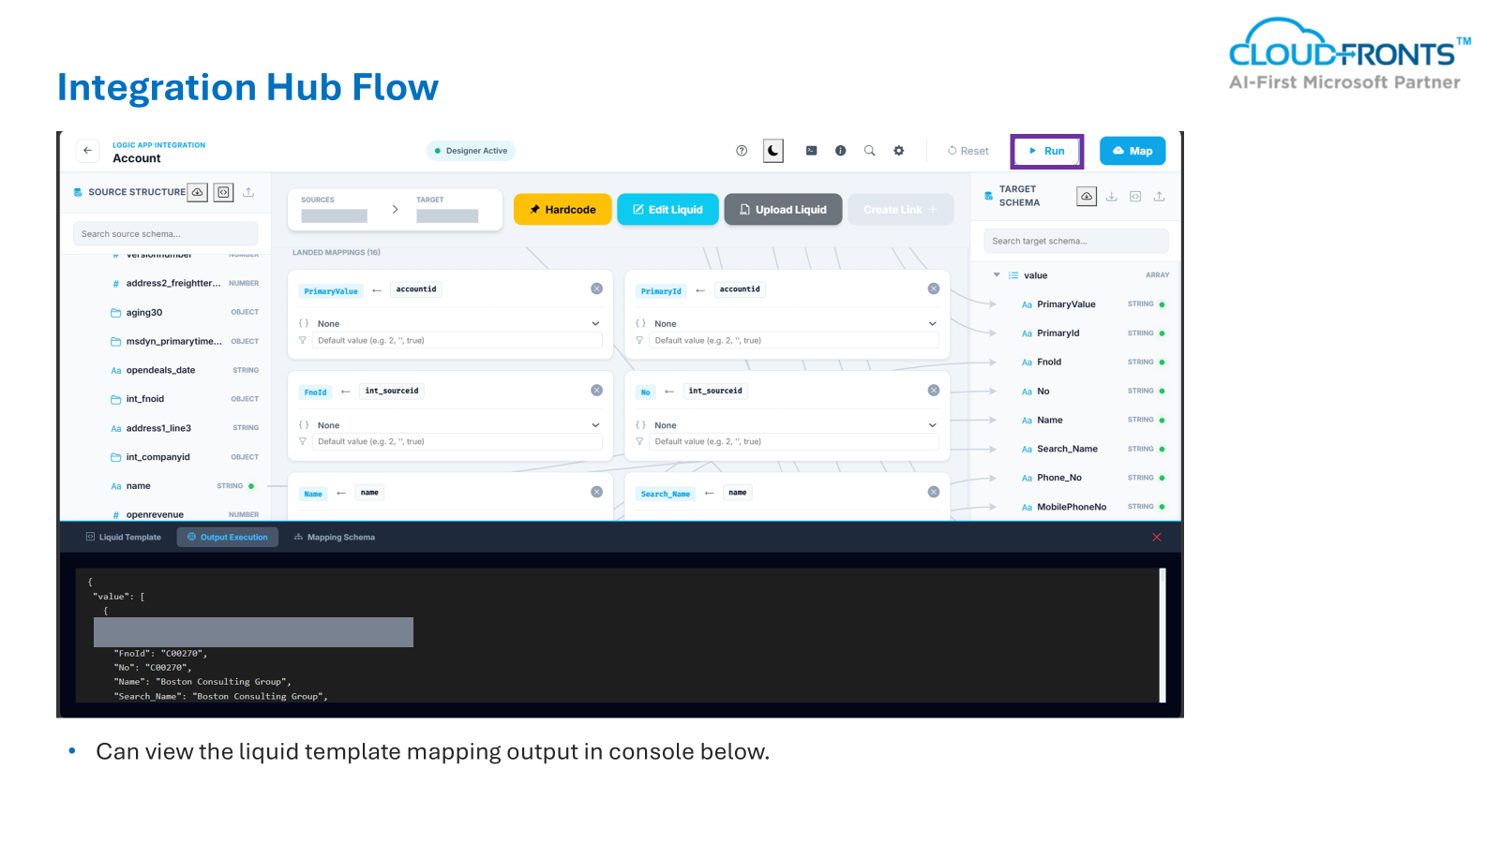
Step 5 – Write the Mapping Rules
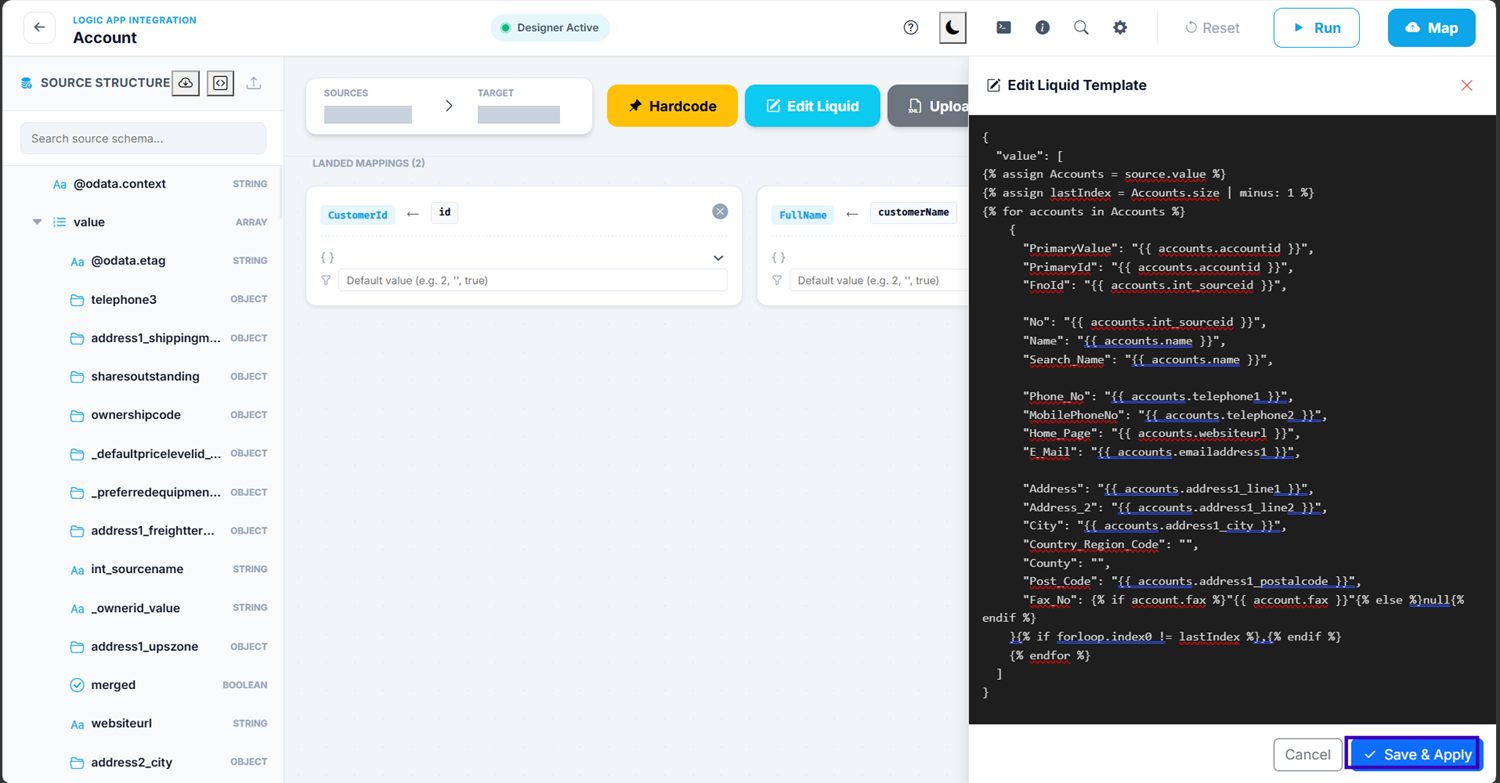
PO and BC use different names for the same thing. For example, PO calls the company name name, and BC calls it Name. PO has telephone1, and BC has Phone_No. A list that says which detail goes where is called a mapping.
In simple words: Imagine two people who use different words for the same thing. A translator sits between them. The Liquid template is that translator. It makes sure every detail lands in the right place.
A Liquid template is a small piece of text where you write these rules. Click Edit Liquid, write the rules, and click Save & Apply.
Step 6 – Test Before You Go Live
Click Run to see the result. The console at the bottom shows exactly what will be sent to BC. You can check the values, like the name and customer number, before anything goes live.
In simple words: This is like a trial run. You see what will be sent, and you can fix any mistake before it reaches BC.
End-to-End Working: How Project Operations Syncs Data to Business Central
Once a link is set up, it works on its own. Here is the full process:
- A person creates or changes a record in PO, like an account.
- PO keeps its data in a place called Dataverse. Dataverse notices the change.
- Dataverse wakes up a Logic App. A Logic App is an automatic helper that does the copying work for us.
- The Logic App reads the new data and uses the mapping rules to put each detail in the right place.
- The Logic App sends the data to Business Central.
- BC creates or updates the record, like a customer card with its own customer number.
Integration Points: The same steps work for other records too, like contacts, projects, tasks and approved time. You only need to create a new integration for each one.
Example: An Account in PO Becomes a Customer in BC
Let us see how this looks for a real record. We use a test account called Boston Consulting Group.
33
Integrations in the PO-BC project
6
Master (basic details like customers)
27
Transactional (daily activity)
In Project Operations. Accounts are created in PO under the Sales area, in the Customers section.
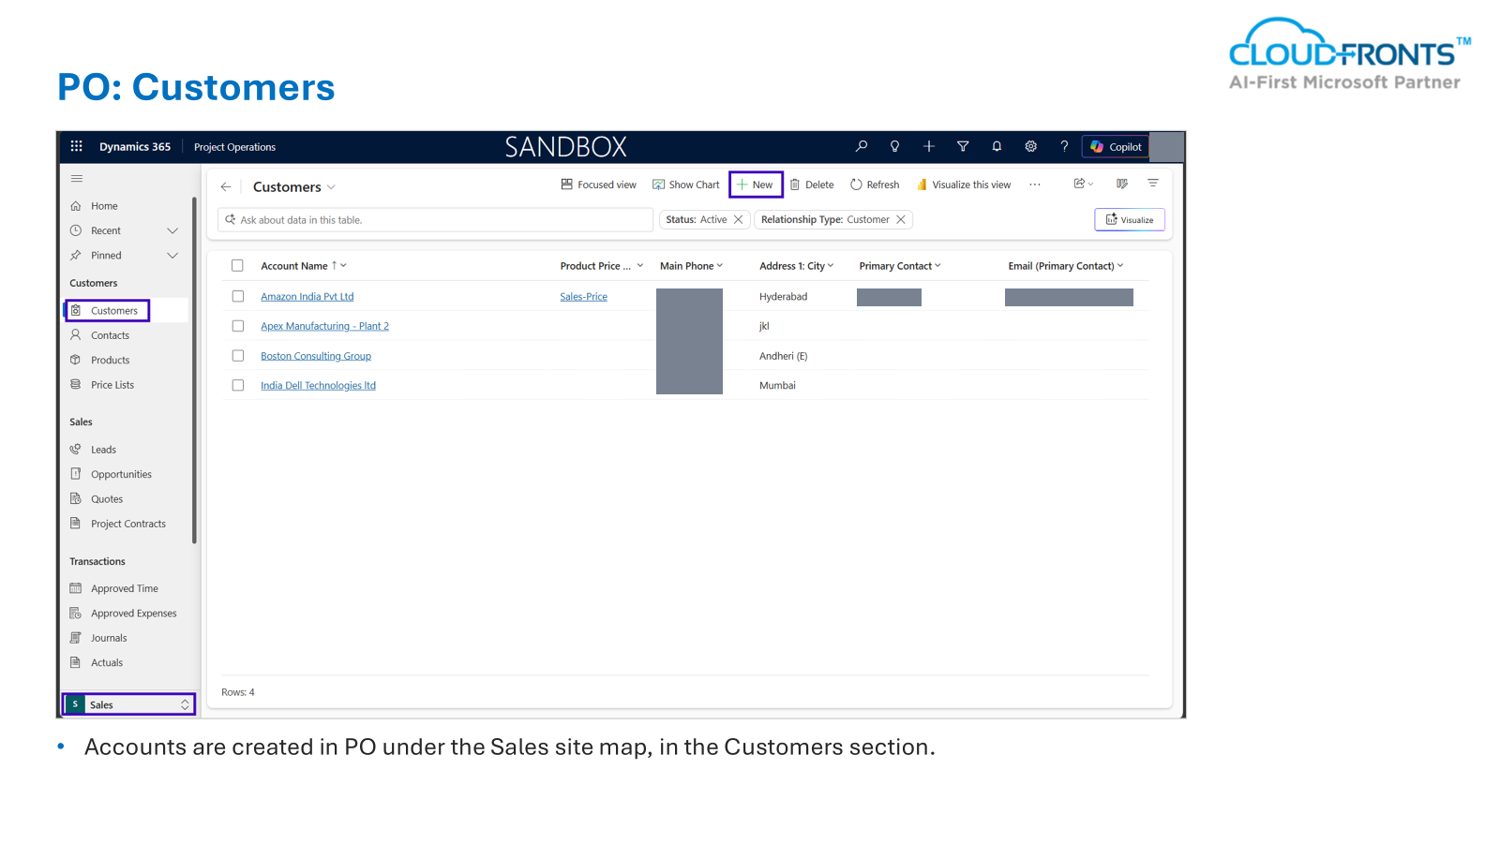
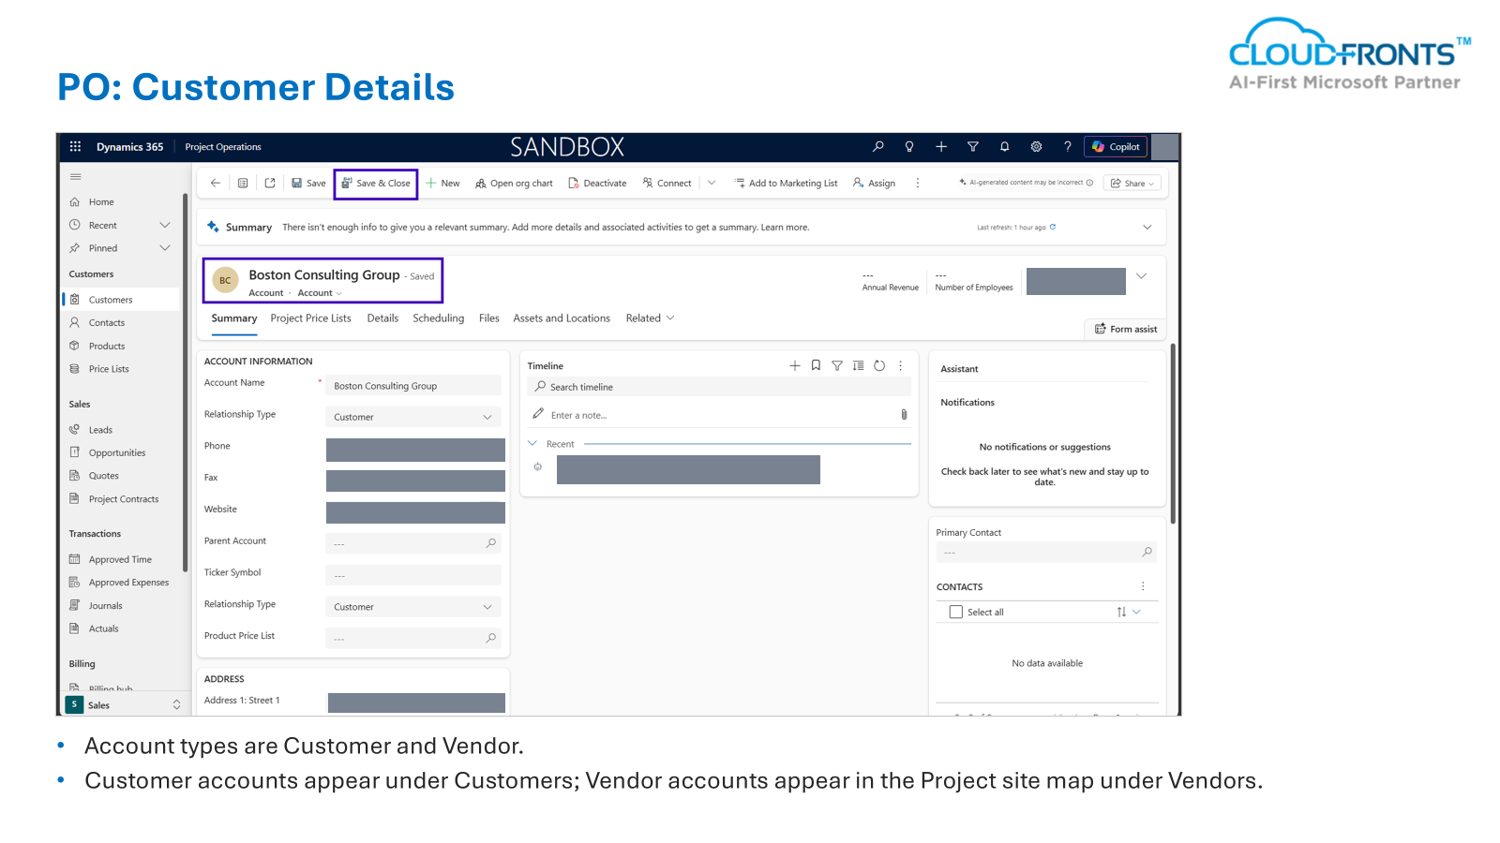
An account can be a Customer or a Vendor. Customer accounts show under Customers. Vendor accounts show in the Project area under Vendors. Here is the Boston Consulting Group account with its phone, website and address.
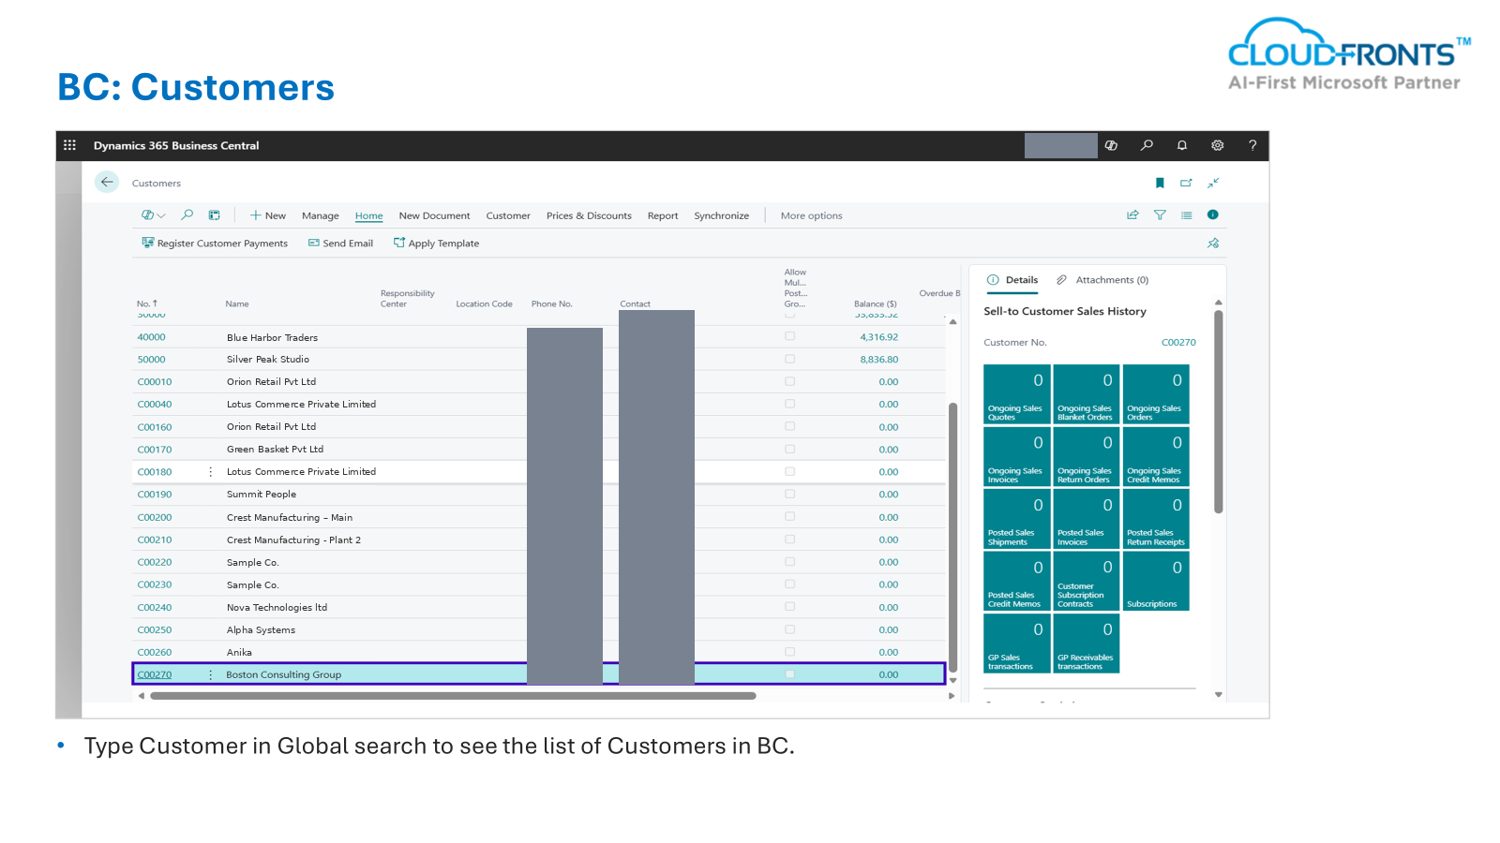
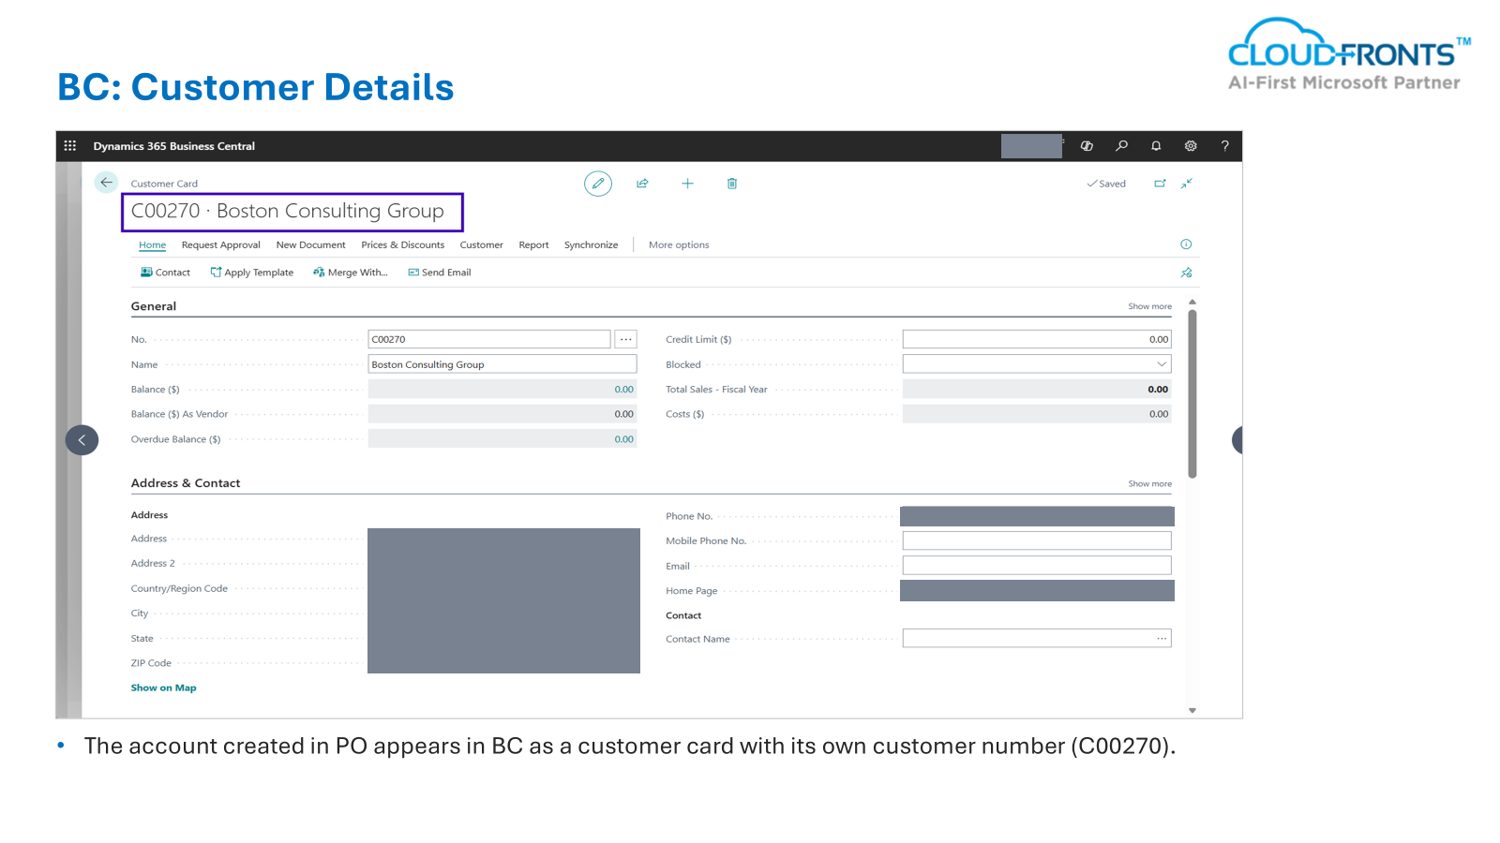
In Business Central. Now we open BC and search for Customers. The same company is in the list, with its own customer number, C00270.
When we open the customer card, we see the same name, phone number, address and website that we entered in PO. Nobody typed them again.
Why This Approach Works for Dynamics 365 Integration
- No Double Typing Data is entered once in PO. It does not need to be typed again in BC.
- Fewer Mistakes Data is copied by rules, not by hand, so there are fewer typing errors.
- Same Details Everywhere PO and BC show the same details, so everyone trusts the numbers.
- Faster Billing Approved work reaches BC quickly, so invoices can go out sooner.
- Easy to Test You can see the result with the Run button before anything goes live.
- Easy to Grow To add a new link, create a new integration. The work does not multiply.
Real-World Use Cases for Project Operations and Business Central Sync
Customers are only the start. Here is the detailed flow. PO is on top, BC is below, and the arrows show the data being shared. Each arrow can be one integration in the Integration Hub.
Use Case 1: Customers and Contacts
A new account and contact in PO become a customer and contact in BC, with no retyping.
Use Case 2: Projects and Tasks
A project and its tasks in PO are created in BC, so finance can see them straight away.
Use Case 3: Planned Work and Costs
Estimates in PO go to BC as planning lines, so both teams plan from the same numbers.
Use Case 4: Approved Time and Expenses
Once approved in PO, they reach BC so an invoice can be made without delay.
Use Case 5: Buying Raw Material
When material is needed, a vendor invoice in PO creates a purchase order in BC.
Use Case 6: Paid Status Back to PO
When an invoice is paid in BC, the paid status goes back to PO. The project team sees it too.
Frequently Asked Questions
1
What is a Dynamics 365 Project Operations and Business Central integration?
It is a link between the two systems. When data is created or changed in Project Operations, such as a customer, project or approved time, it is sent to Business Central automatically. No one has to copy it by hand.
2
Do I need to write a lot of code to integrate Project Operations with Business Central?
No. In the Integration Hub you fill a form, choose the source and the target, and write simple mapping rules. The platform and Azure Logic Apps do the rest.
3
How does a change in Project Operations reach Business Central?
Project Operations keeps its data in Dataverse. When a record changes, Dataverse triggers a Logic App. The Logic App maps the data using your rules and sends it to Business Central.
4
Can I test the integration before it goes live?
Yes. Click the Run button to see exactly what will be sent to Business Central, and fix any mistake before it goes live.
5
What happens if Business Central needs a field that Project Operations does not have?
Use the Sync CRM Fields button. It creates the missing field in Project Operations for you.
Conclusion
A Dynamics 365 Project Operations and Business Central integration saves time and removes manual work. When PO and BC are not connected, teams spend their time copying data, fixing mistakes and waiting for invoices. The Integration Hub turns this into a simple process: choose the source and the target, write the mapping rules once, and test them. After that, every change in PO reaches BC by itself.
We have built and tested this in our own sandbox, and we plan to keep adding more integrations.
Key Takeaway: Enter your data once, and let it flow to where it is needed. Your teams will save time, make fewer mistakes and bill faster.
Watch the Webinar
Want to see more? Watch our webinar to learn how the CloudFronts PO-BC Integration works.
Ready to Connect Your Systems?
If your project and finance teams still copy data by hand, we can help. Reach out to the CloudFronts team at transform@cloudfronts.com.
Connect with Us →About the Author

Aryan Shukla
CRM & Data Engineer · CloudFronts
I’m Aryan Shukla, a CRM & Data Engineer at CloudFronts. I have experience in CRM and in building practical solutions with data, cloud, and AI.
Specialization: Data Engineering, Dynamics 365 CRM, Power BI, Azure, Databricks.
Related posts:

How a Multi-Country Infrastructure Group Evaluated One vs Two Production Environments in Dynamics 36...
How an Australian Linen Company Made Quote Approvals Secure with One Time Links in Dynamics 365
Recovering Lost Approval History After a Purchase Order Deletion in Business Central