Developing Integration Solutions using Microsoft Azure BizTalk Services
Part 1 – Creating Microsoft Azure BizTalk Services and Deploying Bridge.
Scope:
- Creating Microsoft Azure BizTalk Services on Azure Portal
- Developing and Deploying BizTalk Bridge on Azure.
Pre-requisite:
- Azure Subscription to create BizTalk Service.
- Visual Studio for Developing BizTalk Bridge solution.
- Windows Azure BizTalk Services SDK (including Microsoft BizTalk Adapter Pack and Microsoft WCF LOB Adapter SDK)
- .NET Framework 3.5.1 Features should be enabled
- .NET Framework 4.5 must be installed
Background:
Microsoft Azure is a cloud computing platform and infrastructure, created by Microsoft, for building, deploying and managing applications and services through a global network of Microsoft-managed and Microsoft partner hosted datacenters. The cloud services as offered as PaaS (Platform as a Service) and IaaS (Infrastructure as a Service).
Step 1: Creating BizTalk Service
Launch windows Azure portal through URL
https://manage.windowsazure.com (You can create a Trial Subscription)
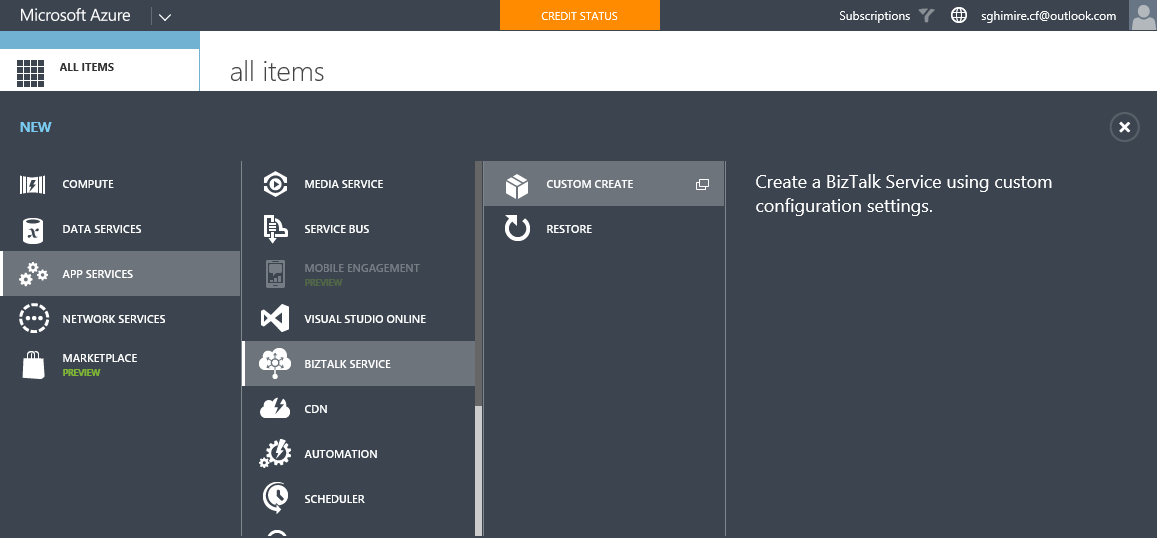
Go to NEW option at the bottom of the page. Select APP SERVICES → BIZTALK SERVICE → CUSTOM CREATE
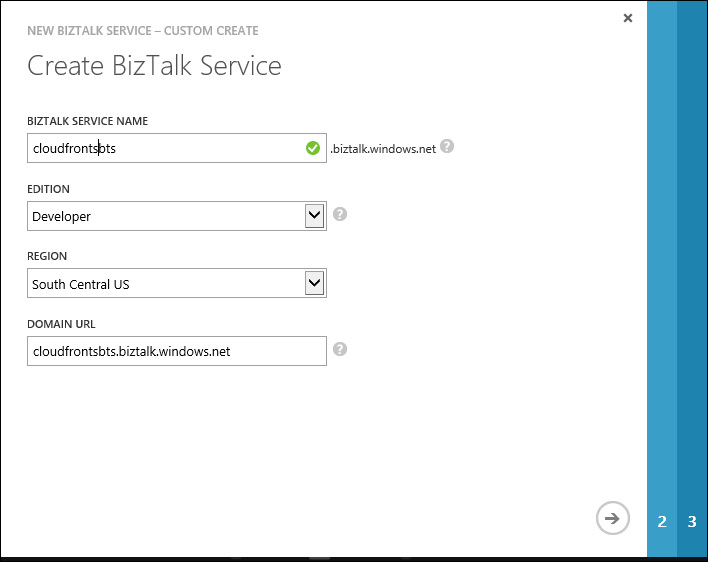
This BizTalk Service Creation web form allows the creation of storage Account Tracking Databases.
After successfully creating the BizTalk Service you get the BizTalk URL. )
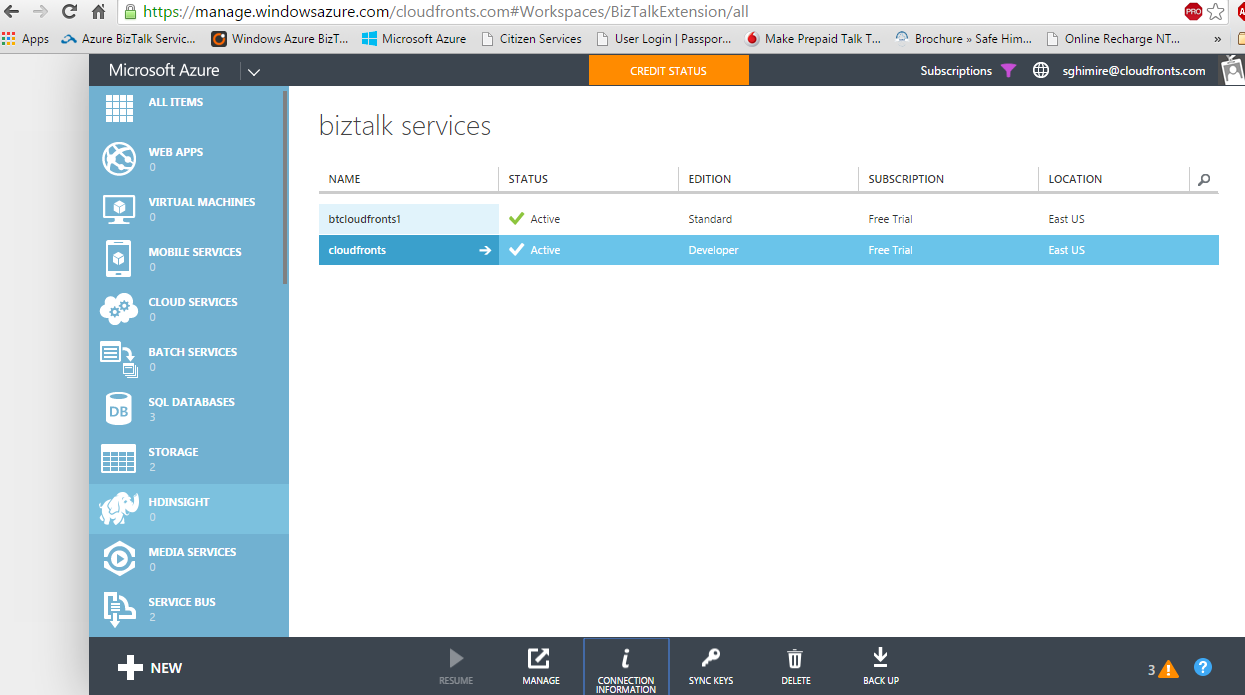
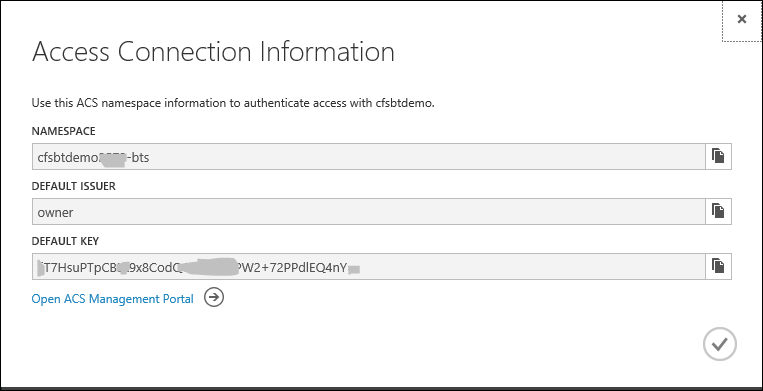
On Clicking the Connection Information Button at the bottom of the page, you get Access Connection Information. This information you need to copy to a notepad to be used during deployment of the BizTalk Bridge solution on Azure.
NAMESPACE
DEFAULT OWNER
DEFAULT KEY
Step 2: Developing the BizTalk Bridge Solution
Launch Visual Studio 2012 and open a new project. Select BizTalk Service Template under folder located BizTalk Services in Visual C#.
Please note BizTalk Services Templates are visible in Visual Studio 2012 only after you install the Windows Azure BizTalk Services SDK. (BizTalk Service Templates are not available in Visual Studio 2013 and 2015 even after installing the SDK)
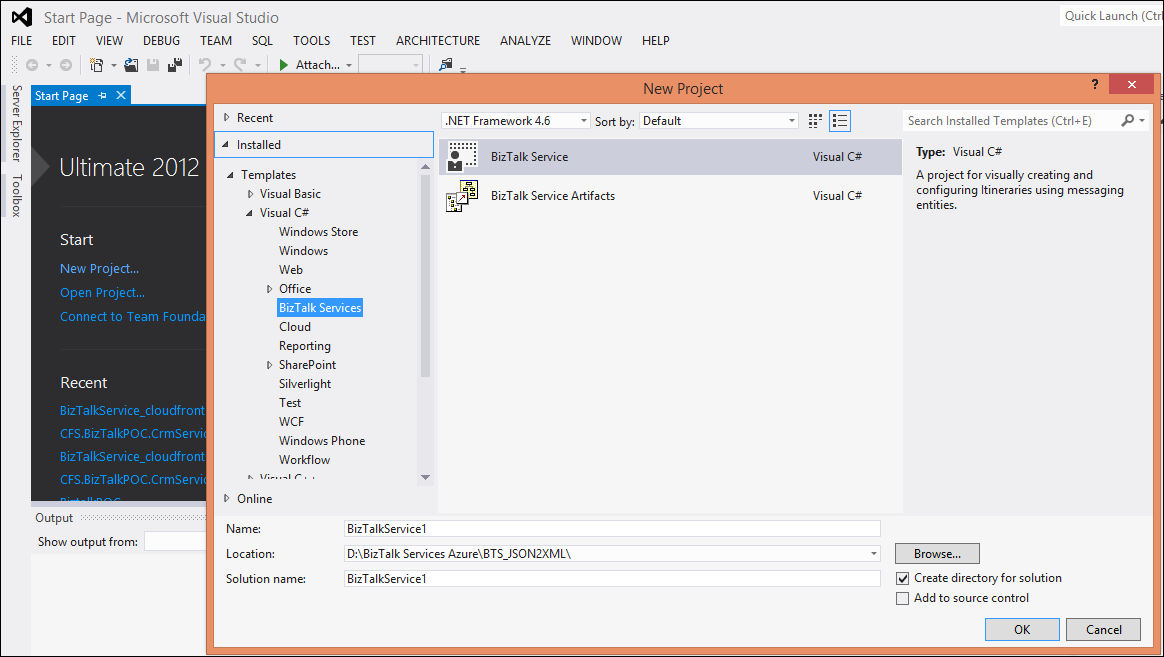
In the Visual Studio solution you need to specify 4 components.
- Sources
- Bridges (XML One way or XML Reply Request or Pass-Through bridge
- Destinations
- BizTalk Service URL
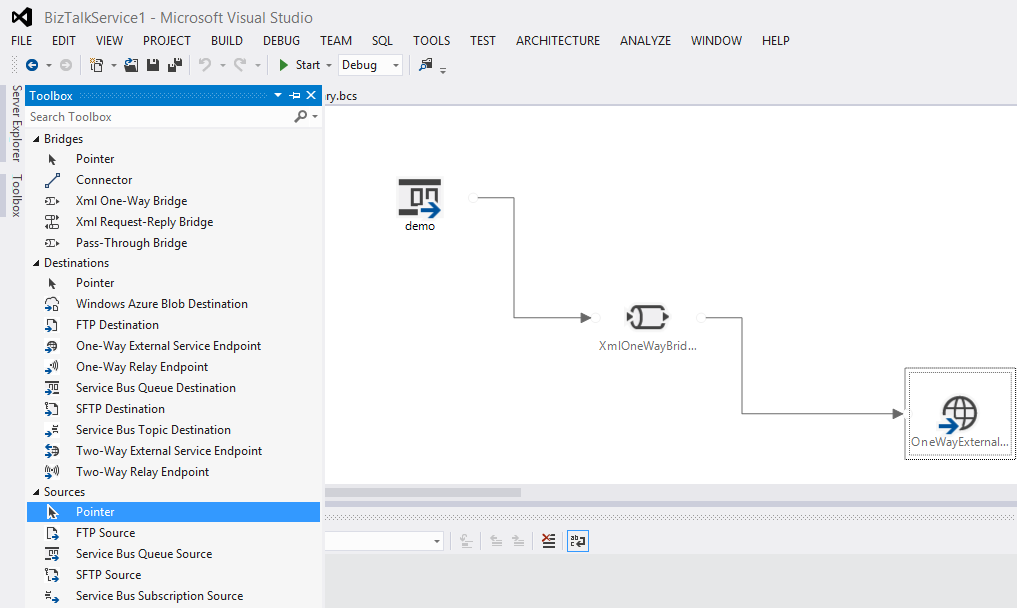
Sources can be FTP / SFTP or Service Bus Queue or Subscription.
Destinations have more options like FTP, FTPS, Service Bus Queue, Service end point, Blob Storage etc.
Bridges can be XML one-way or Two way i.e. Reply Request and simple Pass Through Bridge.
Right click anywhere in the empty space in the solution and select Properties. Enter the BizTalk Service URL (Example: https://cfsbtdemo.biztalk.windows.net). We get this URL when we create BizTalk Service in Azure portal.
After placing the source, Bridge and Target blocks, connect them using connector under Bridge in toll box items.
For complex solutions business logic and SCHEMA mapping between source and Target entities can be defined inside the bridges. Custom code can be written here.
Step 3: Deployment
Save and Build the project and Right click and select deploy. Details like ACS Namespace and Issuer Name (Default – owner) and Shared Secret needs to be entered. ACS NameSpace is the Namespace we got earlier from Azure portal on clicking connection information for the BizTalk service. Shared Secret is the Key “Default Key “
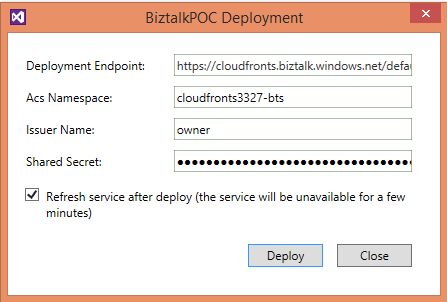
Check the status in the Visual Studio output window for the deployed components.
Please Note: Deployment Name needs to be Registered / created on https://biztalksvc12.portal.biztalk.windows.net/default.aspx before deploying your bridge. (You may need Silverlight on to be able to launch this end point URL).
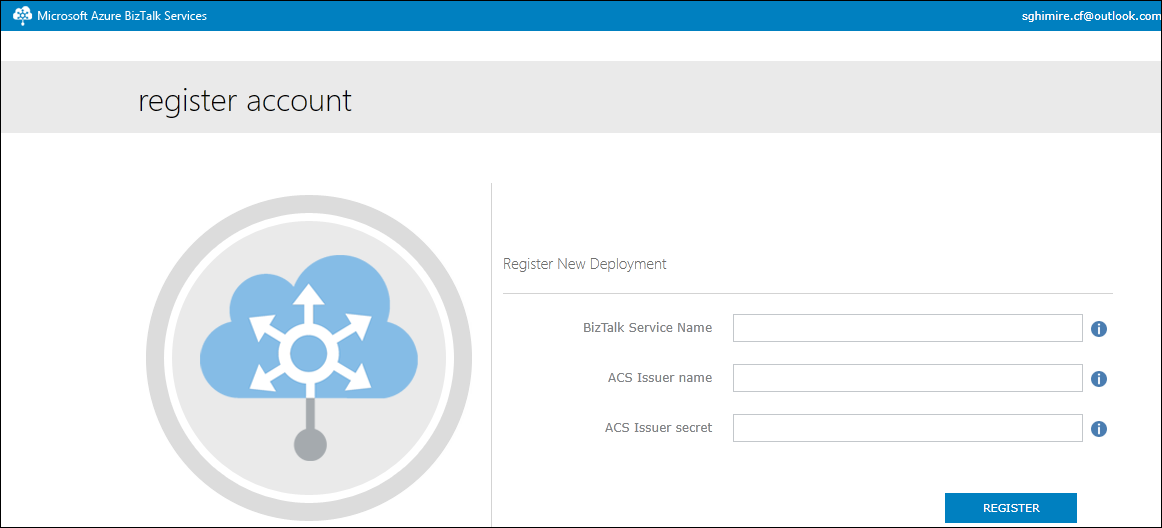
Provide the BizTalk Service Name as in Azure portal
ACS Issuer name (Default is owner)
ACS Issuer secret – This is Shared Secret key from BizTalk Service Connection Information in Azure portal.
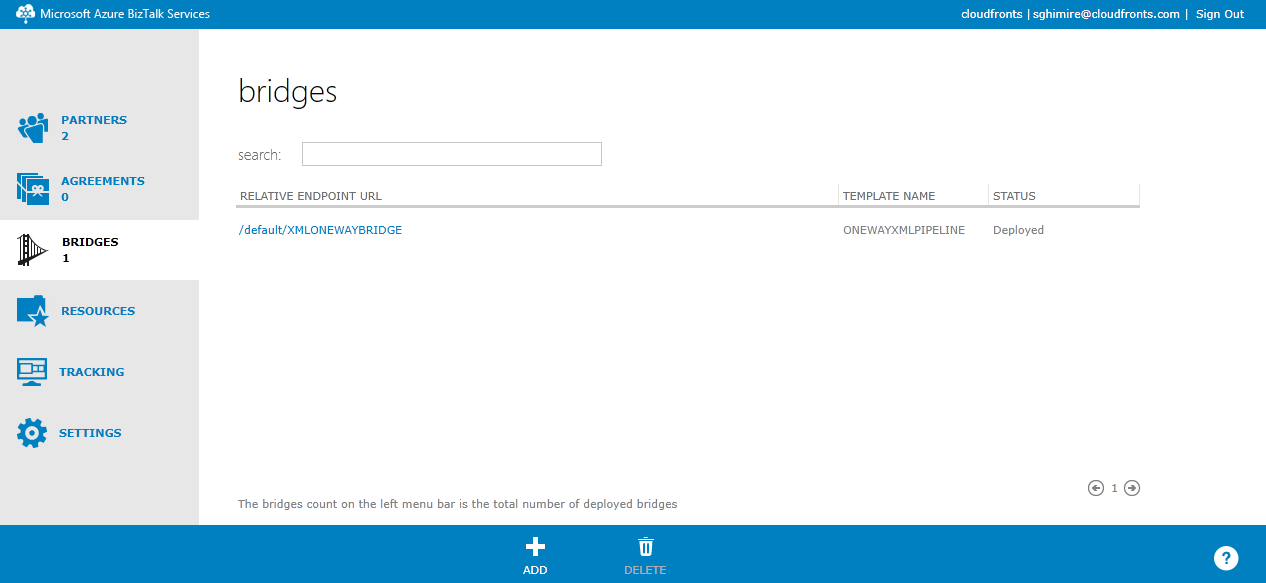
Once you deploy your bridge, it appears under BRIDGES in Microsoft Azure BizTalk services (MABS) Portal. Rest of the deployed codes appear under “RESOURCES”. If you are using bridge solution to route messages from Azure Service Bus Queue to Destinations like Web service end point, you can track them under Tracking Details.
In the next article we will explore the integration between the Microsoft Dynamics CRM Online and Azure Service Bus queue. Azure servicebus Queue is one of the sources that Azure BizTalk Services can listen to for Integration requirements. Please note Azure Queues and Service Bus Queues are 2 different type of Queue offered by Microsoft Azure.
