Xrm.Device.pickFile in D365 v9.0
Introduction:
In this blog we will be showing an example to attach the uploaded files to notes using the Xrm.Device.pickFile function in unified Interface in D365 v9.0
Implementation:
Step 1: In this example we will create a button on the Contacts entity and we write a JavaScript function to trigger on button click.
![]()
In Ribbon Workbench after creating a button we create a command as shown below and add the command on the button.

Step 2: On clicking on the Upload button a dialog box opens and we can select the file we want, this file will then be attached in the notes section of the particular record. The code is shown below. The name of the Note created, name of the attachment can be changed as required by modifying the code.
Code:
var crmCustomization = {

PickFile: function () {

Xrm.Device.pickFile().then(

function (result) {
var dataRecieved = result;
var Content = dataRecieved[0].fileContent;
var FileSize = dataRecieved[0].fileSize;
var FileName = dataRecieved[0].fileName;
var MimeType = dataRecieved[0].mimeType;
var recordId = Xrm.Page.data.entity._entityId.guid;

crmCustomization.UploadToNotes(FileName, MimeType, Content, recordId);
},
function (error) {
alert(error.message);
});
},
UploadToNotes: function (FileName, MimeType, Content, recordId) {
var note = Object();
note["notetext"] = "New Attachment"
note["subject"] = "Uploaded File";
note["filename"] = FileName;
note["mimetype"] = MimeType;
note["objectid_contact@odata.bind"] = "/contacts(" + recordId + ")";
note["documentbody"] = Content;

$.ajax({
type: "POST",
contentType: "application/json; charset=utf-8",
datatype: "json",
url: Xrm.Page.context.getClientUrl() + "/api/data/v9.0/annotations",
async: true,
data: JSON.stringify(note),
beforeSend: function (XMLHttpRequest) {
XMLHttpRequest.setRequestHeader("Accept", "application/json");
XMLHttpRequest.setRequestHeader("OData-MaxVersion", "4.0");
XMLHttpRequest.setRequestHeader("OData-Version", "4.0");
},
success: function (data, textStatus, XmlHttpRequest) {
var result = data;
alert("File attached to Notes successfully");
},
error: function (XmlHttpRequest, textStatus, errorThrown) {
Xrm.Utility.alertDialog("Error: " + textStatus + " " + errorThrown);
}
});

},

};
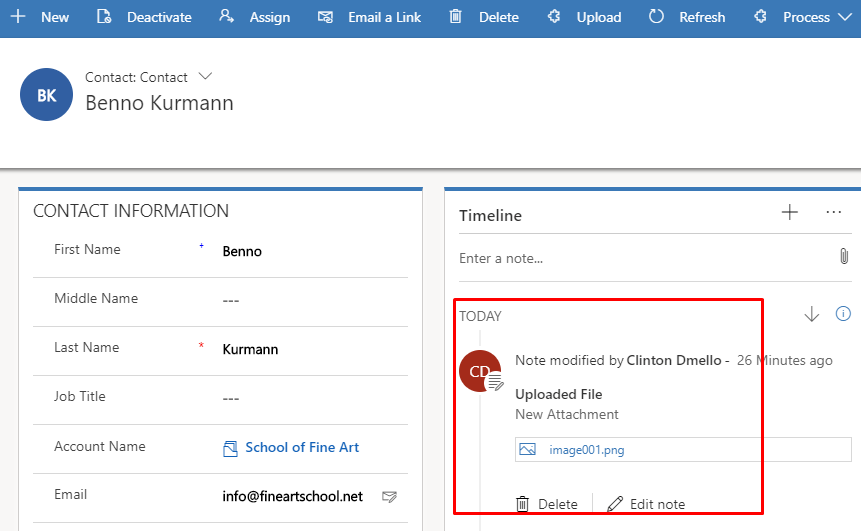
We can see after uploading the file the note is created with the attachment as shown below