Customizing POS Receipt Layout
Introduction
POS Receipts are generated after every transaction that occurs on POS. The default receipt provided by LS Central is generally sufficient but as is in all things there are always exceptions.
There are two approaches we can use to modify the POS Receipts and we are going to see them both.
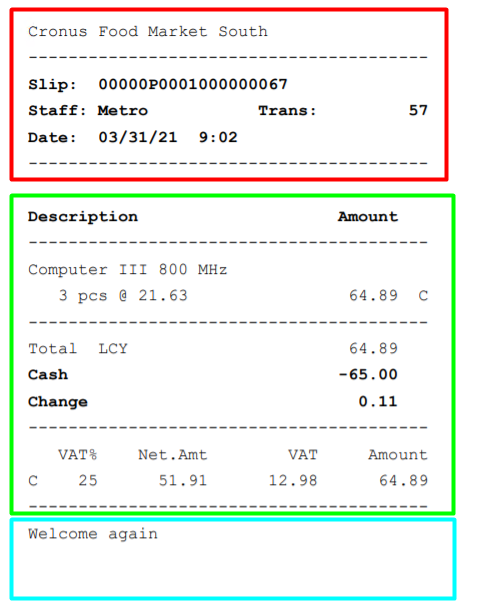
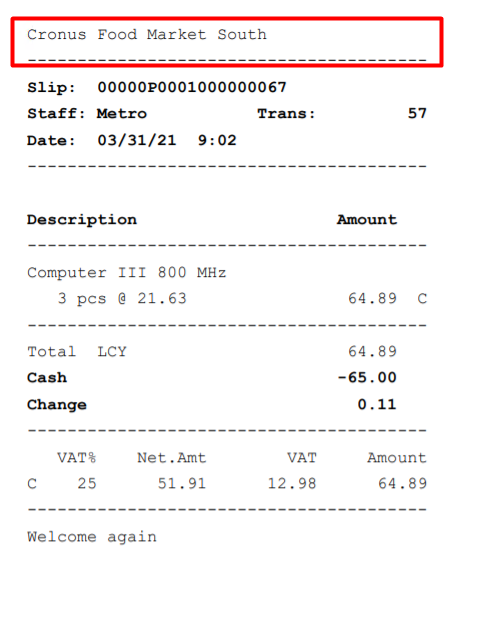
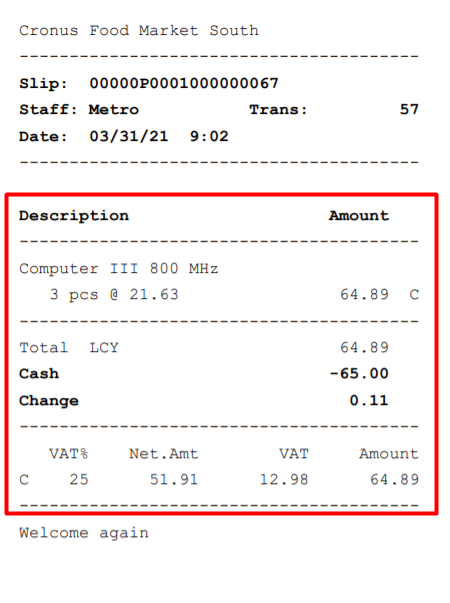
This is the default receipt provided by LS. I have marked division of sections using color.
- Red – Header
- Green – Body
- Blue – Footer
References
- https://www.archerpoint.com/blog/Posts/learn-how-set-pos-receipt-enhancements-ls-retail
- https://help.lscentral.lsretail.com/Content/How-Tos-Created-By-Support/How-To-Set-Up-Receipts-LS-Central.htm
Pre-requisites
- Microsoft Dynamics 365 Business Central
- LS Central
- Development Environment Setup for Business Central
Configuration
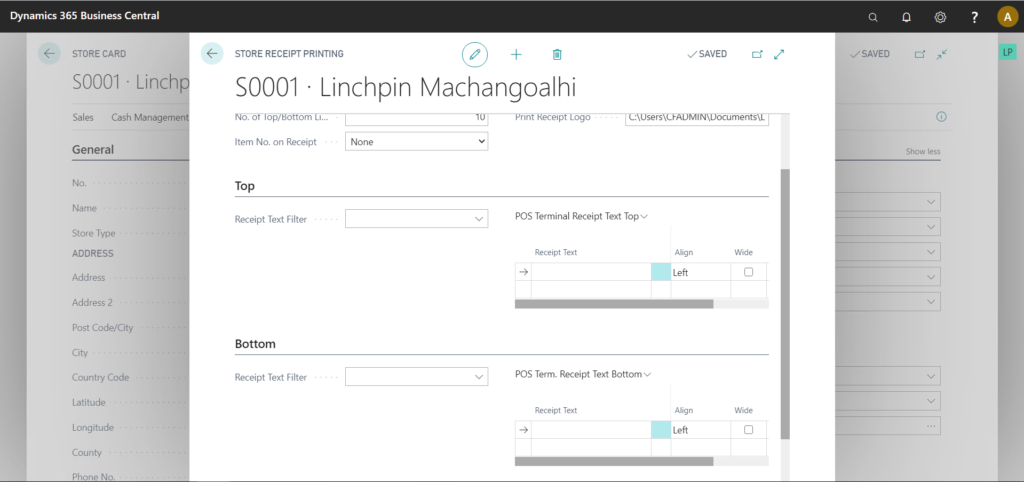
- Using Receipt Printing from POS Terminal / Store Card
We can add text directly into the Header or the Footer of the POS Receipts and also define some basic properties like bold, italic or wide for the text. It can be defined at POS Level or Store Level i.e. for individual POS Terminals or for all the POS Terminals in a Store.
- Go to POS Terminal Card.
- Go to Printing -> Receipt Printing
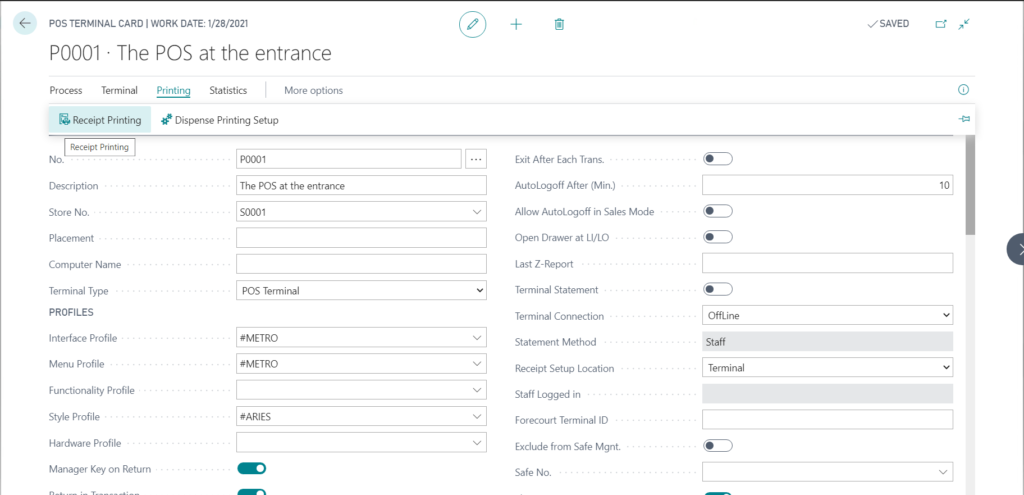
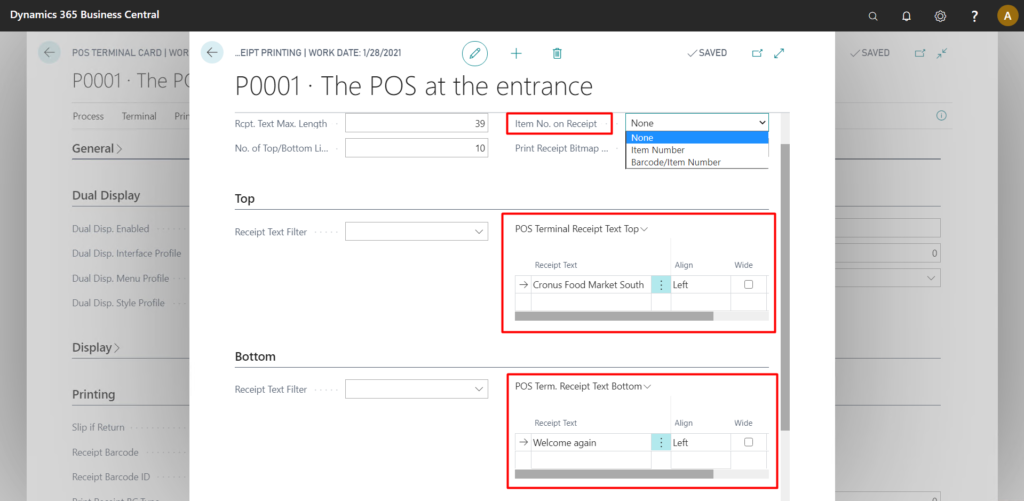
- Here you add static content, like Store Name, GST/VAT No, Store Address, etc in both header and footer.
- Here you can also define, if you want to specify the Item No. or Barcode in the POS Receipt.
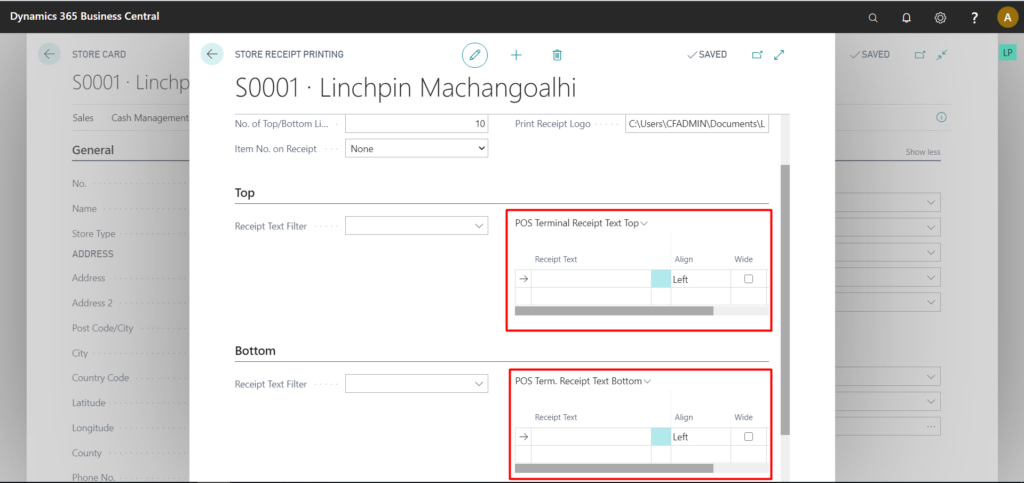
- Similar, to this, we can also define for Store level, i.e. all the POS Terminals in a Store.
- Using the “POS Print Utility” procedure:
In this method, we will write actual code to modify the receipt. If you are using NAV, then this is pretty straight forward, but in case of Business Central, we only have access to Events which we can subscribe to, to change the behaviour of the procedure.
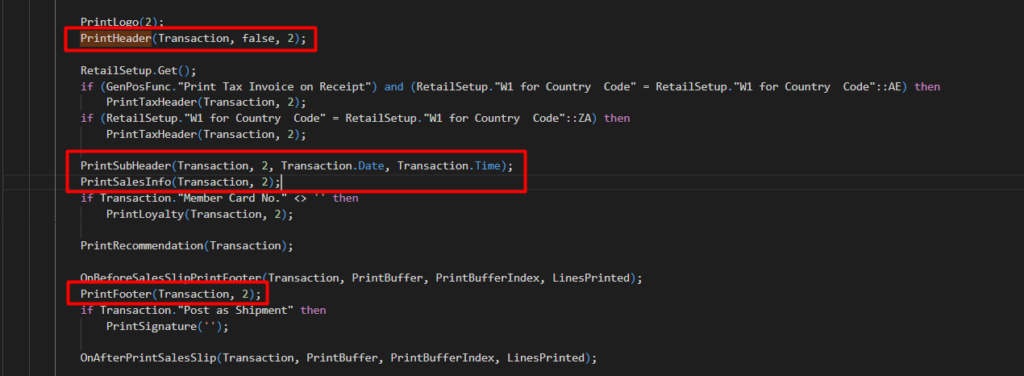
The highlighted four procedures do the majority of the work done in printing.
PrintHeader -> Prints the content of the header defined in the Receipt Printing.
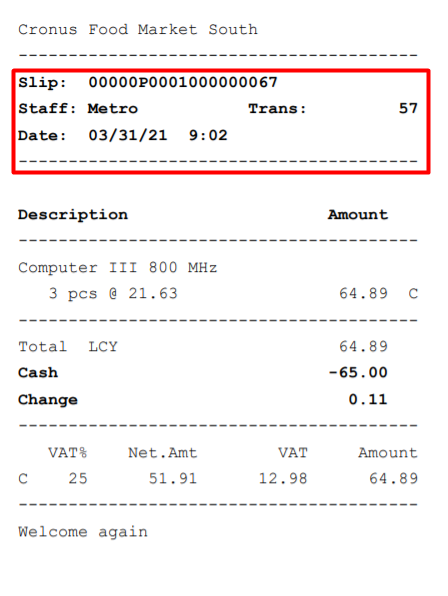
PrintSubHeader: It prints the Information related to the current Transaction.
PrintSalesInfo: It prints the actual Items of the Transaction along with VAT and other details at the bottom.
PrintFooter: It prints the Footer Text defined in the Receipt Printing.
Now that we know which procedure is responsible for which part of the Receipt, we can subscribe to that procedure’s event.
For example, let’s try me modify the “Sub Header” part of the Receipt.
As such we need to modify the “PrintSubHeader” procedure, so we subscribe to its event.
![[EventSubscriber(ObjectType: :Codeunit. Codeunit: : "POS Print Utility". •on8eforePrintSubHeader• ,
, false, false) I
local procedure Ch8eforePrintSuhader(sender: Codeunit "POS Print Utility"; var IsHandIed: Boolean; var TransacticmHeader:
DSTR: Text[leø];
Value: Array[le] of Text[8e];
Node: Array[le] of Text[8ø];
Rec Staff: Record Staff;
Record
"Transaction Header" ;
Tray: Integer;
begin
1sHand1ed
— true;
// Setting Staff Name
Clear ;
Rec_Staff. Reset ( ) ;
Rec_Staff _ ID,
if Rec Staff then;
"Staff ID");](https://www.cloudfronts.com/wp-content/uploads/2021/04/image-30-1024x247.png)
The parameter, sender gives us a reference to the current instance of “POS Print Utility” codeunit which we can use to call all the procedures of that codeunit with the correct values.
TransactionHeader is the current “Transaction Header” record.
At the start of the procedure, we need to set the IsHandled variable to True so that once your procedure ends, the parent “PrintSubHeader” procedure exits immediately.
![Clear (DSTR);
Clear(Va1ue);
( Node ) ;
// Invoice "o
Val
• Inv. No.
' InvLabe1•;
; — Format(TransactionHeader. "Receipt ;
Node[2]
sender. PrintLine(Tray, sender. FormatLine(5ender. FormatStr(VaIue, DSTR), false, true,
sender.AddPrintLine(2Øe, 5, Node, Value, DSTR, false, true, false, false, Tray);
false,
false) ) ;](https://www.cloudfronts.com/wp-content/uploads/2021/04/image-31.png)
- DSTR – It is the design String, here we define the design of the Line that will be printed. It is at max up to 40 characters. It follows the pattern “#(alignment)##…”. The Design String is divided into sections, each section contains one piece of data.
- Value – It is a text array, which defines the data which is to be printed in the sections. The number of values set in the Value should be equal to the sections in the design string.
- Node – It is used as a Label for the data in the section. The number of values in this array should be the same as the values in Value array.
Next, the essential part is the “FormatStr” procedure, the 4 booleans at the end are used to specify whether the String is going to be Wide, Bold, High or Italic respectively.
After this, the final piece of the puzzle is the “AddPrintLine” procedure, the first argument is the “Section ID”, it is related to which part of the receipt we are printing in, it is better to set it the same as the procedure from which this event is being triggered.
Next argument, specifies the maximum number of Sections that will be in the design string, just make sure it is more than the values you have provided.
Next, we pass the Node and Value array, the Design String and specify whether the String is going to be Wide, Bold, High or Italic and the Tray at the end. The value for Tray can be taken directly from the Event’s parameters.
Similar to this, we will add one more line and then we will check the results.
![DSTR ; - •
•Date:•,
We[l]
•DateLabeI ;
Value[2]
: - Format(Today);
We[2] : —
•DateVaIue• ;
Value[3]
- 'Staff:' ,
We[3] : —
•CashierLabeI ;
- "Name on Receipt",
Node[41 • —
• CashierVaIue• ;
, lø);
sender.PråntLine(Tray, sender. DSTR), false, true,
sender.AddPråntLine(2ee, 5, 'bde, Value, DSTR, false, true, false, false, Tray);
sender. PrintSepera Tray) ;
false));](https://www.cloudfronts.com/wp-content/uploads/2021/04/image-32.png)
The “PrintSeperator” procedure is used to draw a horizontal line across the receipt using dashes.
Here is the final result:
Conclusion:
Thus we saw how to customize POS Receipts in LS Central either through POS/Store Receipt Printing or for advanced customizations through Event subscriptions.
