Using the Administrative Wizard for D365 Online Portals
Introduction:
In this blog, we will see how can we use the new feature of the ‘Administrative wizard’ for the D365 Online Portals
Pre-Requisites:
1. D365 CRM Portals
2. D365 CRM Environment
Overview
- In the new update of D365 Online Portal for v8.3, a new feature has been introduced which is the ‘Administrative wizard’ which enables the user to customize the portal by allowing to add an entity to the portal.
- The user needs to decide as to which entity (i.e. a custom entity or an out of box entity) is to be added prior before adding it to the portal
- The administrative wizard enables the user to also add entity components like entity form, list, web pages etc.
Scenario:
In the following scenario, we will add a custom entity with a form and view which is configured prior to the process of adding it to the portal.
Process:
Step 1:
To initiate the process, the user will have to navigate to Portal > Administration > Portal Management as shown below. This will start the administrative wizard.
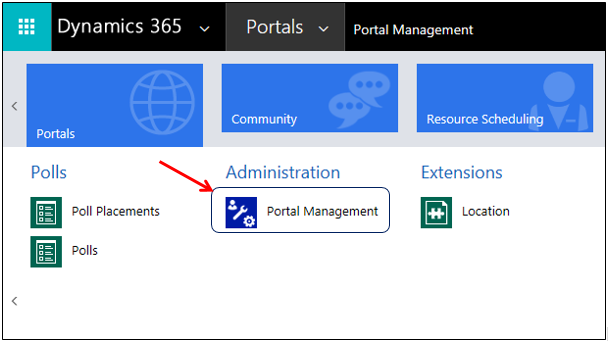
Note: The ‘Portal Management’ Tile is only visible for 8.3v of D365 Online Portals.
Step 2:
Now select ‘Create Portal Content’ from the two options under Portal Management as shown below.
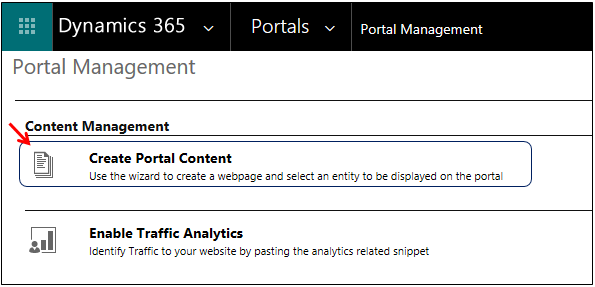
A dialog box will appear after selecting the above mentioned option which will allow the user to create a web page and to display a entity which is optional depending on the requirements of the user.
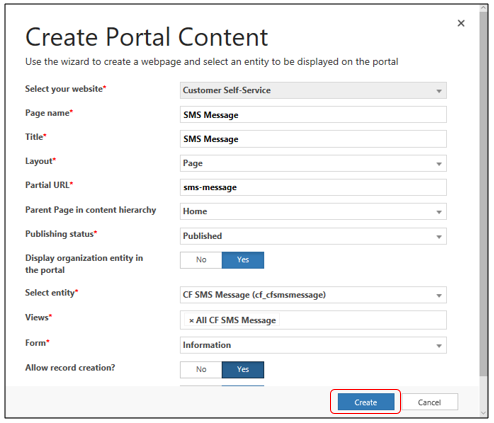
Step 3:
In the dialog box the user will have to enter the following details like the name of the portal website, page name, title, layout and partial URL. Select the publishing state as ‘Published’ as shown below.
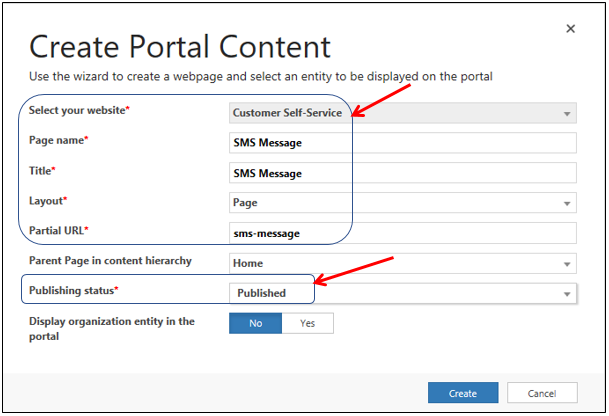
The user can get additional options on enabling the entity in the page by changing the value of the ‘Display Organization entity in the portal’ to ‘Yes’ which is ‘No’ by default. On selecting Yes the following options appear as shown below:
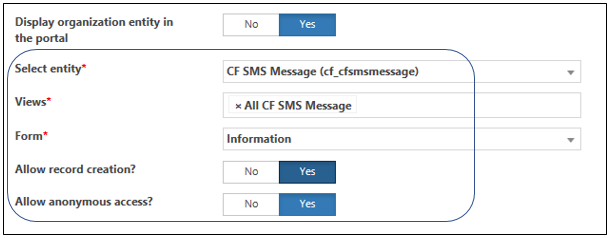
1. The user can select the entity from which he would want to use a particular view.
2. Select the view that is to be displayed.
3. Finally select the Form that is to be displayed.
The user wants can allow record creation and anonymous access by toggling on the options to ‘Yes’ or ‘No’.
Once all the details have been entered click on the create button to the bottom of the dialog box.
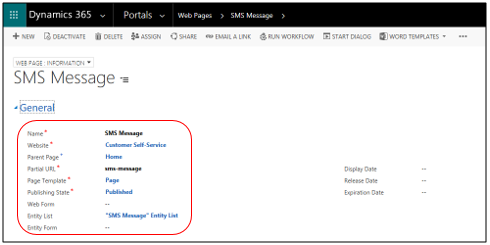
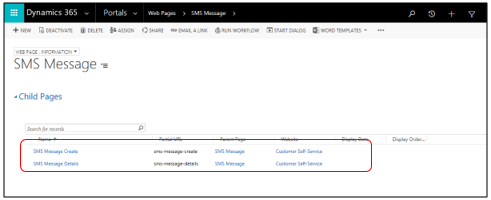
Step 4:
The user will be automatically redirected to the Portal> Web Page option in CRM where a Web Page is created which consists of the entity list details entered in the previous step. In the Child page section will include the create, edit and details web pages with entity forms associated with it as shown below.
Conclusion:
Thus, by using administrative tool we can create and expose entity information effortlessly and easily on the D365 Online Portal.
