Creating Custom Error Log Table in SSIS for OLEDB Block And Kingswaysoft Dynamics CRM Block
Introduction
This log error will help us to understand and fix an issue as quickly. There are three main phases in an SSIS ETL execution life-cycle to catch errors:
- When data is being extracted from source systems
- When data is being transformed
- When data is loaded to the target systems
Customized Error Handling also avoids the failure of Package during Runtime. It allows the package to be executed successfully and the Errors can be checked later from the Customized Error Log Table which you create to know what problem exactly occurred.
Our Scenario
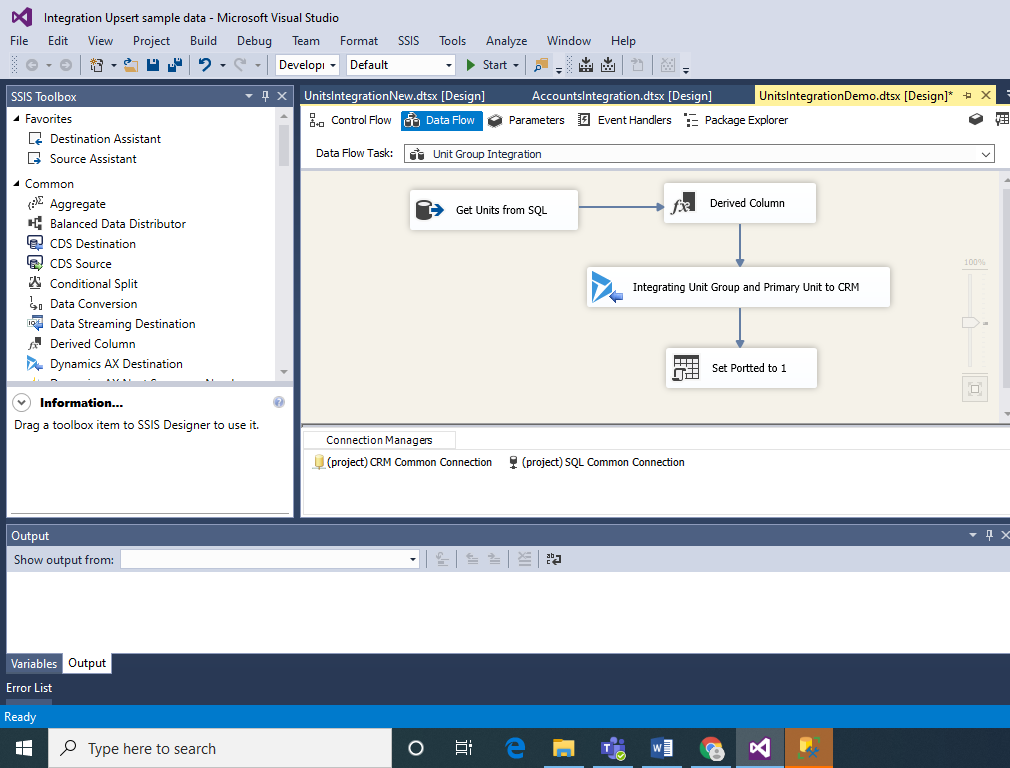
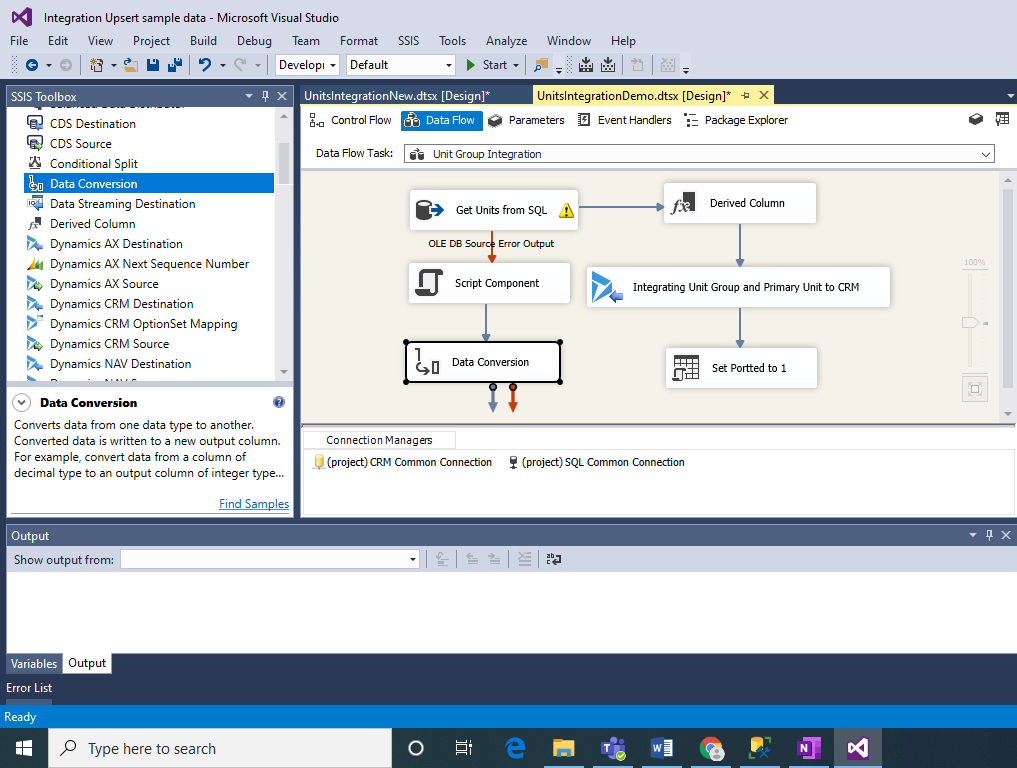
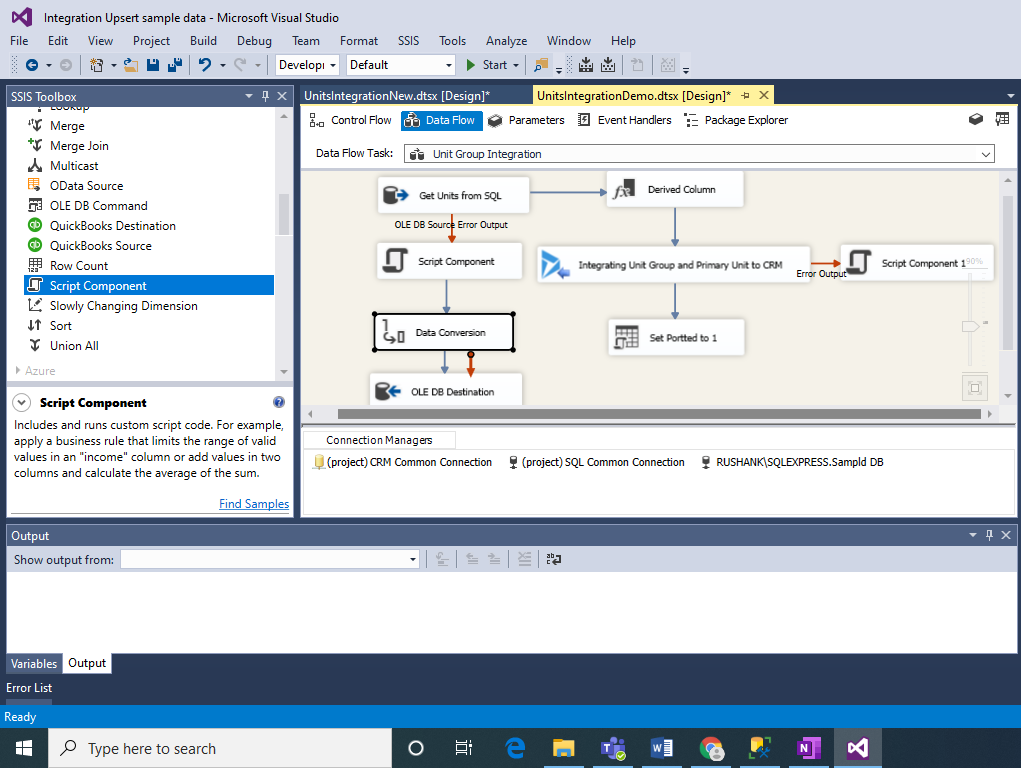
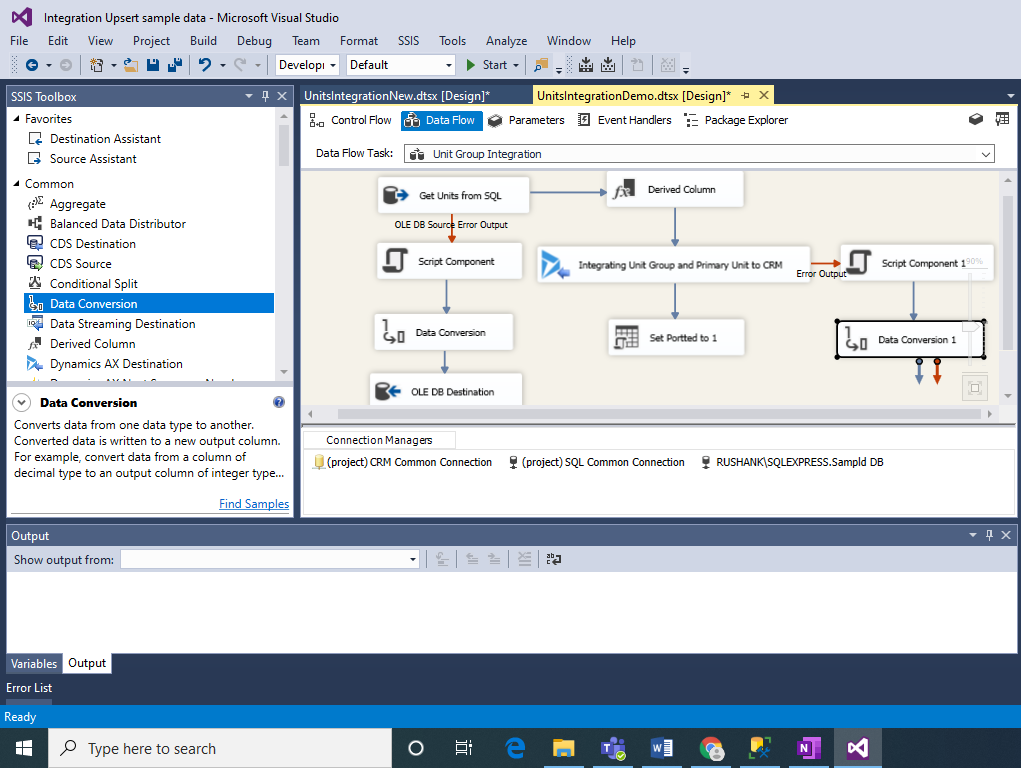
For demonstration purpose, we will consider a Units Integration Map for Integration of Units from SQL to Dynamics CRM.
In this Blog, we will Create a Customized Error Log Table in SQL and Catch the Errors from SQL (Source Block) and Dynamics CRM (Destination block).
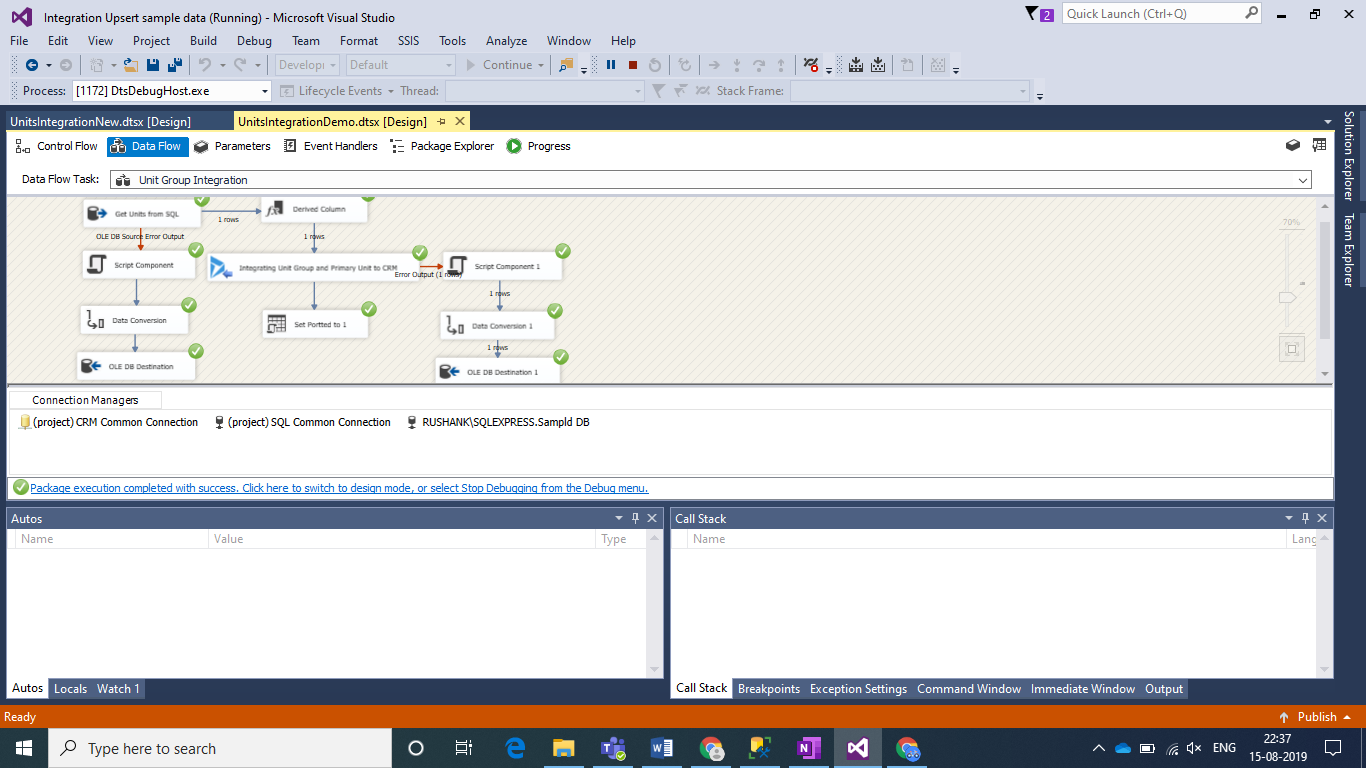
The Map for Unit Integration is as follows:
Customized Error Handling in SSIS
Execute the following query and create a customized Error Log Table in SSIS:
CREATE TABLE [dbo].[ErrorLog](
[ErrorID][uniqueidentifier] NOT NULL default newid() primary key,
[Entity] [varchar](250) NULL,
[Record_Id] [int] NULL,
[RecordName] [varchar](250) NULL,
[ErrorDescription] [varchar](500) NULL,
[DateTime] [datetime] NULL
) ON [PRIMARY]
The structure of Table is as follows:
| ErrorID | Entity | Record_Id | Record Name | ErrorDescription | DateTime |
| Primary Key of Error Log Table. (System Generated) | Unit | UnitId | Unit Name | Error Message | Error Log Date |
Error Handling at OLEDB Source Block:
Step 1:
Add a Script Component to catch the Error Description, Error Log Date and Entity.
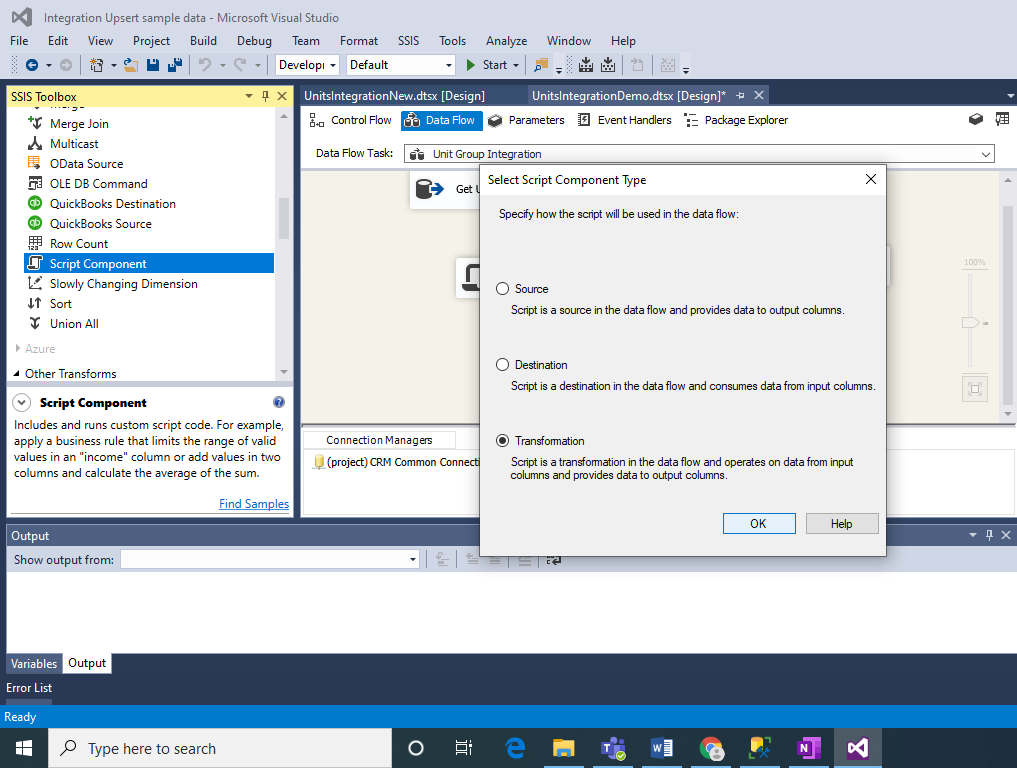
Select Transformation and click on Ok.
Step 2:
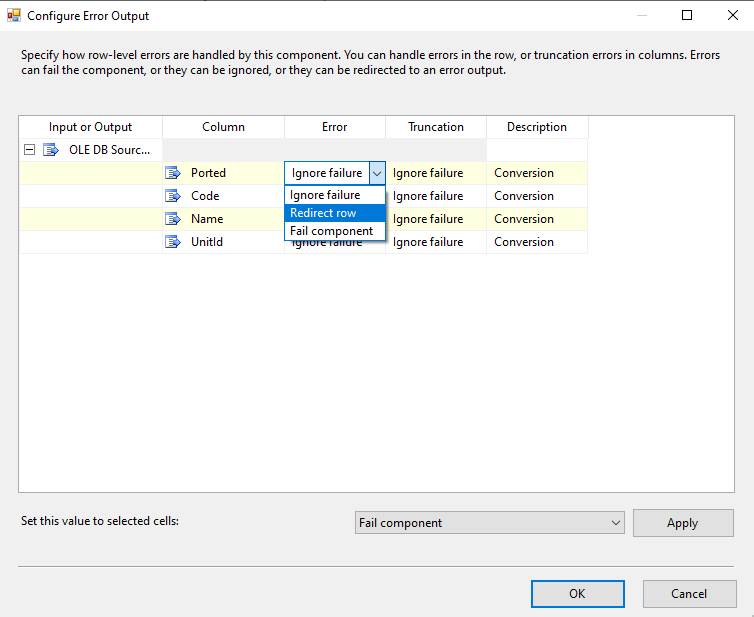
Connect the Error Output (Red Arrow) from OLDEB Source to the Script Component. Select “Redirect row” for all columns in the Error and Truncation Columns to redirect Error Output to Script Component.
Step 3:
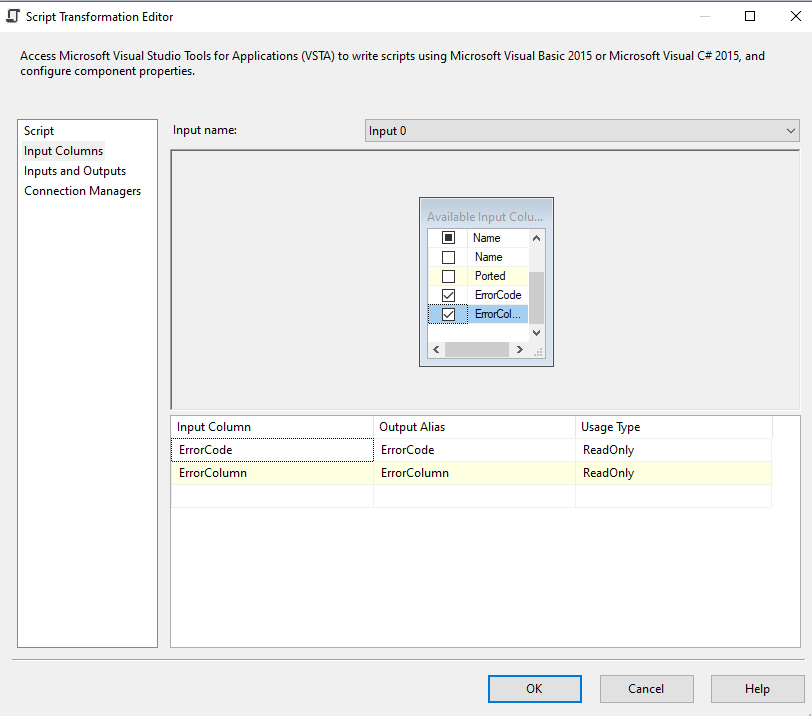
Configure the Script Component as following:
In Input Columns section Select Error Code and Error Column.
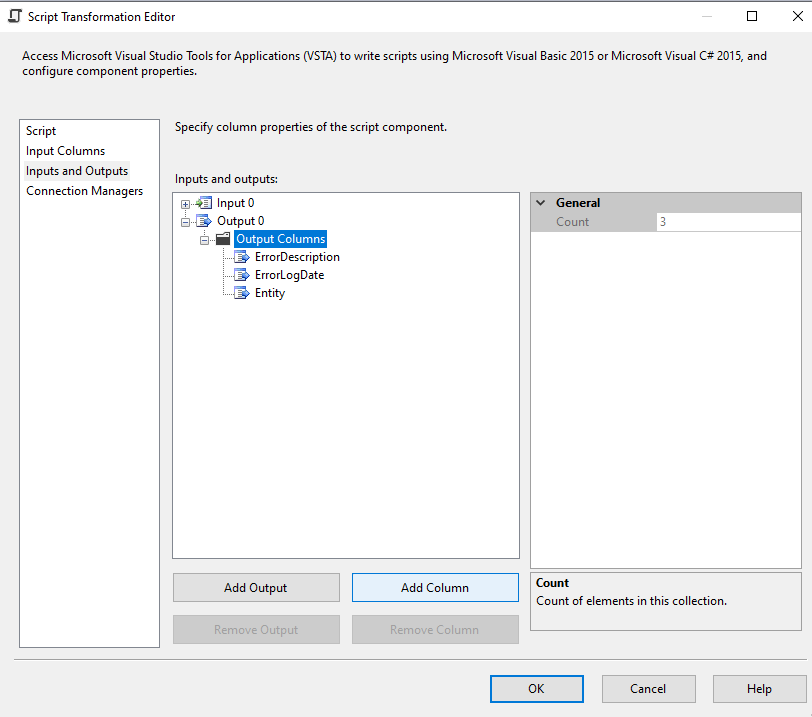
In Inputs and Outputs section Add following Columns
| Column Name | Data Type | Length |
| ErrorDescription | Unicode string [DT_WSTR] | 500 |
| ErrorLogDate | database timestamp [DT_DBTIMESTAMP] | —- |
| Entity | string [DT_STR] | 50 |
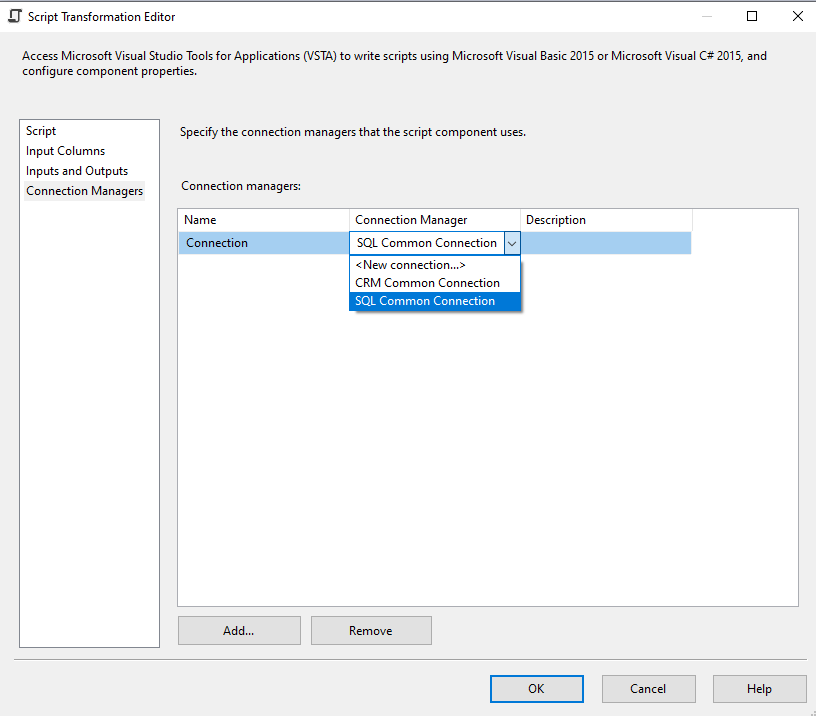
In the Connection Managers Section add a new connection and select your SQL connection
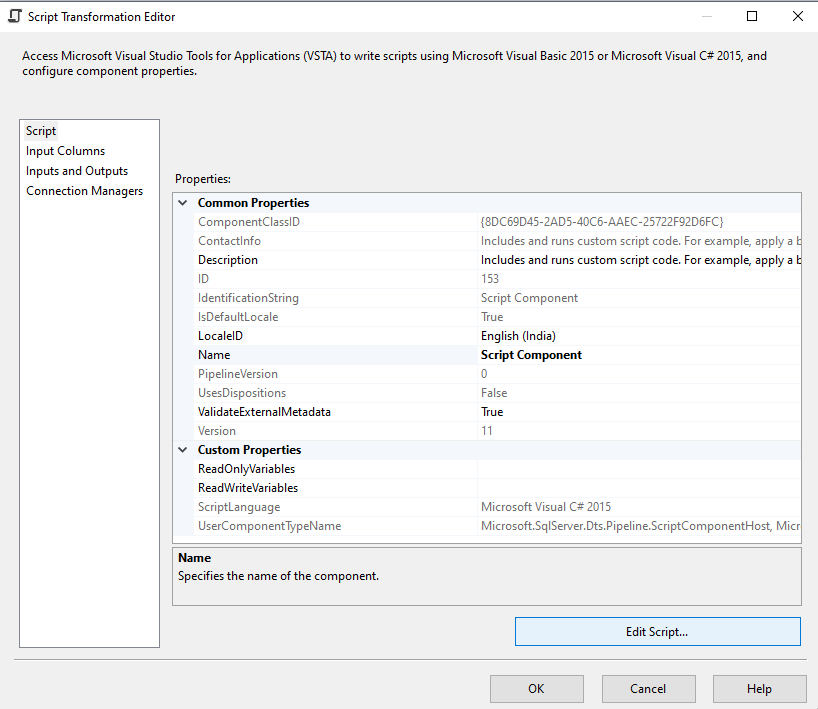
In the Script Section click on Edit Script. After a minute a New Editor Window will Open. Here you have to copy and paste the following Script inside the “public override void Input0_ProcessInputRow(Input0Buffer Row)” section.
Code Snippet:
try
{
Row.Entity = “Unit”;
Row.ErrorDescription =
this.ComponentMetaData.GetErrorDescription(Row.ErrorCode);
Row.ErrorLogDate = DateTime.Now;
//If an error occurred due to Check Constraint, the ErrorColumn would be 0,
and that error affects the entire row. Hence there is no specific column for
that error
if (Row.ErrorColumn == 0)
{
Row.ErrorDescription = “An error that affects the entire row”;
}
//If an error occurred due to Data type, then errorcolumn name would be
updated.
else
{
var componentMetaData130 = this.ComponentMetaData as
IDTSComponentMetaData130;
if (componentMetaData130 != null)
{
Row.ErrorDescription =
componentMetaData130.GetIdentificationStringByID(Row.ErrorColumn).Replace
(“Customer Target.Inputs[OLE DB Destination Input].Columns[“, “”).Replace(“]”, “”);
}
}
}
catch (Exception ex)
{
Row.ErrorDescription = “Unable to get Error Column Name”;
}
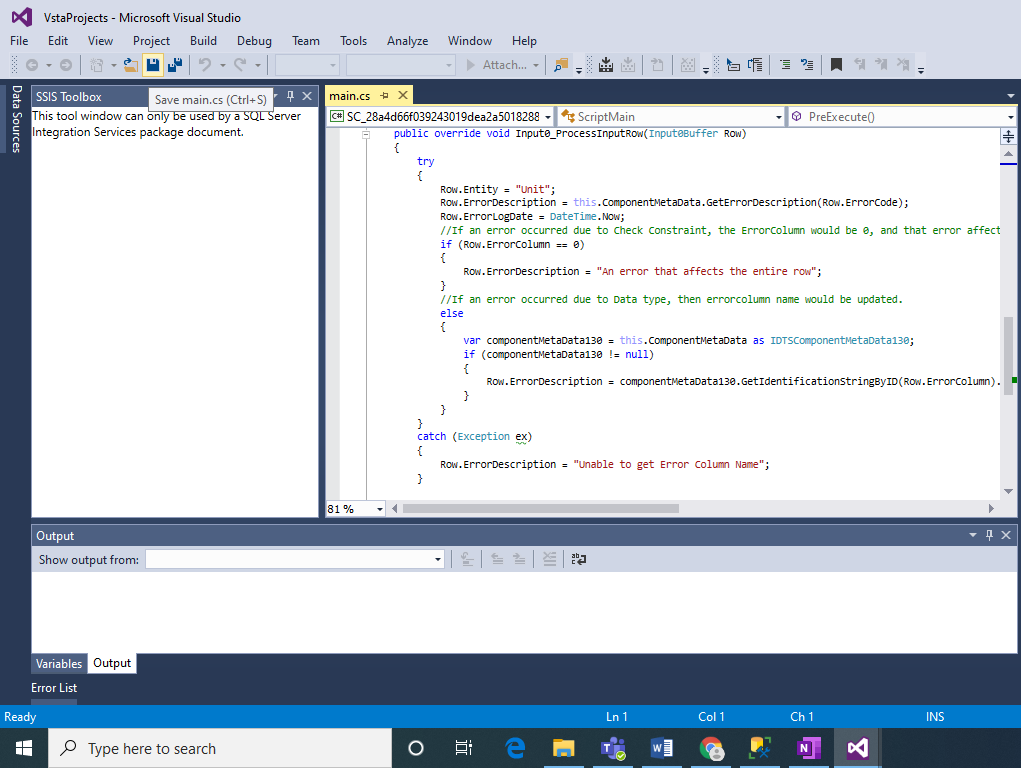
Click on Save and then Close the Window.
Step 4:
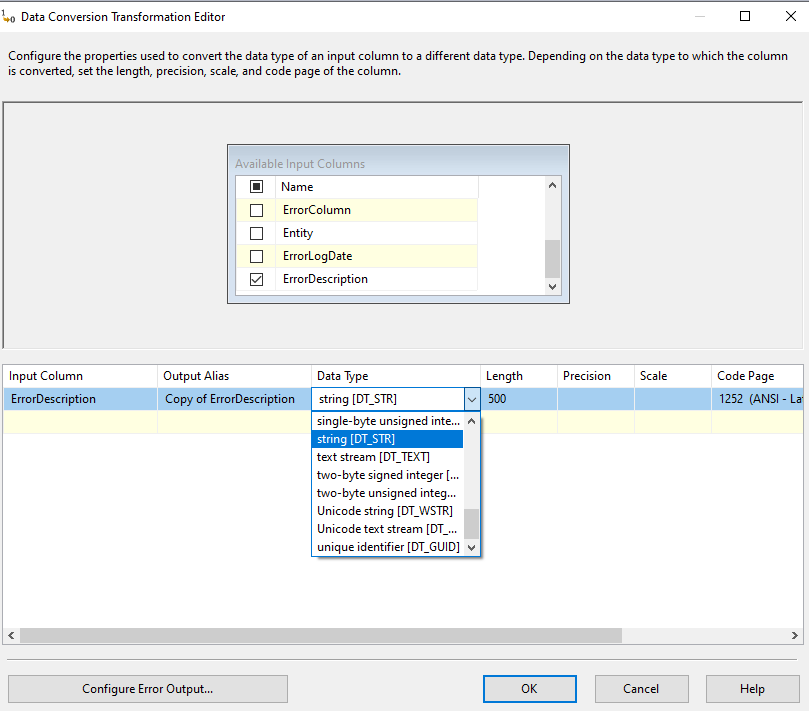
Add a Data Conversion Block to avoid any Truncation Errors because of Data Type Conversion between NVarchar and Varchar Data Types of the Error Description Column.
Select ErrorDecription Column and select Data Type as String. Click on OK.
Step 5:
Add an OLEDB destination block.
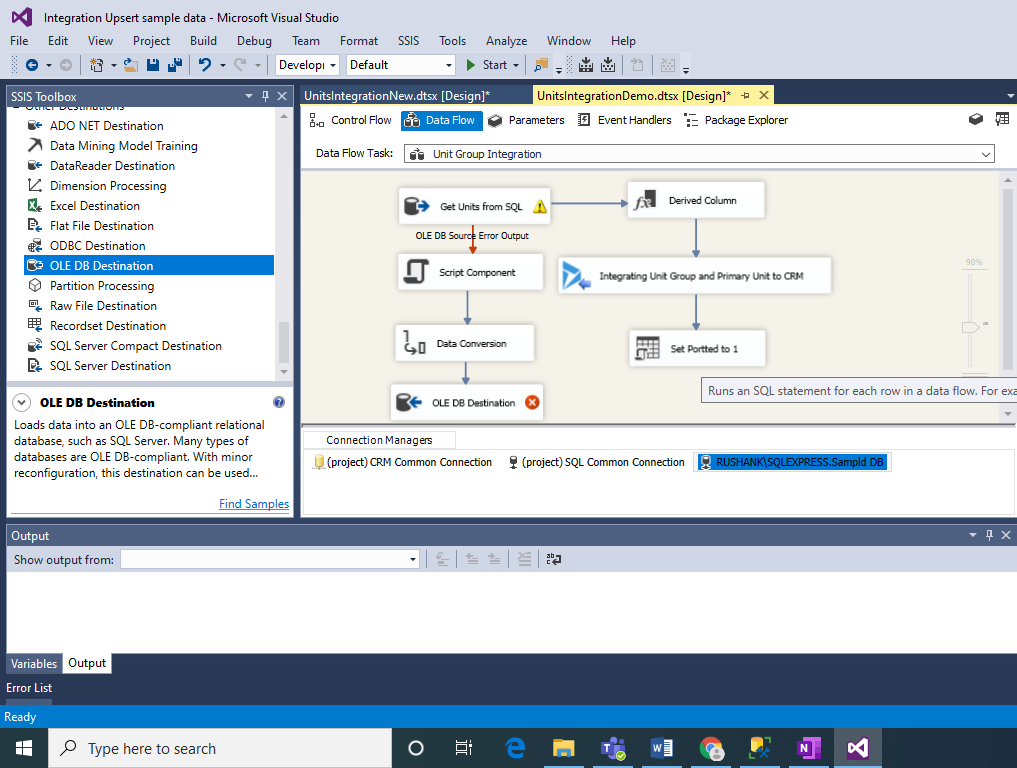
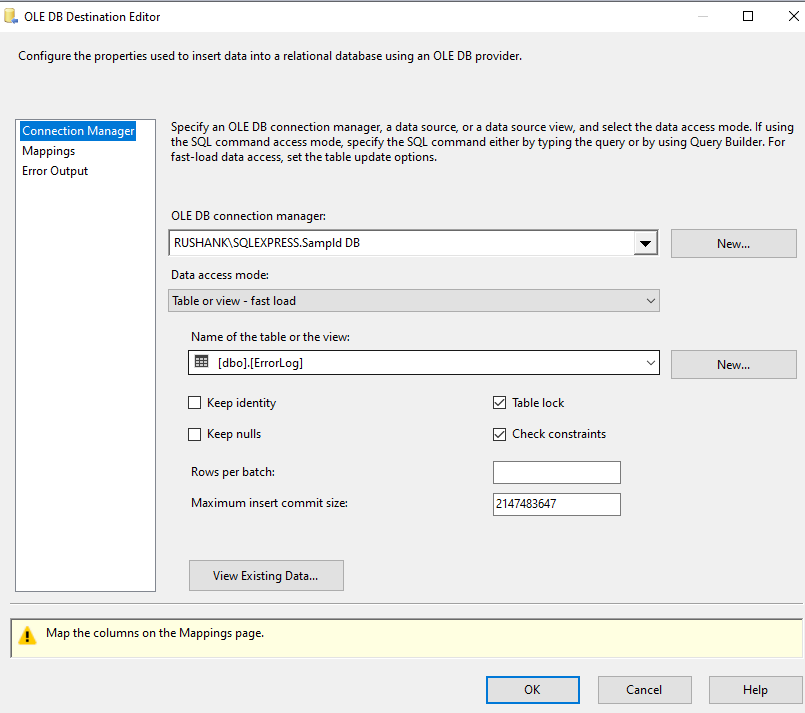
Configure your OLEDB Connection Manager and Select the Error Log Table which you had created in SQL Server.
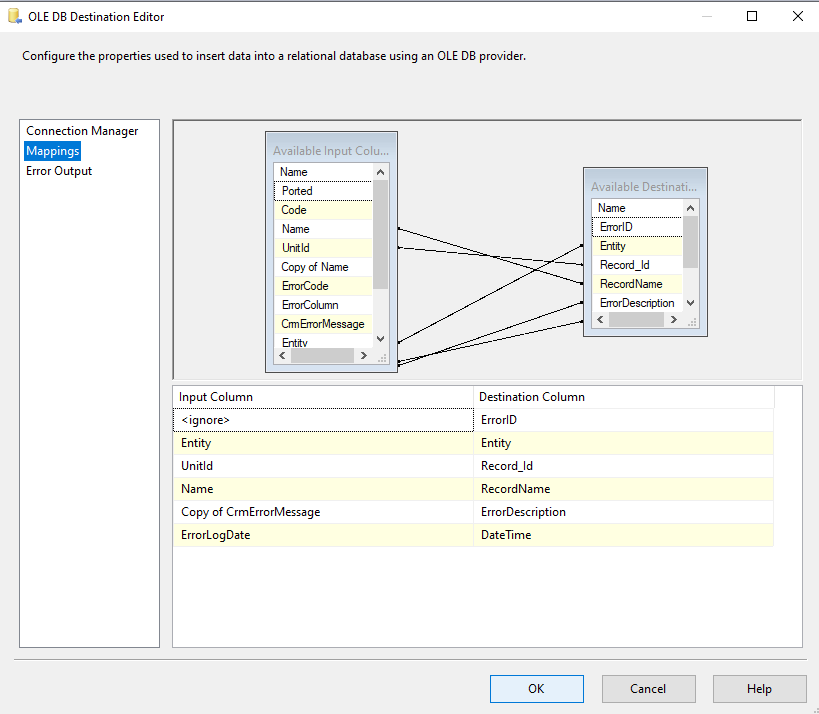
In the Mapping section do the following Mappings and click on Ok.

Error Handling at Dynamics Destination Block:
Step 1:
Perform the Steps 1 and 2 as specified above in Error Handling at OLEDB Source Block.
Step 2:
Configure the Script Component as following:
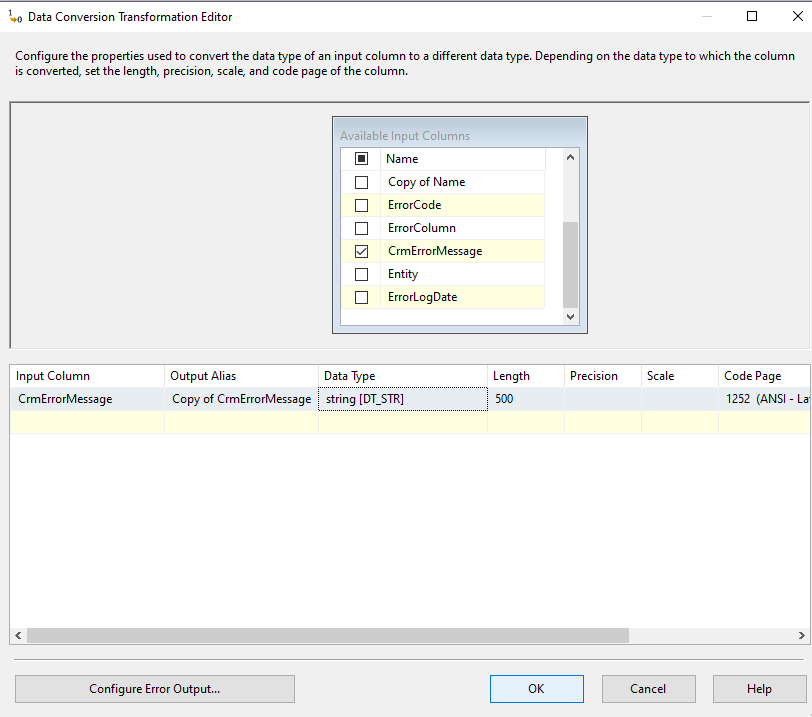
In Input Columns section Select Error Code, Error Column and CrmErrorMessage.
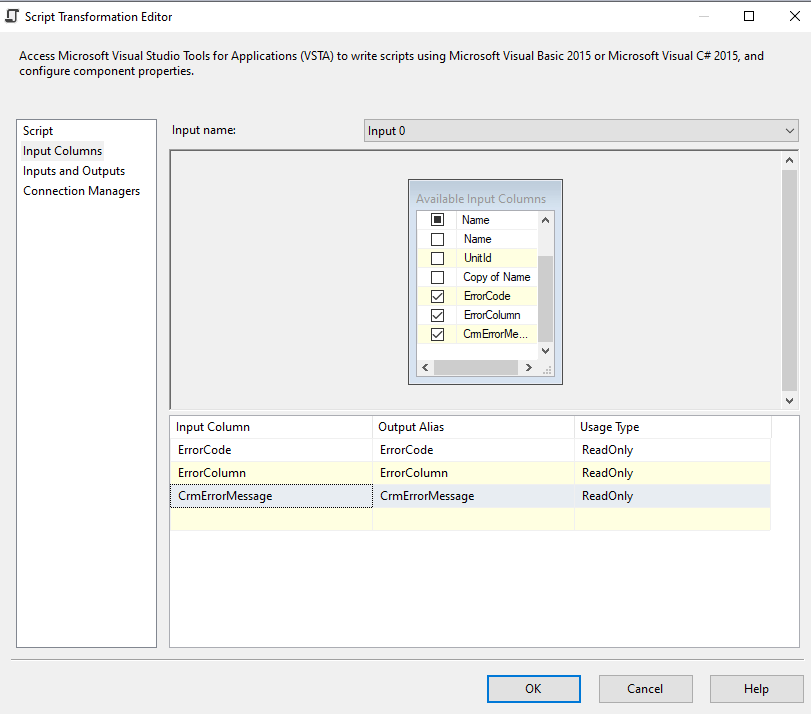
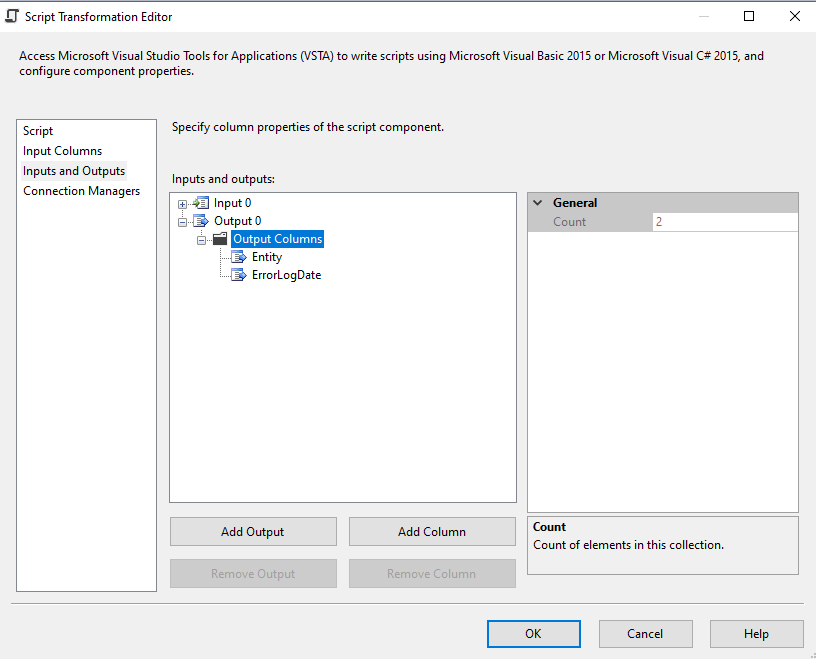
In Inputs and Outputs section Add following Columns
| Column Name | Data Type | Length |
| ErrorLogDate | database timestamp [DT_DBTIMESTAMP] | —- |
| Entity | string [DT_STR] | 50 |
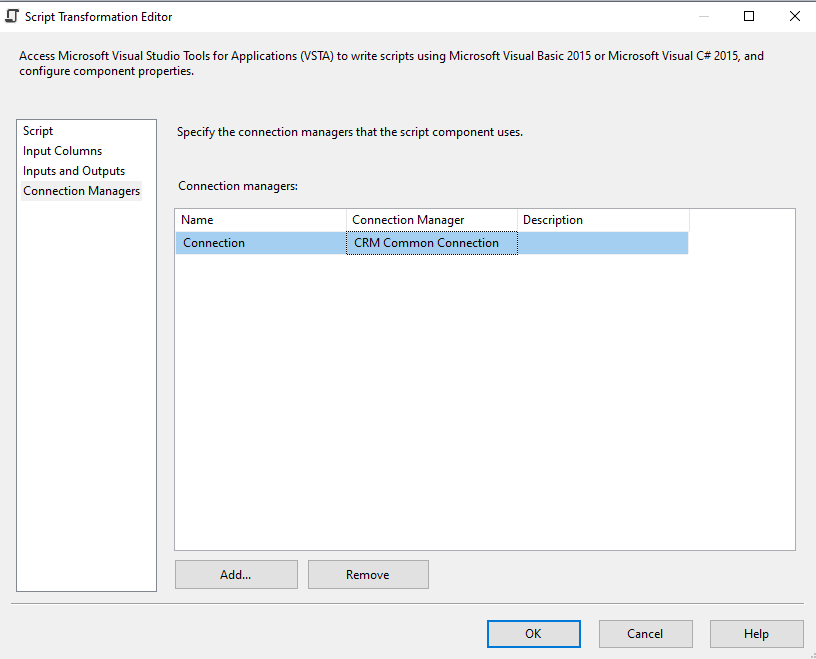
In the Connection Managers Section add a new connection and select your CRM connection:
In the Script Section click on Edit Script. You have to copy and paste the following Script inside the “public override void Input0_ProcessInputRow(Input0Buffer Row)” section.
Code Snippet:
Row.Entity = “Unit”;
Row.ErrorLogDate = DateTime.Now;\
Click on Save and then Close the Window.
Step 3:
Add a Data Conversion Block to avoid any Truncation Errors because of Data Type Conversion between NVarchar and Varchar Data Types of the Error Description Column.
Select CrmErrorMessage Column and select Data Type as String and length as 500 i.e. according to the length of columns SQL. Click on OK.
Step 4:
Add an OLEDB destination block.
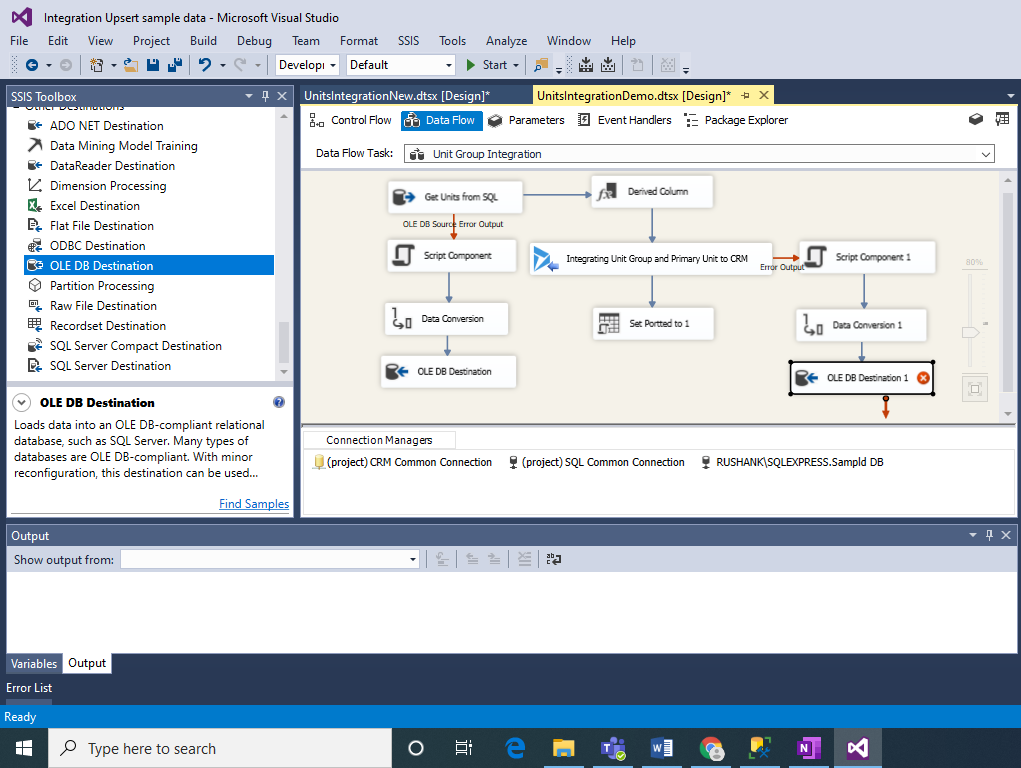
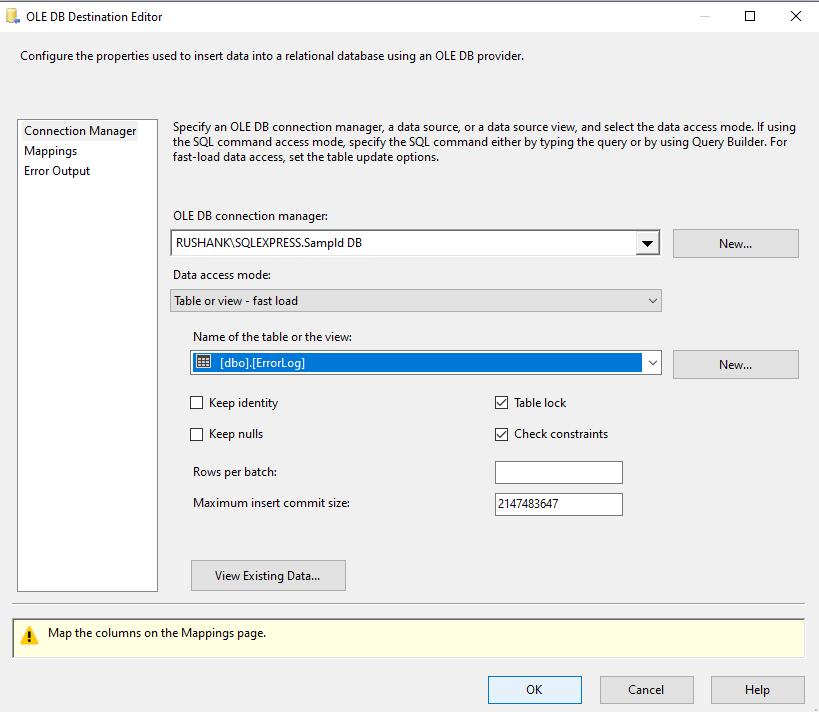
Configure your OLEDB Connection Manager and Select the Error Log Table which you had created in SQL Server.
In the Mapping section do the following Mappings and click on Ok.
Checking the Error Occurred during Integration
You can see the Error rows passing through the Error Output and being logged in our Error Log Table.
Open the Error Log Table to check the Errors Occurred.
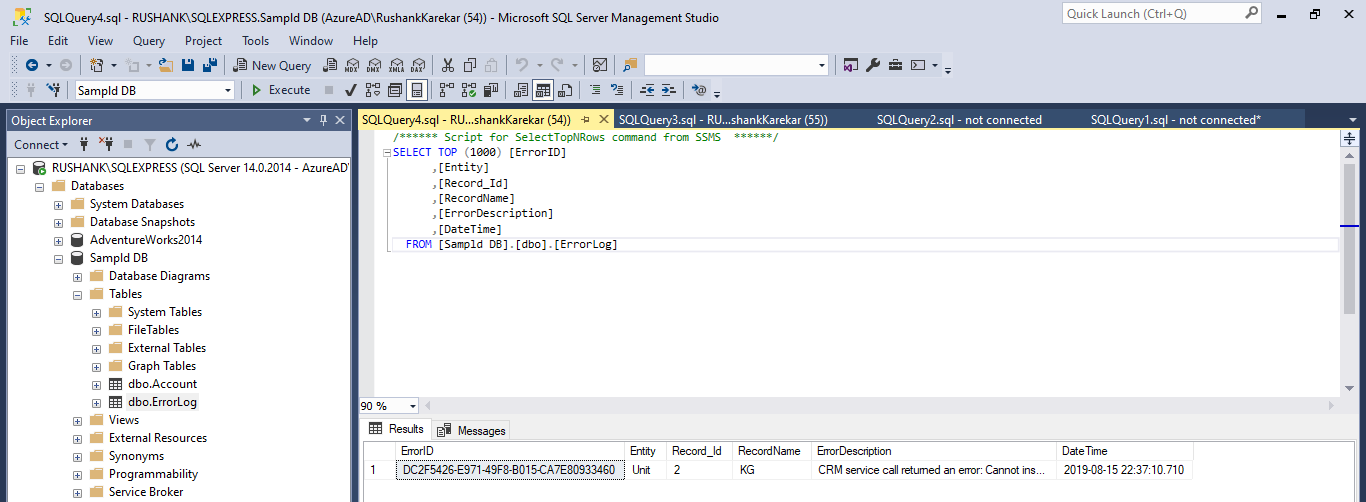
Now you can easily identify the errors occurred during Integration process from your Custom Error Log Table and solve them to have successful Integration results.
