How to Create Inventory Period in Business Central.
Inventory periods are used to keep track of when inventory adjusting entries are posted. Unless inventory periods are closed on a monthly basis, adjusting entries will post in the same period as the original transaction. Inventory adjustments will not be posted in that period if you create and close inventory periods. If the initial transaction was posted during a closed inventory period, the adjustments’ value is posted on the first day of the first open inventory period. This ensures that once the financial statements have been printed for a month, the G/L value of inventories, costs, and cost of goods sold do not change.
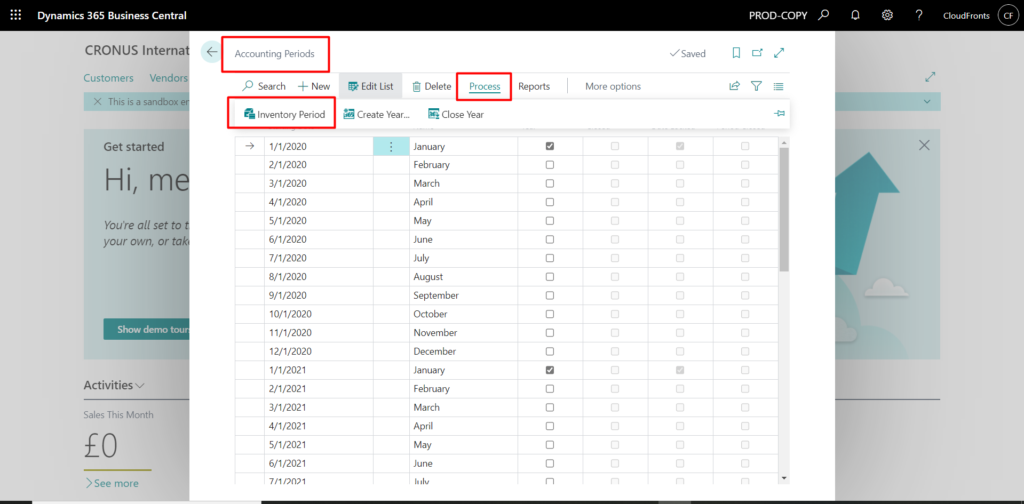
CREATING INVENTORY PERIOD
Many companies manage inventory the same time they manage accounting Period.
Steps to access inventory period:
Go to ‘Accounting Period’ Click on ‘Process’, there you find ‘inventory period’
OR
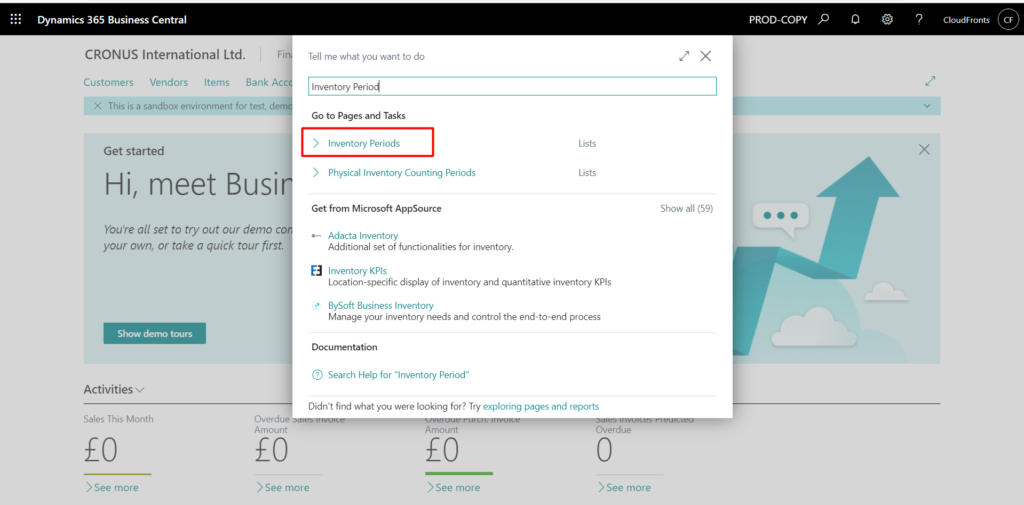
You can simply Go to ‘Inventory Period’ from Global Search.
STEPS TO CREATE AN INVENTORY PERIOD.
- Click On the search icon and enter Inventory Period, select relevant link.
- Create a new line
- In the Ending Date Field, enter the last date in the inventory period that you want to define. When the period is closed, you will not be able to post inventory changes before this date.
- Enter a descriptive name in the Name field.
CLOSING INVENTORY PERIOD.
- The Closed parameter specifies whether the inventory period is closed to changes in inventory value. This field is not editable.
- You can close any inventory period if the following conditions are met
- In that time period, there are no open outbound item ledger entries, showing negative inventory.
- The Adjust Cost – Item Entries batch job was used to adjust the cost of all goods.
- This means that any outbound transaction quantities must be applied to existing inventory numbers, such as those from sales orders, outbound transfers, sales invoices, buy returns, or purchase credit notes.
TO CLOSE AN INVENTORY PERIOD
- Before closing an inventory period, choose the Adjust Cost – Item Entries action to ensure that all cost adjustments are posted.
Run the Close Inventory Period – Test report to determine if there are any open outbound item entries within the inventory period or any items whose cost has not yet been adjusted. - Choose the Close Inventory Period – Test action.
Run the Post Inventory Cost to G/L batch job to ensure that all costs are posted to the general ledger. - Choose the Post Inventory to G/L action.
- On the Inventory Periods page, select the inventory period you want to close.
- Choose the Close Period action. After the inventory period has been closed, you cannot post inventory changes before the ending date. The cost of all items must be adjusted with the Adjust Cost – Item Entries batch job before you close the inventory period.
- Choose the Yes button to confirm that you want to close the period, or choose No to cancel the closing.
- The inventory period is closed and a confirmation message is displayed when it is finished.
REOPEN INVENTORY PERIOD
- It is not possible to delete an inventory period once it has been closed. You can, however, reopen it if you want to allow posting before the inventory period’s expiration date. When you reopen a period, it also reopens other inventory periods with ending dates later than the reopened period.
TO REOPEN AN INVENTORY PERIOD
- Choose the icon, enter Inventory Periods, and then choose the related link.
- Select the inventory period you want to reopen.
- Choose the Reopen Period action. Confirm that you want to reopen the period.
- All inventory periods with ending dates later than the period you selected are reopened.
Thank you for reading.
Hope this helped. 🙂
