Securing an API using Open ID Connect from AAPIM : Part 4 – Configure a JWT validation policy to pre-authorize requests
Introduction
Configuring OpenID Connect for your APIs hosted in Azure API Management adds an extra layer of security and prevents unauthorized access. This is a very important configuration form Security point of view for your Endpoints and is provided out of the box by Azure. This is the Fourth part of a series of Blogs on Securing your API using OpenID Connect in Azure API Management. Please go through all the parts to find easy and detailed steps that will help you configure the OpenID Connect Authentication.
Note: This Blog will demonstrate the steps to configure and test the Open ID connect Authentication with Developer portal (Legacy). The steps are similar for Developer Portal Open ID connect Authentication Configuration. But it is worth noting that the Developer Portal currently only supports Implicit Mode of Authentication and might give you a 401 Error.
Configure a JWT validation policy to pre-authorize requests
At this point, when a user tries to make a call from the Developer Console, the user is prompted to sign in. The Developer Console obtains an access token on behalf of the user and includes the token in the request made to the API.
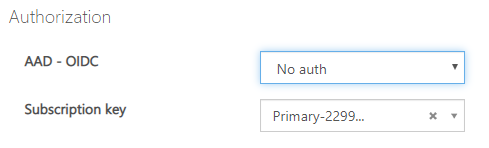
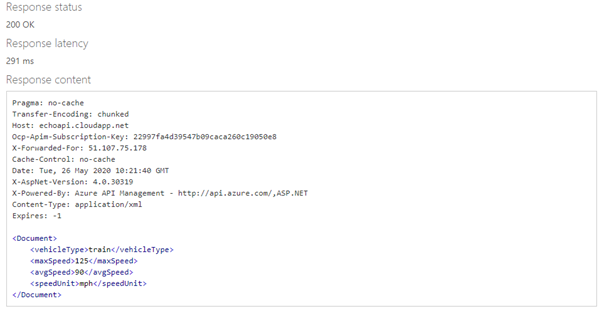
- However, what if someone calls your API without a token or with an invalid token? For example, try to call the API without the
Authorizationheader, the call will still go through. The reason is that API Management does not validate the access token at this point. It simply passes theAuthorizationheader to the back-end API.
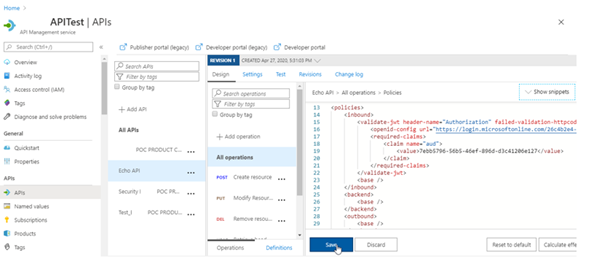
2. You can use the Validate JWT policy to pre-authorize requests in API Management, by validating the access tokens of each incoming request. If a request does not have a valid token, API Management blocks it. For example, add the following policy to the <inbound> policy section of the Echo API. It checks the audience claim in an access token, and returns an error message if the token is not valid.
<validate-jwtfailed-validation-error-message="Unauthorized. Access token is missing or invalid."failed-validation-httpcode="401"header-name="Authorization"><openid-config url=""https://login.microsoftonline.com/{aad-tenant}/.well-known/openid-configuration"" /><required-claims><claim name="aud"><value>{App-ID}</value></claim></required-claims></validate-jwt>
Note
1. This openid-config URL corresponds to the v1 endpoint.
2. For the v2 openid-config endpoint, use https://login.microsoftonline.com/common/v2.0/.well-known/openid-configuration.
For our scenario the XML Policy is as follows:
<validate-jwt
failed-validation-error-message=”Unauthorized. Access token is missing or invalid.”
failed-validation-httpcode=”401″
header-name=”Authorization”>
<openid-config url=”https://login.microsoftonline.com/26c4b2e4-ec07-4c7b-92e5-97f52865e98b/.well-known/openid-configuration” />
<required-claims>
<claim name=”aud”>
<value>7ebb5796–56b5–46ef-896d-d3c41206e127</value>
</claim>
</required-claims>
</validate-jwt>
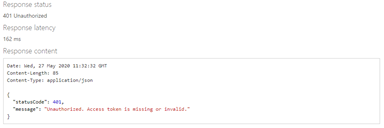
Now go back to the developer console and without selecting the Authorization Code try to click on send.
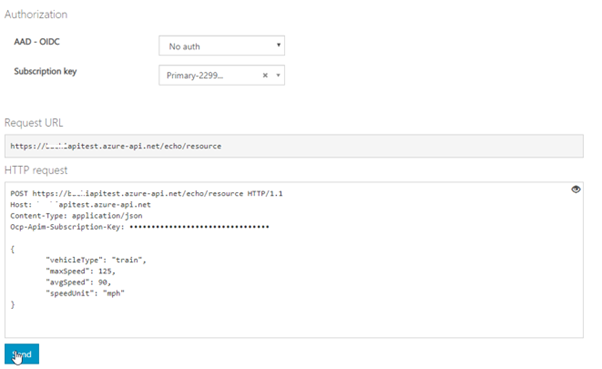
You will get an error message.
Links to All Blogs of this Series
Part 1: Register an application in Azure AD to represent the API
Part 2: Configure/Setup and Enable Open ID Connect in the Developer Console
Part 3: Successfully call the API from the developer portal (legacy)
Part 4: Configure a JWT validation policy to pre-authorize requests
